Page 2 of 11
AS9.1-2 | Intravenous Access and Central Venous Access in Simulation — SDL Guide (Part 2)
Monitoring and Interpretation After Vascular Access
Successful placement of a catheter does not complete the procedure; immediate and ongoing confirmation of correct position and function is equally essential. Monitoring errors — failing to confirm tip position or detect inadvertent arterial placement — account for catastrophic complications that are largely preventable. Every insertion must be followed by a systematic three-part verification: aspiration test, waveform transduction, and imaging. Peripheral lines additionally require ongoing surveillance at every patient contact because phlebitis and extravasation can develop insidiously and escalate rapidly. The clinical data obtained from a correctly positioned and functioning central line — particularly CVP waveform morphology and trends — provides information that guides fluid resuscitation, vasopressor titration, and the recognition of life-threatening haemodynamic deterioration. Complacency in the post-insertion monitoring phase is therefore as dangerous as poor insertion technique.
Confirming correct placement of a CVC:
- Free aspiration test: All lumens should aspirate blood freely. Non-aspiration suggests kinking, catheter tip against a vessel wall, or extravascular position.
- Pressure waveform transduction: Connect the distal lumen to a pressure transducer. A venous waveform (low pressure, gentle respiratory variation, CVP 5–12 cmH₂O) confirms venous placement. A high-pressure arterial waveform demands immediate removal.
- Post-procedure chest X-ray: The gold standard. The CVC tip should lie in the superior vena cava (SVC) at or just above the cavoatrial junction, visible at approximately the level of the carina or the right tracheobronchial angle. A tip in the right atrium or ventricle risks arrhythmia and perforation; a tip in the subclavian or a contralateral brachiocephalic vein means inadequate advancement.
- Ultrasound confirmation: Transthoracic or point-of-care ultrasound can detect pneumothorax immediately after subclavian or IJV insertion (absence of lung sliding on M-mode).
Peripheral IV monitoring: assess the site for extravasation (swelling, pain, skin blanching) and phlebitis (erythema, warmth, tenderness, cord formation) at each clinical encounter. Grade phlebitis 0–4 (VIP score). Resite cannulas at first sign of Grade 2 or above. Cannulas should be replaced at 72–96 hours per institutional protocol (or sooner if clinically indicated).
Central venous pressure (CVP) interpretation: normal CVP is 5–12 cmH₂O (3–8 mmHg). Elevated CVP suggests fluid overload, cardiac tamponade, tension pneumothorax, or right heart failure. Depressed CVP (<3 cmH₂O) suggests hypovolaemia. CVP alone is no longer a reliable resuscitation endpoint (the surviving sepsis campaign has moved away from CVP-targeted resuscitation), but absolute values and trends during a fluid challenge remain clinically informative.
Complications to monitor: pneumothorax (sudden fall in SpO₂, absent breath sounds, respiratory distress within 30 minutes of subclavian/IJV access); haemothorax; catheter-related bloodstream infection (CRBSI — fever, rigors, bloodstream positivity with no other source); venous thrombosis; air embolism (sudden cardiovascular collapse during line removal — patient should be supine, Valsalva applied).
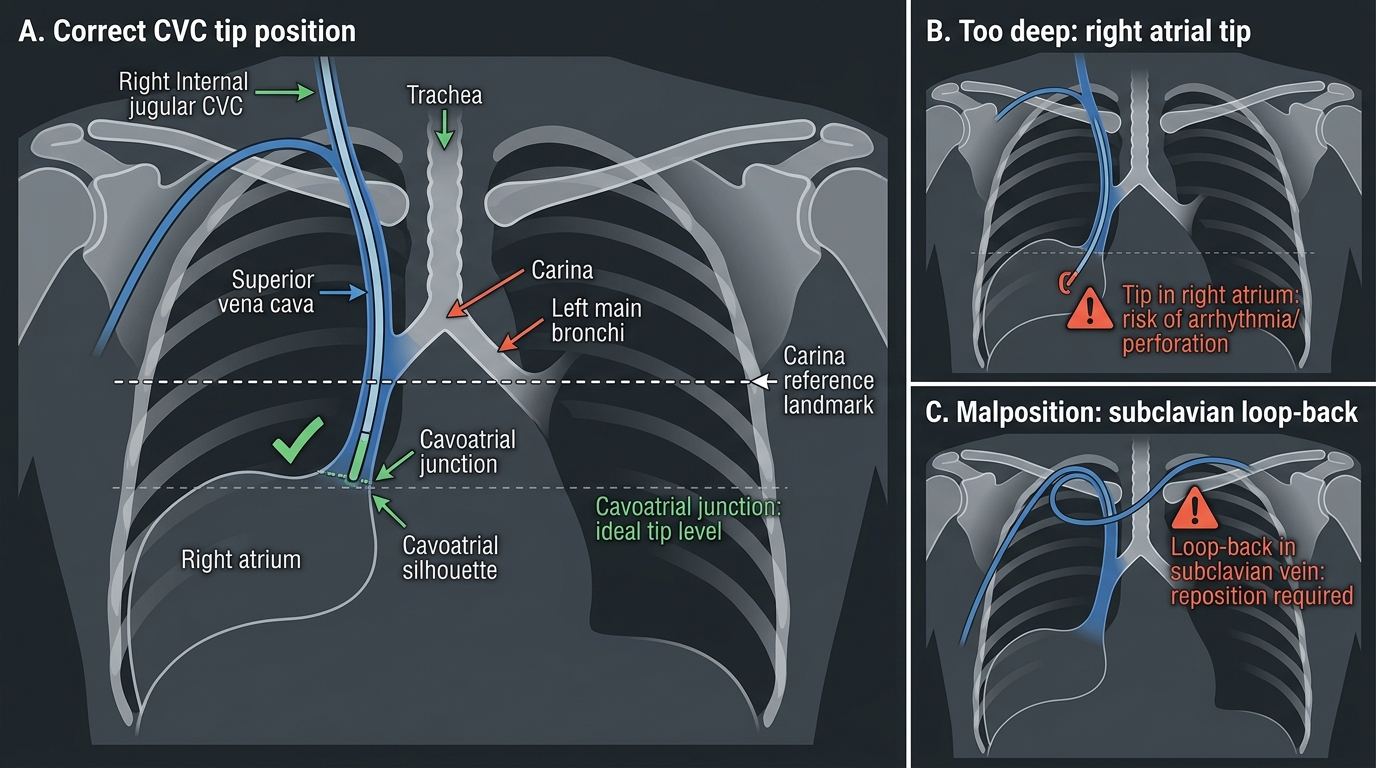
CVC Tip Position on Chest X-ray
Applied and Supervised Practice in Simulation
Simulation-based training bridges the gap between theoretical knowledge and safe clinical practice. The NMC 2024 curriculum specifies that anaesthesiology students must establish intravenous and central venous access in a simulated environment (AS9.1, AS9.2) — recognising that skill acquisition requires repetition under controlled conditions before exposure to real patients. In simulation, errors are learning opportunities rather than harms: a trainee who inadvertently punctures the carotid artery on a phantom, recognises the complication, and corrects it has acquired a critical safety reflex that no lecture or textbook can provide. The structured components of an effective simulation session — pre-brief, deliberate performance, and faculty-led debrief — are each as important as the procedural execution itself, and all three must be attended to in a high-fidelity training programme.
Deliberate practice model: Each simulation session should include a briefing (reviewing anatomy and procedural steps), a performance phase (student performs the skill on a mannequin/phantom), and a structured debrief (faculty reviews each step against a checklist, identifies specific errors, and mandates targeted re-practice). This model — rooted in Ericsson's theory of deliberate practice — produces faster skill acquisition than unstructured repetition.
Peripheral IV simulation tasks typically involve:
- Practice on a forearm IV training arm with simulated skin and subcutaneous tissue
- Progression from ideal sites (large antecubital veins) to difficult sites (small, rolling, fragile veins)
- Simulating a 'difficult IV' scenario (tourniquets, warm compresses, selecting the least-bad site)
- Documenting attempt count, success rate, and time to successful flashback
Central venous access simulation tasks involve:
- Landmark-guided IJV cannulation on a neck phantom (plastic or gel-based)
- Ultrasound-guided IJV cannulation (most centres now require US guidance as the default)
- Full Seldinger sequence — needle, wire, dilator, catheter — to completion
- Complication recognition: simulated arterial puncture (bright pulsatile blood), pneumothorax (inability to ventilate the phantom), wire advancement failure
- Sterile technique audit: faculty observes and scores each aseptic step using a structured observation tool
Assessment frameworks: direct observation of procedural skills (DOPS) is the standard workplace-based assessment tool. A DOPS completed on the simulator provides formative feedback; DOPS on real patients (under direct supervision) provides summative evidence of competence. Most training programmes require a minimum of 3–5 supervised central lines before independent practice is permitted.
Key mental models to internalize: (1) never advance the dilator without first confirming venous position of the guidewire; (2) never let go of the guidewire; (3) always check position with chest X-ray or waveform transduction before using the line; (4) if in doubt about arterial vs venous placement, transduce before proceeding.
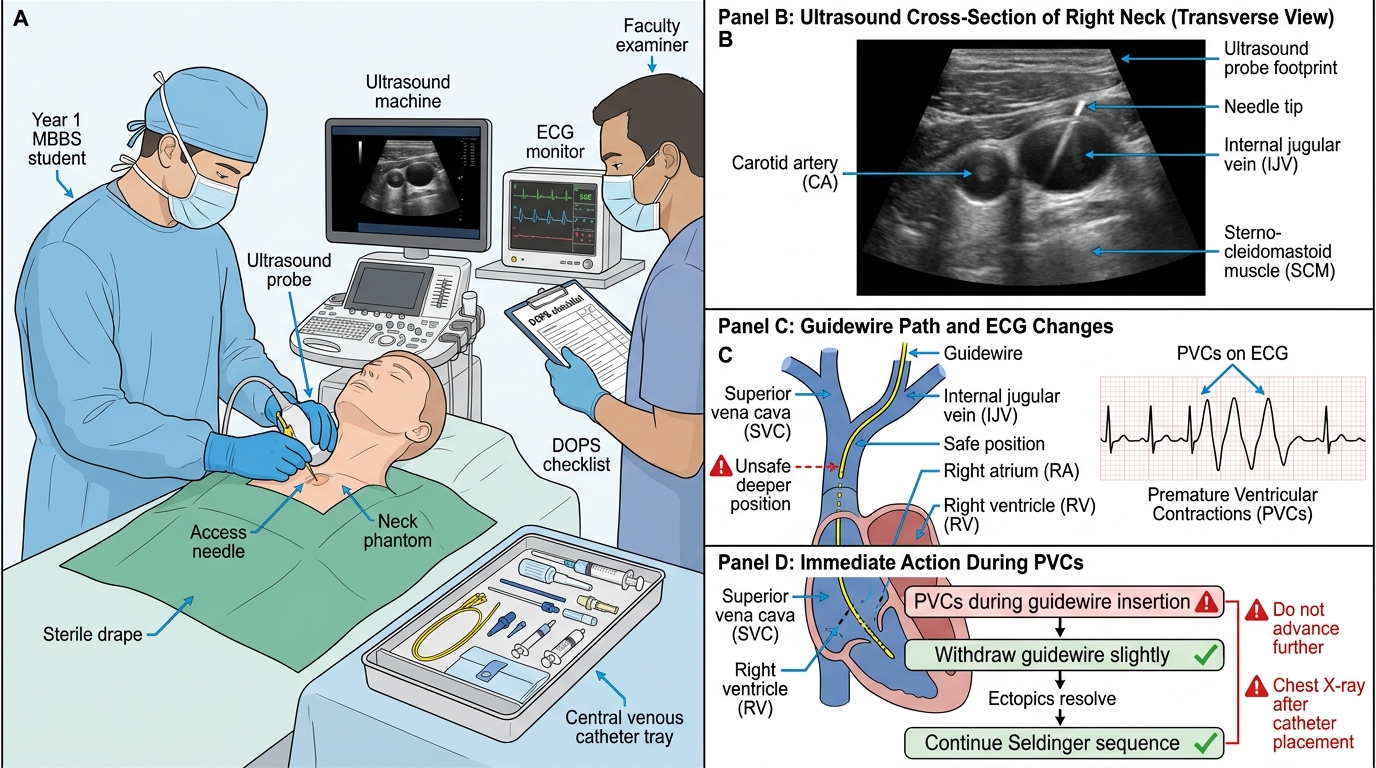
Right Internal Jugular Central Venous Access Simulation
SELF-CHECK
During simulation, you insert a needle for right internal jugular vein cannulation. Dark-red blood aspirates freely. You thread the guidewire — it passes smoothly to 20 cm. The ECG monitor shows frequent premature ventricular contractions. What is the most appropriate immediate action?
A. Withdraw the guidewire until the ectopics resolve, then continue the Seldinger sequence
B. Remove the guidewire completely and abandon the procedure
C. Advance the guidewire further to seat it firmly in the ventricle
D. Immediately order a chest X-ray and wait for results before proceeding
Reveal Answer
Answer: A. Withdraw the guidewire until the ectopics resolve, then continue the Seldinger sequence
PVCs during guidewire insertion indicate the wire tip has entered the right ventricle or right atrium. The correct response is to withdraw the wire until the ectopics resolve (tip is back in the SVC), then continue the Seldinger sequence. The wire should not be advanced further (increases arrhythmia risk and perforation risk) and should not be completely removed unless complications occur. A chest X-ray is ordered after catheter placement, not during the procedure.
Self-Assessment: Vascular Access Competency
Effective self-assessment after simulation sessions accelerates skill acquisition by directing practice toward identified weaknesses. Trainees who systematically review their own performance — comparing each step against the standard technique rather than simply asking "did it work?" — develop a metacognitive awareness that distinguishes safe, adaptive clinicians from those who merely repeat the same errors with increasing confidence. The self-assessment domains below are structured to mirror the procedural sequence you just completed. Work through them immediately after each simulation encounter, before the debrief, so your recollection is fresh and unfiltered by faculty feedback. Honest identification of a specific failure point — "I advanced the cannula before confirming flashback" rather than "I found it hard" — makes the subsequent debrief conversation more productive and the targeted re-practice more efficient.
Peripheral IV self-checklist:
- Did I correctly apply the tourniquet, identify the vein, and clean the site before inserting?
- Was my needle angle appropriate (15–30°) at insertion, and did I lower the angle before advancing the cannula?
- Did I release the tourniquet before removing the needle to avoid haematoma?
- Did I flush and confirm patency before securing the cannula?
Central venous access self-checklist:
- Did I correctly position the patient (Trendelenburg, head rotated)?
- Were all sterile barrier steps completed without breaks in technique?
- Did I use the finder needle before the access needle?
- Did I maintain guidewire control at all times and watch the ECG during wire advancement?
- Did I nick the skin before advancing the dilator?
- Did I confirm free blood aspiration from all lumens and record the insertion depth?
- Did I plan for post-procedure chest X-ray to confirm tip position?
Reflection questions:
1. Which anatomical landmark caused the most uncertainty during the procedure, and how will you address that knowledge gap?
2. If your first attempt at IJV access failed, what alternative site would you choose and why?
3. In which clinical scenarios would you choose subclavian over internal jugular access, despite the higher pneumothorax risk?
Students are encouraged to complete a formal DOPS form after each simulation encounter and to discuss performance with their supervisor before progressing to supervised clinical practice on real patients.
CLINICAL PEARL
Ultrasound before landmark for central lines, always: multiple randomised trials and meta-analyses confirm that real-time ultrasound guidance for internal jugular vein cannulation reduces first-attempt failure rates, arterial puncture, and haematoma formation compared to landmark alone. The National Institute for Clinical Excellence (NICE) and most anaesthesiology societies now mandate ultrasound guidance as the standard of care. In the simulation lab, always practise both methods — landmark builds anatomical understanding, ultrasound builds the skill you will use clinically. A quick 'reconnaissance scan' before draping to identify IJ patency, size, and position relative to the carotid is considered mandatory even when formal real-time guidance is not used.