Page 6 of 20
OG35.{16-17,20} | ARM, Episiotomy Suturing and Urinary Catheterisation — SDL Guide (Part 2)
Episiotomy Suturing: Technique
Episiotomy suturing requires understanding of the tissue layers involved, the appropriate suture material, and the technique that achieves haemostasis and anatomical restoration without tension necrosis. A poorly sutured episiotomy is associated with pain, dyspareunia, wound breakdown, haematoma, and prolonged recovery. The standard suture material for episiotomy repair is 2-0 or 3-0 polyglactin (Vicryl) — an absorbable, braided synthetic suture that does not require removal and is associated with less pain than catgut (now rarely used). Closure is performed in three defined layers.
Before suturing, several preparatory steps are essential: ensure adequate lighting and exposure; confirm the extent of the episiotomy and exclude extension to the anal sphincter (gently palpate the anal sphincter circumferentially — if the sphincter ring is disrupted, call for senior help); administer adequate analgesia (perineal infiltration with 10-20 mL of 1% lidocaine if regional anaesthesia has not been used); ensure haemostasis — actively bleeding vessels should be individually ligated before layered repair; and place a vaginal pack temporarily to reduce blood loss from the upper vagina during suturing.
Three-layer repair technique:
1. Vaginal mucosa (first layer): identify the apex of the vaginal incision (may be higher than you expect); begin your suture 0.5-1 cm above the apex to secure any retracted vessels; use a continuous locking stitch (or continuous non-locking) suture to close the vaginal mucosa from apex down to the level of the hymen; bring the suture through the hymeneal ring to the perineal skin level
2. Perineal muscles (second layer): use interrupted or continuous sutures to reapproximate the bulbospongiosus and transverse perineal muscles (the perineal body); this is the tension-bearing layer that restores perineal body integrity; do not leave dead space, which fills with blood and becomes a haematoma
3. Skin (third layer): close the perineal skin with a continuous subcuticular (subcutaneous) suture from the hymen to the anal margin — buried stitches are less painful and result in superior cosmesis compared to interrupted sutures that leave surface knots; alternatively, interrupted mattress sutures may be used
Final checks after repair:
- Per rectum (PR) examination: insert a gloved finger into the rectum to palpate for suture material penetrating the rectal mucosa — any stitch felt in the rectum must be removed and re-sutured to prevent rectovaginal fistula
- Count swabs used during the repair to ensure nothing is retained
- Document the repair: layers sutured, suture material, blood loss, PR examination result
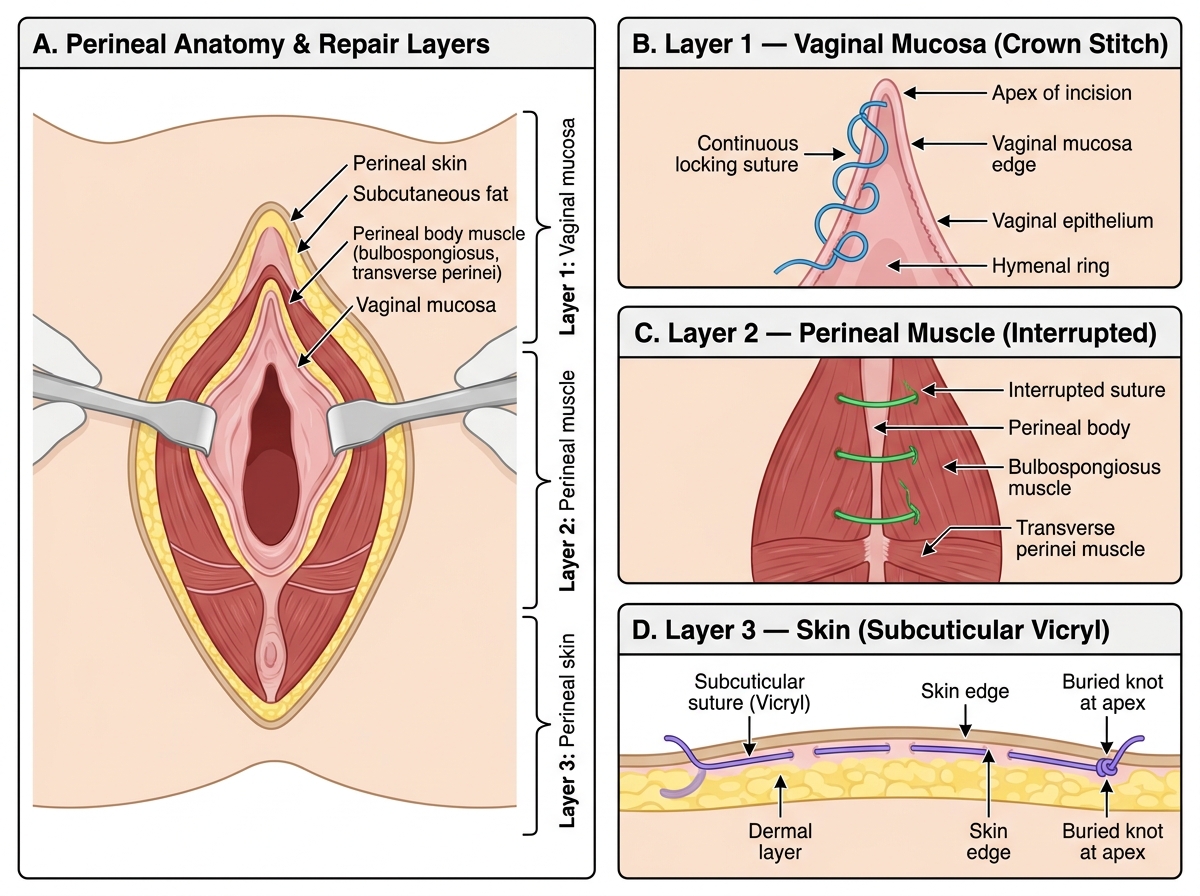
Episiotomy Repair: Three-Layer Closure Technique
Urinary Catheterisation: Technique
Female urethral catheterisation in obstetric patients demands particular care and methodical preparation because the altered perineal anatomy of the postpartum state — oedema, haematoma, perineal pain, displacement of soft tissue landmarks — can make identification of the urethral meatus substantially more difficult than in non-obstetric patients. The meatus lies only 3-4 cm from the bladder and is positioned in the midline between the clitoris anteriorly and the vaginal opening posteriorly, but in a swollen postpartum perineum it may be buried beneath redundant tissue or obscured by haematoma. Introducing the catheter into the vaginal opening rather than the urethra is the single most common catheterisation error in obstetric patients. Beyond the anatomical challenge, every catheterisation introduces infection risk: CAUTI is the most common healthcare-associated infection in hospitalised patients, and the risk increases with each day an indwelling catheter remains in situ. Strict aseptic non-touch technique (ANTT) must therefore be maintained throughout the entire procedure. The clinical indication — monitoring urine output in a shocked patient versus draining postpartum retention — determines whether an indwelling Foley catheter or a single-pass straight catheter is appropriate.
Equipment for Foley catheterisation:
- Sterile catheterisation pack: drapes, sterile gloves, cotton swabs, 10 mL syringe with water for injection
- Foley catheter (size 14-16 Fr for adult women; silicone preferred for prolonged use)
- Sterile lubricant (water-based gel)
- Urine drainage bag and connecting tubing
- Sterile water (10 mL) to inflate the balloon (do NOT use normal saline — crystallises in the balloon port)
- Good lighting
Step-by-step technique:
1. Explain the procedure to the patient; obtain verbal consent
2. Position: supine with knees flexed and thighs abducted (dorsal recumbent); expose perineum adequately
3. Open the catheterisation pack maintaining sterility; add catheter and lubricant to the sterile field
4. Put on sterile gloves; arrange drapes to create a sterile field
5. With non-dominant hand (now non-sterile), separate the labia to expose the meatus; maintain this separation throughout — do not allow the labia to contaminate the sterile field
6. With dominant (sterile) hand, clean the urethral meatus from front to back using antiseptic swabs (e.g., chlorhexidine); use each swab only once; clean inner labia, then the meatus itself
7. Apply a small amount of lubricant to the catheter tip
8. Instruct the patient to take a slow breath and relax; advance the catheter into the urethral meatus gently; the female urethra is 3-4 cm long, so advance the catheter 5-7 cm (or until urine flows)
9. If resistance is met: do not force; the catheter may be misdirected into the vagina; withdraw and re-identify the meatus; a common error is to insert the catheter into the vaginal orifice (especially in postpartum women with oedema — the vaginal orifice is often more easily palpated than the meatus)
10. Once urine flows, advance the catheter a further 2-3 cm to ensure the balloon is entirely within the bladder; inflate the balloon with 10 mL sterile water; withdraw gently until resistance is felt (balloon seated at bladder neck)
11. Connect to drainage bag; secure the catheter to the inner thigh to prevent traction; document the procedure and initial urine output
Post-catheterisation care:
- Maintain a closed drainage system; keep the bag below bladder level
- Remove the indwelling catheter at the earliest clinically appropriate time — each day increases CAUTI risk
- If catheter inserted after LSCS: remove once the patient is mobilising (typically 12-24 hours postoperatively) and document first void after removal
SELF-CHECK
During episiotomy repair, you perform a per-rectum (PR) examination at the end and feel a suture material in the rectal lumen. What is your immediate action?
A. Document it and reassure the patient that Vicryl is absorbable and will dissolve
B. Remove and re-suture the offending stitch to prevent rectovaginal fistula formation
C. Insert a vaginal pack for 24 hours to apply pressure and reduce fistula risk
D. Prescribe broad-spectrum antibiotics and discharge with outpatient review
Reveal Answer
Answer: B. Remove and re-suture the offending stitch to prevent rectovaginal fistula formation
A suture penetrating the rectal mucosa after perineal repair is a significant complication that must be corrected immediately. If left in place, the stitch creates a communication between the vagina and rectum (rectovaginal fistula), causing faecal contamination of the vaginal repair, wound breakdown, and chronic rectovaginal fistula — a highly morbid complication requiring major reconstructive surgery. The offending stitch must be identified, removed, and the repair re-checked and re-sutured to ensure the rectal mucosa is not included. Antibiotics alone (option D) and pressure packing (option C) are not treatments. Leaving a buried suture in the rectum (option A) is never acceptable, regardless of suture material.
Assessing Outcomes and Recognising Complications
All three procedures require active post-procedural assessment to detect complications early. Recognising complications promptly and responding correctly is as important as the technical performance of the procedure itself, and trainees must know the specific warning signs for each.
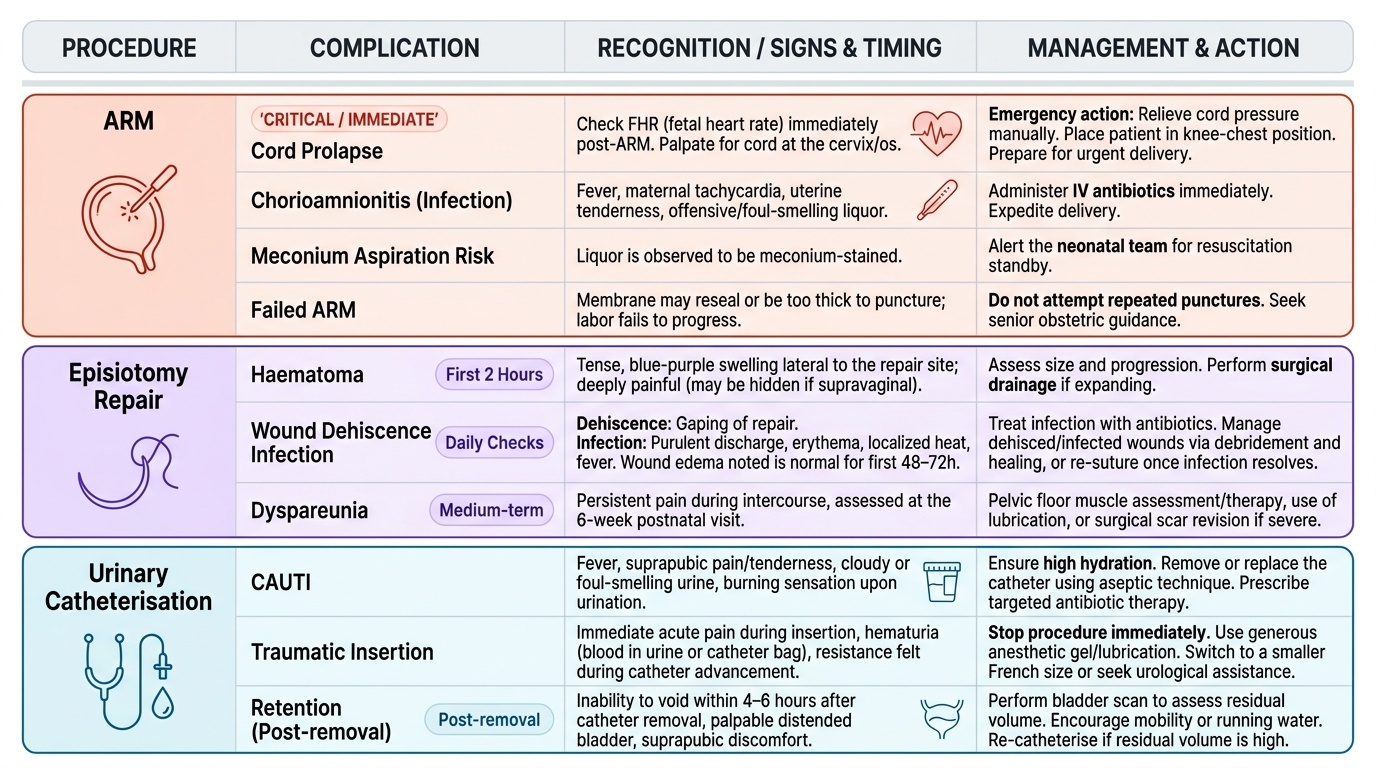
Post-ARM assessment:
The most critical immediate complication is cord prolapse — always check the fetal heart rate immediately after ARM and palpate for cord at the os. Late complications include chorioamnionitis (fever, maternal tachycardia, uterine tenderness, offensive liquor — treat with IV antibiotics and expedite delivery), meconium aspiration risk (if liquor is meconium-stained, alert the neonatal team for resuscitation standby), and failed ARM (membrane may reseal or be too thick — do not attempt repeated punctures without senior guidance).
Post-episiotomy repair assessment:
In the first 2 hours after delivery, inspect the perineum for haematoma (a tense, blue-purple swelling lateral to the repair, often deeply painful — may not be visible if supravaginal; requires surgical drainage if expanding). Examine daily for: wound oedema (normal for first 48-72 hours), wound dehiscence (gaping of repair, usually secondary to infection or haematoma), infection (purulent discharge, erythema, fever — treat with antibiotics; dehisced infected wounds are often managed by debridement and secondary healing or re-suture after infection resolved). Dyspareunia is a medium-term complication — assess at the 6-week postnatal visit.
Post-catheterisation assessment:
Monitor urine output hourly in patients where the indication was shock, PPH, or severe pre-eclampsia (target ≥30 mL/h). Signs of CAUTI (fever, haematuria, suprapubic pain, cloudy offensive urine developing after catheterisation) require urine culture and antibiotic treatment according to sensitivity. After removal of the catheter, document the first void — failure to void within 4-6 hours after catheter removal requires re-catheterisation and urology review.
Provided image
CLINICAL PEARL
The most common error in episiotomy repair is starting the vaginal mucosal suture too low — missing the apex of the incision results in a haematoma in the unrepaired dead space above the suture. Always identify the apex of the cut by using adequate lighting and swabbing blood away; begin your first stitch 0.5-1 cm above the visible apex. The second most common error is leaving dead space in the perineal muscle layer — interrupted bites must obliterate the cavity, not just appose the surface. A large perineal haematoma is almost always the consequence of inadequate deep haemostasis or muscle closure, not skin bleeding.