Page 9 of 22
OP1.3 | Visual Acuity, Colour Vision, Pinhole, Menace and Blink Reflex Testing — SDL Guide
Learning Objectives
- Demonstrate the steps in testing distance visual acuity (VA) using the Snellen chart
- Test near visual acuity using the Jaeger/N-notation chart
- Correctly document VA using Snellen notation and describe the meaning of each level (6/6, 6/60, CF, HM, PL, NPL)
- Perform and interpret the pinhole test and explain its optical basis
- Test colour vision using Ishihara pseudoisochromatic plates and interpret the result
- Demonstrate and interpret the menace reflex and blink (corneal) reflex
INSTRUCTIONS
These clinical tests are the first step of every ophthalmic examination — and of the general clinical examination whenever a patient reports visual symptoms. Visual acuity is the ophthalmic equivalent of blood pressure: it must be measured and documented before anything else is interpreted. The pinhole test is a bedside separator that tells you in seconds whether you are dealing with a correctable refractive problem or an organic disease requiring urgent investigation. Mastering these tests as skills — not just knowing them conceptually — is what OP1.3 demands: you must be able to perform them on a real patient in a real clinic.
References
- Khurana AK. Comprehensive Ophthalmology, 7th ed. New Age International, 2019. Ch 1, Examination of the Eye. (textbook)
- Parsons J, Duke-Elder S. Diseases of the Eye, 22nd ed. Elsevier, 2011. Ch 2, Clinical Examination. (textbook)
Version 2.0 | NMC CBUC 2024
CLINICAL SCENARIO
Ravi, a 45-year-old truck driver, presents to the PHC medical officer complaining that he struggles to read distant road signs. His livelihood depends on his visual acuity. You have a Snellen chart, a pinhole disc, and a torch — no ophthalmoscope, no slit lamp. Your task: determine whether Ravi's problem is a simple refractive error (correctable with spectacles, allowing him to continue driving) or an organic disease requiring urgent referral. This clinical scenario — common in any PHC, CHC, or urban OPD — is exactly what the tests in this module are designed to answer.
WHY THIS MATTERS
Visual acuity assessment and the associated tests covered in this module are not ophthalmology-only skills. Any physician — in a casualty, a PHC, a medical ward — may face a patient with acute visual loss and need to measure and document VA before the ophthalmologist arrives. Documentation of baseline VA is medico-legally essential in trauma, before and after any ophthalmic procedure, and in any patient where vision is at risk. The pinhole test prevents the cardinal error of referring a patient urgently for 'organic' visual loss when the cause is simply an uncorrected refractive error. The menace and blink reflexes are part of the basic neurological examination and are routinely assessed in neonates, in patients with suspected CN VII palsy (Bell's palsy), and in unconscious patients. These tests together form the essential baseline of every ophthalmic and neurological clinical assessment.
RECALL
From OP1.1, recall: the visual pathway — light from a visual target → cornea/lens refraction → retina → optic nerve (CN II, afferent) → visual cortex. The integrity of this pathway is what visual acuity measures. From OP1.2, recall: the pinhole works because it eliminates peripheral (aberrant) rays and allows only the central beam to enter — when VA improves with the pinhole, the peripheral rays were causing blur due to refractive error; when it does NOT improve, the retina or optic nerve is the problem. From Year-1 Anatomy: cranial nerve V (trigeminal) — ophthalmic division (V1) carries corneal sensation; CN VII (facial) innervates orbicularis oculi for lid closure. These are the arcs of the blink/corneal reflex.
Clinical Indication and Relevance: Why These Tests Are Done
Every clinical encounter involving the eye — whether in an ophthalmology OPD, a paediatric clinic, a casualty department, or a rural PHC — begins with the same obligatory first question: what is this patient's visual acuity? Visual acuity is to the eye what the blood pressure reading is to the cardiovascular system — it is the fundamental quantitative measure from which all clinical reasoning flows. Without a documented baseline VA, you cannot determine whether vision has changed, whether a treatment has helped, or whether a patient's visual system is at risk. This is why VA documentation has medico-legal significance in any patient with ocular trauma, before and after any ophthalmic procedure, and in any medicolegal assessment involving visual function.
The tests in this module are not used in isolation — they form a clinical decision-making battery. The Snellen chart measures the spatial resolving power of the visual pathway end-to-end. The pinhole test immediately distinguishes refractive blur from organic disease at the bedside, at zero cost and without requiring specialist equipment. Colour vision testing detects acquired or congenital defects in cone photopigments that may indicate optic nerve disease (as in optic neuritis, where red-green desaturation is an early sign) or disqualify a patient from colour-critical occupations (aviation, military, certain branches of engineering). The menace and blink reflexes assess the integrity of the afferent visual pathway and the efferent facial motor pathway respectively — they are part of the basic neurological examination in unconscious patients, in neonates at the routine check, and in any patient with suspected cranial nerve palsy. Knowing when to perform each test — and how to interpret the result — is the clinical skill this module develops.
Instruments and Optical Principles: Snellen Chart, Pinhole and Ishihara Plates
Each test in this clinical skill set exploits a specific optical or neurophysiological principle. Understanding the principle is what allows you to interpret the result correctly and avoid common errors.
Snellen Chart and Visual Angle:
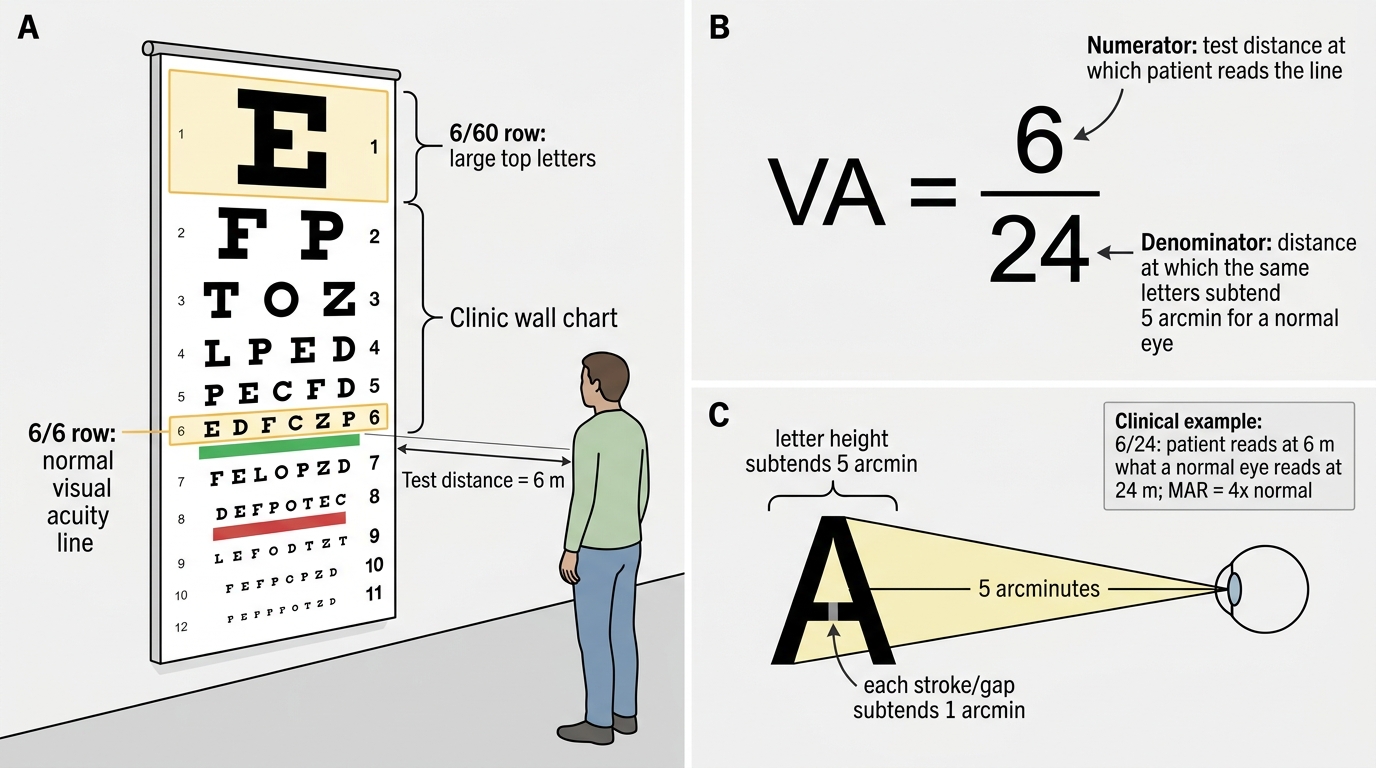
The Snellen chart, developed by Hermann Snellen in 1862, is designed so that each letter on the 6/6 line subtends a visual angle of 5 arcminutes at the designated test distance, with each stroke of the letter subtending 1 arcminute. This is the minimum angle of resolution (MAR) for a normal eye. The Snellen fraction is expressed as: VA = test distance (numerator) / distance at which the letter subtends 5 arcmin for a normal eye (denominator). So 6/6 means the patient reads at 6 m what a normal eye reads at 6 m. 6/24 means the patient reads at 6 m what a normal eye can read at 24 m (i.e. the patient's visual angle is 4× worse than normal). A well-illuminated, calibrated Snellen chart at 6 metres (or an illuminated retroilluminated box chart) is required for reliable testing.
Pinhole Disc:
A pinhole disc (typically 1.2–2 mm aperture) works by restricting the light entering the eye to a narrow central pencil of rays, bypassing the peripheral refracting zones of the cornea and lens where aberration and defocus occur. A pinhole dramatically reduces the blur circle in refractive errors. Crucially, a pinhole has no effect on blur caused by pathology of the retina (macular disease) or optic nerve — these require a sharp, focused retinal image to begin with, which the pinhole cannot provide if the neural substrate is damaged.
Ishihara Pseudoisochromatic Plates:
Ishihara plates test red-green colour deficiency — the commonest hereditary colour vision defect (X-linked recessive, affecting ~8% of males and ~0.5% of females). Each plate contains a pattern of coloured dots: persons with normal colour vision see a number embedded in the dots; those with red-green deficiency see a different number or nothing. The plates do NOT detect blue-yellow defects (which are more often acquired — from glaucoma, macular disease, or drugs such as hydroxychloroquine or ethambutol). For blue-yellow defects, the Farnsworth-Munsell 100-hue test is used.
Snellen Visual Acuity Fraction
SELF-CHECK
A patient reads the 6/24 line on the Snellen chart at 6 metres. Which of the following BEST explains what this VA means?
A. The patient's eye has a refracting power of 24 dioptres
B. The patient reads at 6 m what a normal eye reads at 24 m — the minimum angle of resolution is 4× normal
C. The patient can only see objects at a maximum of 6 metres distance
D. The patient's visual acuity is 24% of normal
Reveal Answer
Answer: B. The patient reads at 6 m what a normal eye reads at 24 m — the minimum angle of resolution is 4× normal
The Snellen fraction VA = test distance / distance at which the letter subtends 5 arcmin for a normal eye. 6/24 means the patient reads at 6 m what a normal eye reads at 24 m — the patient's letters must be 4× larger (subtend 4× the normal 5 arcmin angle = 20 arcmin) to be resolved. This is the minimum angle of resolution (MAR) principle. A percentage interpretation of Snellen fractions is not standard and is misleading.
Procedure: How to Test Distance and Near Visual Acuity
Visual acuity testing follows a precise procedure. Any deviation from the standard conditions introduces error and renders the measurement clinically unreliable. This is not pedantry — the VA measurement is often the critical piece of information that determines whether a patient is referred urgently, whether a treatment has worked, or whether a legal standard (such as the driving vision requirement or the NPCBVI blindness threshold) has been met. A VA measured at the wrong distance, with inadequate occlusion, or without separating the two eyes is worthless as a clinical record. The examiner's discipline in following the steps correctly is what gives the number its meaning. The same discipline applies to near VA testing, the sub-threshold VA hierarchy (count fingers, hand movements, light perception), and to the pinhole — each of these is a precise clinical manoeuvre, not an approximation. The steps are:
Distance VA (Snellen chart) — step by step:
- Position: Patient seated at exactly 6 metres from the Snellen chart. The chart must be at eye level and well-illuminated (natural or calibrated artificial light). If space is limited, a mirror-reversed chart can be used at 3 metres with a mirror at 3 metres (effective 6 m).
- Occlude one eye: Use an occluder (or the patient's palm, with eyes closed behind it — not through their fingers). Test the RIGHT eye first by convention. Ensure the fellow eye is fully occluded — the most common error is patients 'peeking'.
- Refractive correction: Test first WITHOUT spectacles (unaided VA), then WITH spectacles (corrected VA, or 'best corrected VA', BCVA). Document both.
- Reading: Start from the largest letters (top row) and progress downward. Ask the patient to read each line. The VA is the SMALLEST line the patient can read correctly (more than 50% of letters on that line correct is the standard criterion).
- Document: Record as, e.g., '6/12' for the right eye (RE) and '6/6' for the left eye (LE). Use 'RE 6/12 NC' (not corrected) and 'RE 6/6 CC' (with correction).
If VA <6/60 (patient cannot read the top line of the Snellen chart):
- Move the patient closer (e.g. 3 metres): if they read the top line, VA = 3/60
- If still cannot read: test Count Fingers (CF) — hold up fingers at 1 m, 2 m, 3 m: document as 'CF at x m'
- If cannot count fingers: test Hand Movements (HM) — wave hand in front of eye
- If no HM: test Perception of Light (PL) — use a torch in a darkened room; document whether the patient can tell which direction light comes from (projection = PR, i.e. perception of light with projection)
- If no PL: No Perception of Light (NPL) — the eye has no functional visual pathway
Near VA:
Use a Jaeger chart (J notation — J1 = finest print) or N notation (N5 = normal near VA in good light). Hold at 33 cm (normal reading distance). Test each eye separately with appropriate near correction (reading glasses if needed). Document as 'Near VA N6 at 33 cm'.