Page 4 of 11
OR11.1 | Peripheral Nerve Injury Assessment and Splinting — SDL Guide
Learning Objectives
- Classify peripheral nerve injuries using the Seddon and Sunderland systems and predict clinical recovery
- Identify the nerve injured, the functional deficit, and the appropriate splint for radial, ulnar, median, lateral popliteal, and sciatic nerve injuries
- Demonstrate the correct application of a cock-up splint for wrist drop, a foot-drop splint/AFO for foot drop, and a knuckle-bender splint for claw hand
- Describe the principles of Tinel's sign and EMG/NCS in monitoring nerve recovery
- Outline the management principles for peripheral nerve injuries including surgical indications
INSTRUCTIONS
Peripheral nerve injuries are common in orthopaedic and emergency practice, yet a systematic clinical approach to them — correctly identifying which nerve is injured, predicting the degree of recovery, and fitting the right splint immediately — can mean the difference between a functional and a non-functional limb. The splinting component of OR11.1 is a hands-on CBME competency: you are expected to demonstrate these splints on mannequins or simulated patients in your clinical postings. This module gives you the anatomical, pathophysiological, and practical foundation to perform that demonstration confidently and to counsel patients regarding realistic timelines for nerve recovery.
References
- Maheshwari's Essential Orthopaedics, 6th ed, Chapter 25: Peripheral Nerve Injuries (textbook)
- Apley & Solomon's System of Orthopaedics and Trauma, 10th ed, Chapter 12: Peripheral Nerve Injuries (textbook)
Version 2.0 | NMC CBME 2024
CLINICAL SCENARIO
In the emergency department, you examine a 28-year-old man who sustained a laceration to the mid-shaft of the humerus when his motorcycle struck a pillar. The wound is closed and the bone is intact, but he cannot extend his wrist — his hand hangs limply in wrist drop. A colleague wants to send him home with a bandage. You know better: you recognise this as a radial nerve injury at the spiral groove, and you know that without a cock-up splint to hold the wrist in functional extension tonight, the patient will develop a fixed flexion contracture that will persist even after the nerve recovers. What else do you need to assess to stage this injury and counsel the patient accurately?
WHY THIS MATTERS
Peripheral nerve injuries occur in 3–5% of all limb trauma cases and in a significant proportion of open fractures, gunshot wounds, and iatrogenic injuries. The functional consequences — wrist drop, claw hand, foot drop, loss of hand opposition — are immediate and can be permanent if nerve recovery is incomplete or if secondary deformities (joint contractures) are allowed to develop in the interval before reinnervation. The splinting skills in this module are classified as CBME 'demonstrate on a mannequin' competencies (OR11.1) — meaning you will be assessed on your ability to apply them correctly in clinical postings. Beyond examination skills, the ability to correctly identify the nerve, predict recovery, apply protective splinting, and time referral for surgical repair is a patient-safety imperative at the level of a general medical officer.
RECALL
Review your knowledge of upper and lower limb nerve anatomy before proceeding: (1) The radial nerve (C5–T1) winds around the posterior aspect of the humeral shaft in the spiral groove; (2) the ulnar nerve passes behind the medial epicondyle of the humerus then enters the Guyon's canal at the wrist; (3) the median nerve passes through the carpal tunnel; (4) the common peroneal (lateral popliteal) nerve winds around the neck of the fibula; (5) the sciatic nerve exits the pelvis below the piriformis and passes through the posterior thigh. Also recall that Wallerian degeneration refers to the anterograde degeneration of the axon distal to an injury — this is the pathological substrate underlying the Seddon classification.
Clinical Indication and Relevance: When Nerve Injury Must Be Recognised
The clinical indication for suspecting and systematically assessing peripheral nerve injury is any situation in which a mechanism of injury places a named peripheral nerve at risk and the patient reports sensory loss, motor weakness, or a characteristic postural deformity of the hand or foot. The key recognition principle is that the nerve deficit must match the injured structure — if you know which nerve is anatomically vulnerable at the site of fracture or laceration, you can anticipate and actively screen for the expected deficit rather than discovering it days later.
The clinical relevance of immediate recognition is threefold. First, splinting prevents contracture: a nerve injury that leaves a hand or foot in a non-functional position will develop fixed contractures in the muscles and joints within days to weeks — contractures that persist even after the nerve fully recovers, obliterating any benefit of neurological recovery. Second, timing of surgical repair matters: a clean laceration of a peripheral nerve is best repaired primarily (within hours) or secondarily (within 3 weeks); the window for optimal outcome closes progressively after that as the distal nerve stump becomes fibrotic and unreceptive to regenerating axons. Third, prognosis counselling shapes patient expectations: a patient told they have a minor stretch injury (neurapraxia, full recovery expected in 6–12 weeks) will cope differently from one with a complete transection (neurotmesis, requiring surgical repair and months of recovery).
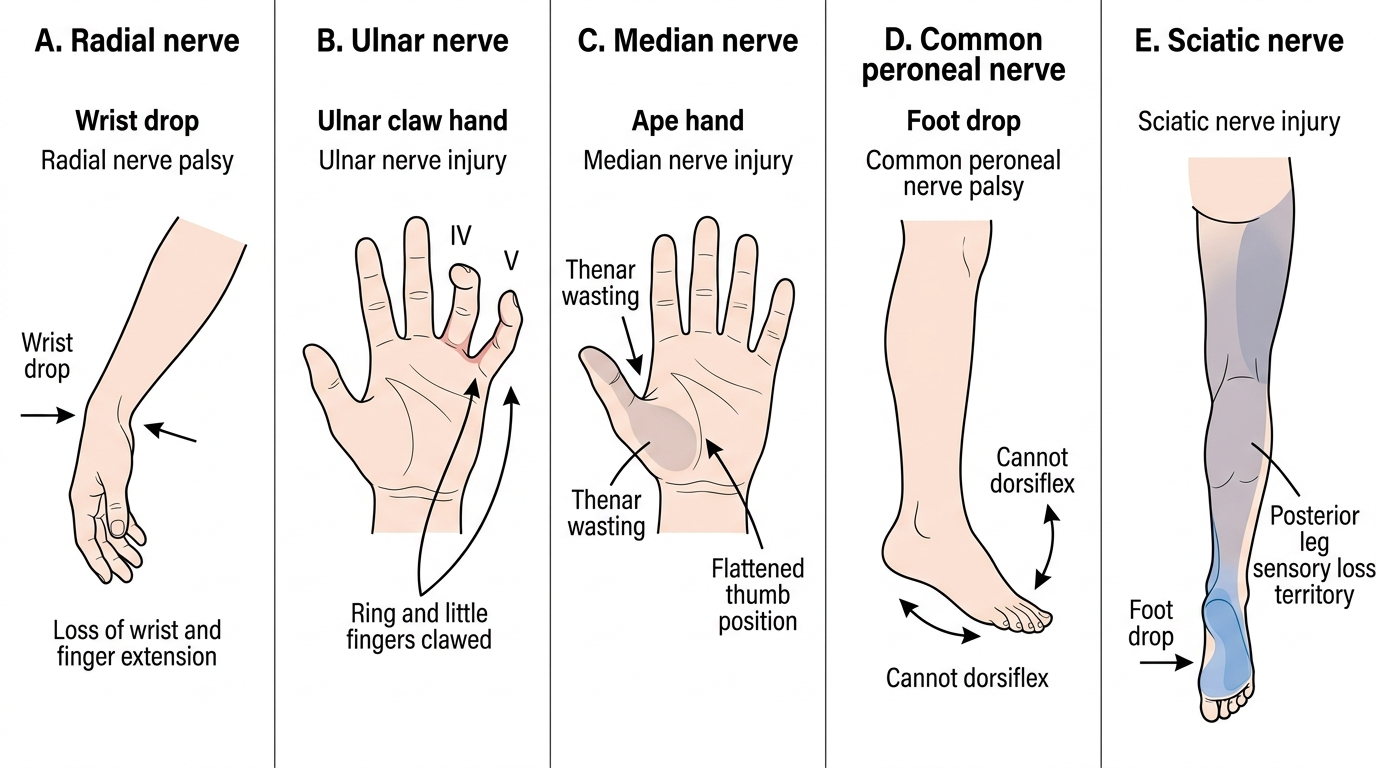
The five peripheral nerve injuries you must be able to assess, splint, and manage as a general practitioner are: radial nerve (wrist drop), ulnar nerve (claw hand), median nerve (ape thumb / loss of thumb opposition), lateral popliteal nerve (foot drop), and sciatic nerve (combined foot drop + posterior thigh/leg sensory loss).
Clinical Deformities in Peripheral Nerve Injuries
Anatomy and Governing Principles: Seddon and Sunderland Classifications
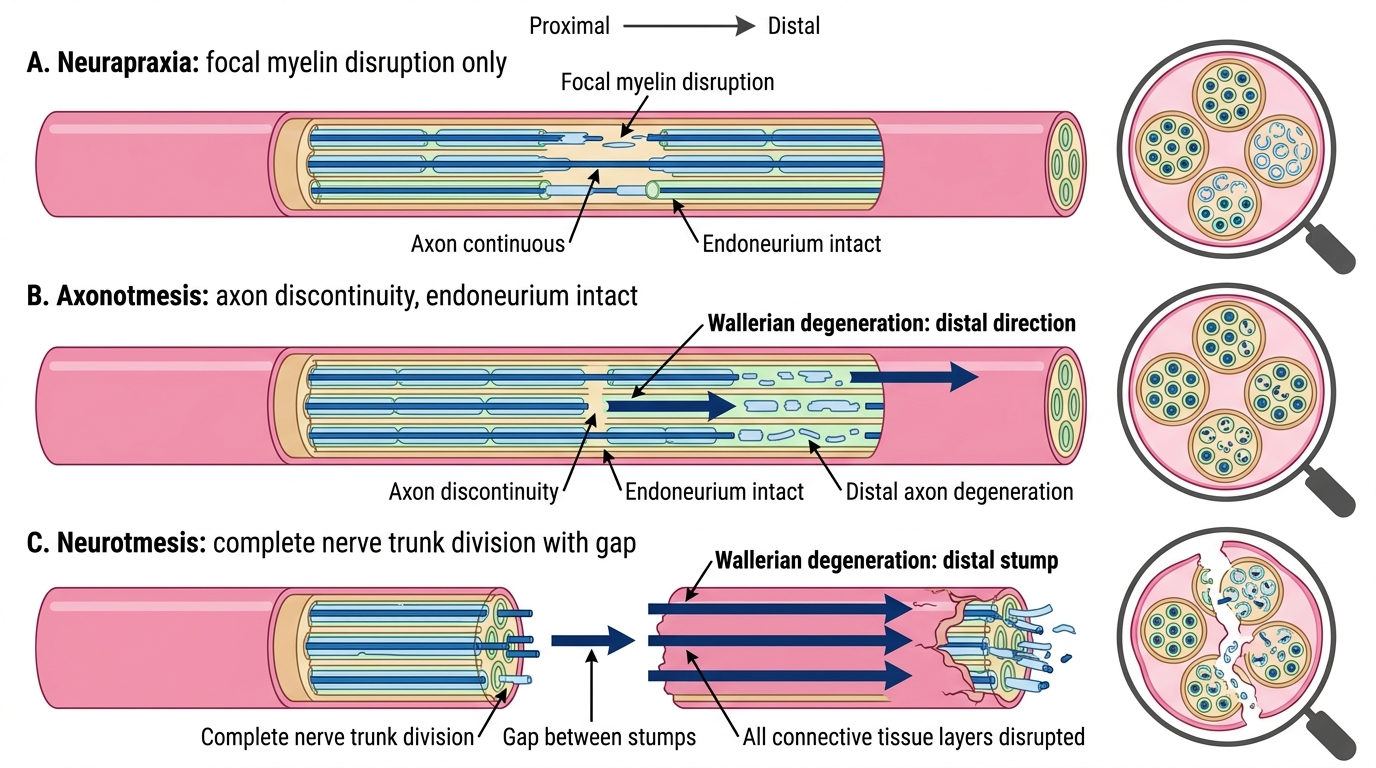
The Seddon classification (1943) divides peripheral nerve injuries into three grades based on the structural integrity of the nerve and the prognosis for spontaneous recovery. This is the framework that guides initial clinical management and determines whether surgical intervention is required.
Neurapraxia (Seddon grade I; Sunderland grade 1) is a physiological block of nerve conduction without structural damage to the axon, myelin, or connective tissue sheaths. It is caused by focal demyelination or ischaemia — classically from compression (nerve caught between bone and a hard surface) or traction (brief stretch). The hallmark is incomplete and often selective loss of function: motor function is usually more affected than sensory (the large myelinated motor fibres are more vulnerable than small sensory fibres). There is no Wallerian degeneration. Recovery is complete and spontaneous within 6–12 weeks (range 2–12 weeks) as remyelination occurs. Tinel's sign is negative in neurapraxia. Example: Saturday night palsy (radial nerve compressed against the arm by a hard chair edge during prolonged unconscious sleep).
Axonotmesis (Seddon grade II; Sunderland grades 2–4) represents axon disruption with intact endoneurium (Sunderland 2), perineurium (S3), or epineurium (S4) depending on degree. Because the endoneurial tubes are intact (in Sunderland 2), they provide a pathway (scaffold) for regenerating axons to grow distally — giving axonotmesis a better prognosis than neurotmesis. Wallerian degeneration occurs distal to the lesion within 3–5 days, eliminating muscle response on electromyography. Recovery occurs by axonal regeneration at 1 mm/day (approximately 2.5 cm/month) from the injury site distally — an important number for counselling the patient on the timeline to expect reinnervation. Example: spiral groove radial nerve injury from humeral shaft fracture (usually axonotmesis — the bone breaks but does not transect the nerve).
Neurotmesis (Seddon grade III; Sunderland grade 5) is complete division of the nerve — all axons and all connective tissue sheaths (endoneurium, perineurium, epineurium) are disrupted. Spontaneous functional recovery is not expected — without a guiding scaffold, regenerating axons form a disorganised neuroma. Surgical repair is mandatory. The result depends on the level of injury (more proximal = greater distance to target = longer denervation = worse muscle recovery), the gap between nerve ends, and the timing of repair.
Patterns of Peripheral Nerve Injury
Nerve Injury Patterns: Five Nerves, Five Deficits, Five Splints
Provided image
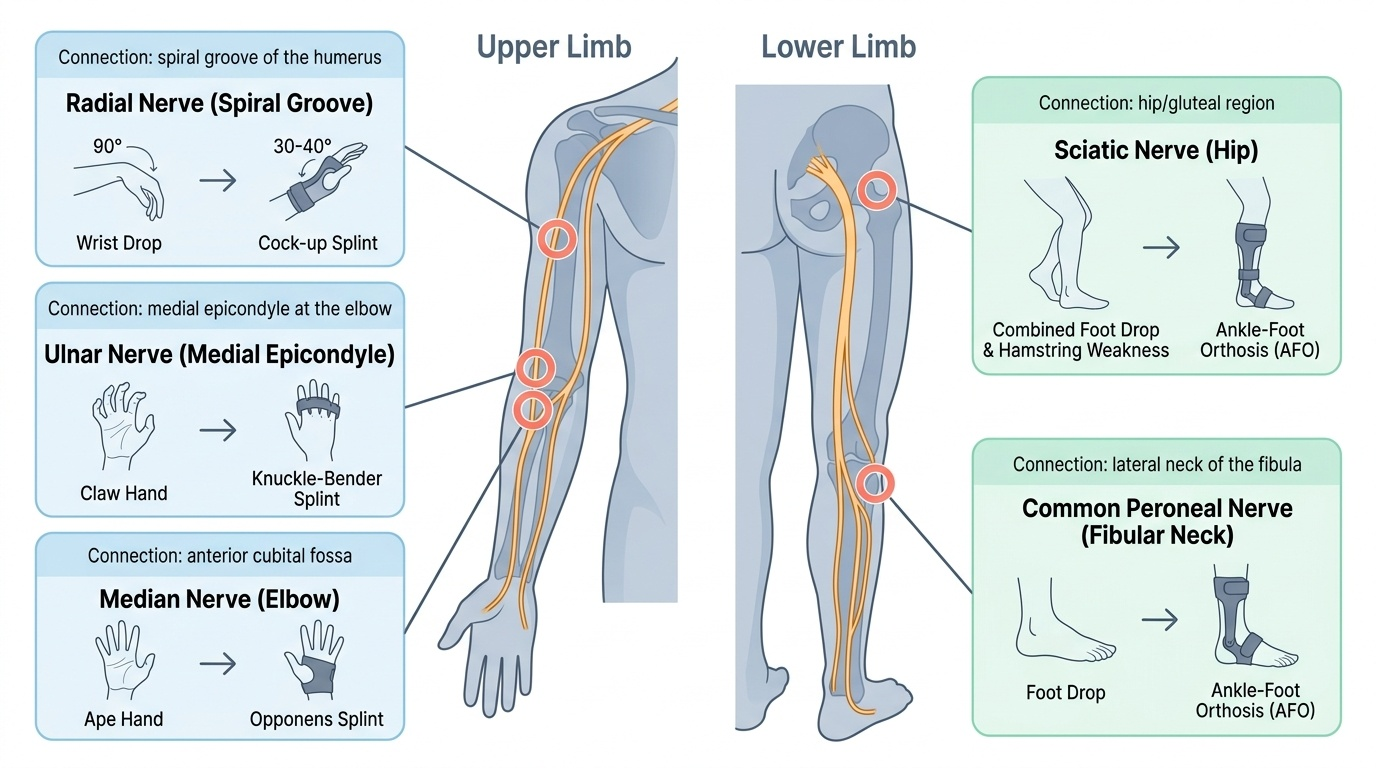
A systematic knowledge of the five most important peripheral nerve injuries — including their characteristic mechanism, resulting deficit, and the splint required — is the core clinical skill of this module. The mechanism-deficit-splint triad is the practical thread that connects your anatomical knowledge to bedside management. Each nerve injury produces a predictable and recognisable deformity because each nerve serves a specific and non-overlapping set of muscles in the hand or foot; understanding why the deformity takes the form it does, rather than merely memorising the association, allows you to diagnose an unfamiliar presentation by reasoning from anatomical principles. For the CBME competency OR11.1, you must be able to both describe and demonstrate the management of all five nerve injuries. The management framework for each nerve follows three questions: which muscles are paralysed (motor loss), which skin territory loses sensation (sensory loss), and what position will allow the hand or foot to function while the nerve recovers (splint choice). The following subsections address each nerve in this structured sequence:
Radial nerve (C5–T1, posterior cord of brachial plexus):
- Vulnerable site: spiral groove of the humeral shaft (mid-shaft fracture humerus — the nerve is in direct contact with the bone here).
- Motor loss: wrist extensors + finger extensors at the MCP joints → wrist drop (wrist flexed, fingers semi-flexed due to gravity). Loss of triceps only if the injury is in the axilla (proximal to spiral groove).
- Sensory loss: dorsum of hand — a variable small patch over the first web space (the autonomous zone).
- Splint: cock-up splint — a dorsal wrist splint maintaining the wrist in 30–40° of extension. This restores the hand to a functional grip position, prevents wrist and finger flexion contractures, and allows the patient to use the hand until nerve recovery restores active extension.
Ulnar nerve (C8–T1, medial cord):
- Vulnerable sites: medial epicondyle (elbow fracture, cubitus valgus, tardy ulnar palsy) and Guyon's canal at the wrist (handlebar injury, ganglion).
- Motor loss: intrinsic muscles of the hand (except the LOAF muscles supplied by median — thenar group + two radial lumbricals). Loss of medial two lumbricals and all interossei → claw hand (ring and little fingers hyperextended at MCP, flexed at PIP/DIP due to unopposed extrinsic flexors acting without intrinsic counter-balance). Paradoxically, wrist lesions produce more severe claw than elbow lesions because at the elbow the FDP to ring/little fingers is also paralysed (preventing the flexion component of the claw — called the ulnar paradox).
- Sensory loss: little finger and medial half of ring finger, hypothenar eminence.
- Splint: knuckle-bender splint (or lumbrical bar splint) — prevents hyperextension at the MCP joints of ring and little fingers, allowing the intact extrinsic extensors to extend the IP joints. This corrects the claw posture functionally.
Median nerve (C6–T1, medial and lateral cords):
- Vulnerable sites: at the elbow (supracondylar fracture humerus — the most important paediatric nerve injury); at the wrist (carpal tunnel syndrome — the commonest entrapment neuropathy).
- Motor loss (high median injury above elbow): loss of pronators, wrist flexors, flexors of the index and middle fingers (FDS, FDP-index/middle) + thenar muscles. The thumb lies flat in the plane of the palm, unable to oppose or abduct → ape hand (ape thumb). Loss of opposition is the most functionally devastating consequence.
- Motor loss (low median — carpal tunnel): only the thenar eminence (abductor pollicis brevis, opponens pollicis, flexor pollicis brevis superficial head) → thenar wasting + loss of opposition without finger flexor weakness.
- Sensory loss: radial 3.5 digits (thumb, index, middle, radial half of ring) — the autonomous zone is the tip of the index finger.
- Splint: opponens splint — maintains the thumb in opposition/abduction to allow key pinch and precision grip. In high median injuries at the elbow, a more complex dynamic splint may be needed.
Lateral popliteal nerve (common peroneal nerve) (L4–S1, from sciatic nerve at the lateral knee):
- Vulnerable site: neck of the fibula — the nerve is immediately subcutaneous here and is injured by a plaster cast pressing directly on the fibular neck, or by trauma (knee dislocation is a major cause).
- Motor loss: dorsiflexors (tibialis anterior) and evertors (peronei) → foot drop — the patient walks with a high-stepping gait (to clear the dropped foot) and cannot dorsiflex or evert the foot.
- Sensory loss: dorsum of the foot and anterolateral leg (autonomous zone: first web space on the dorsum).
- Splint: foot-drop splint / ankle-foot orthosis (AFO) — a rigid plastic or metal splint that holds the ankle in 90° of dorsiflexion (neutral position), preventing the plantar-flexion contracture of the Achilles tendon and allowing a normal heel-toe gait.
Sciatic nerve (L4–S3):
- Vulnerable sites: posterior hip dislocation (the nerve passes posterior to the hip joint — posterior hip dislocation stretches or injures it directly), intramuscular injection into the upper outer quadrant (safe site) vs lower medial quadrant (dangerous — hits the sciatic nerve), deep gluteal region fractures.
- Motor loss: all muscles below the knee (complete foot drop from peroneal component) + hamstrings (weakness of knee flexion from tibial component). This is the combination that distinguishes sciatic from common peroneal: hamstring weakness + foot drop = sciatic; isolated foot drop without hamstring weakness = common peroneal.
- Sensory loss: entire sole, dorsum of foot, and posterolateral leg below the knee.
- Splint: foot-drop AFO (same as common peroneal) to prevent equinus contracture, plus physiotherapy for the entire leg.
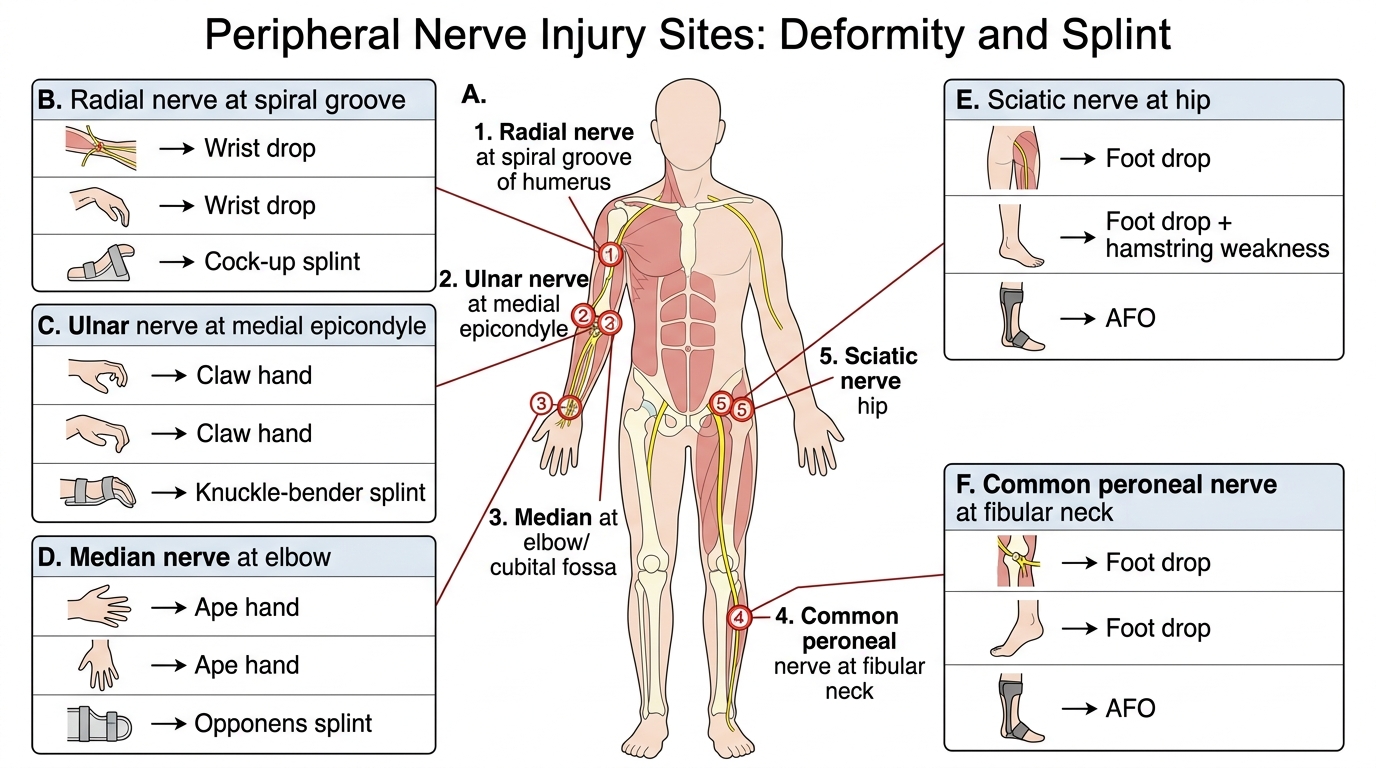
Peripheral Nerve Injury Sites, Deformities, and Splints
SELF-CHECK
A 35-year-old woman sustains a posterior dislocation of the hip in a road traffic accident. After reduction, she is found to have weakness of knee flexion and an absent ankle jerk, with foot drop and sensory loss over the sole of the foot. Which nerve is injured?
A. Common peroneal nerve at the fibular neck
B. Femoral nerve
C. Sciatic nerve
D. Tibial nerve
Reveal Answer
Answer: C. Sciatic nerve
Posterior hip dislocation classically injures the sciatic nerve. The combination of foot drop (from the peroneal component) AND weakness of knee flexion/absent ankle jerk (from the tibial component) indicates sciatic nerve injury. Common peroneal injury alone would not affect the hamstrings or ankle jerk. The mechanism — posterior hip dislocation — confirms sciatic nerve vulnerability at the posterior aspect of the hip joint.