Page 1 of 14
OR13.1 | Plastering and Splinting Skills — SDL Guide
Learning Objectives
- State the clinical indications for above-elbow, below-knee, and above-knee plaster-of-Paris casts, Thomas splint, and shoulder/clavicle strapping
- Describe the composition, setting chemistry, and key properties of plaster-of-Paris (calcium sulphate hemihydrate)
- Demonstrate the step-by-step technique for applying an above-elbow POP cast, below-knee POP cast, and a Thomas splint on a mannequin or simulated patient
- Recognise early and late complications of plaster immobilisation, including compartment syndrome, pressure sores, and disuse atrophy
- Perform distal neurovascular checks after cast application and describe when cast splitting or bivalving is indicated
INSTRUCTIONS
Plaster-of-Paris immobilisation and splintage are among the most frequently performed orthopaedic procedures in any emergency department or fracture clinic. A poorly applied cast can convert a straightforward fracture into a surgical emergency by causing compartment syndrome, pressure sores, or malunion. Mastering the technique — from stockinette application to final moulding — is therefore a core patient-safety skill. This module prepares you to participate as a supervised team member in cast application on real patients and to perform it correctly on mannequins or simulators, fulfilling NMC competency OR13.1.
References
- Maheshwari's Essential Orthopaedics, 5th ed, Ch 8 (Principles of Fracture Treatment) (textbook)
- Apley & Solomon's System of Orthopaedics and Trauma, 10th ed, Ch 23 (Methods of Fracture Fixation) (textbook)
- Ebnezar's Textbook of Orthopaedics, 5th ed, Ch 6 (Plaster Techniques) (textbook)
Version 2.0 | NMC CBME 2024
CLINICAL SCENARIO
A 14-year-old boy arrives in your casualty with a forearm fracture after a fall from a bicycle. The senior resident applies a circular above-elbow POP cast and sends him home. Six hours later the boy returns screaming in pain, his fingers are swollen and dusky, and passive extension of the fingers produces agonising pain — the classic presentation of impending compartment syndrome. The cast is immediately split: the limb is saved. This near-miss happened because the cast was too tight and no neurovascular check was performed before discharge. The scenario above is entirely preventable. Today's module gives you the knowledge and technique to apply casts safely, monitor for complications, and act decisively when they arise.
WHY THIS MATTERS
Cast application and splintage are performed in every orthopaedic unit and emergency department in India daily. As a junior doctor, you will be expected to apply or assist with above-elbow and below-knee casts on the same night as a trauma call. The Thomas splint remains the definitive pre-operative device for femoral shaft fractures, reducing blood loss through traction and alignment. Shoulder and clavicle strapping are first-contact interventions. Errors at this stage — tight casts, improper joint positioning, missed neurovascular deficits — carry immediate and severe consequences. Understanding the underlying principles converts a mechanical task into safe, reasoned clinical practice.
RECALL
Before proceeding, check your existing knowledge:
- What does the term compartment syndrome mean, and which clinical signs (the 6 P's) alert you to it?
- Can you name the two bones of the forearm and the joints above and below a midshaft radius-ulna fracture?
- What is the anatomical boundary of the popliteal fossa, and which neurovascular structures pass through it?
- What is the mechanism by which a tight cast converts a closed fracture into a limb-threatening emergency?
If you are uncertain, revisit your anatomy of the forearm compartments (anterior and posterior) and leg compartments (anterior, lateral, deep posterior, superficial posterior) before continuing.
Clinical Indication and Relevance of Plaster Immobilisation
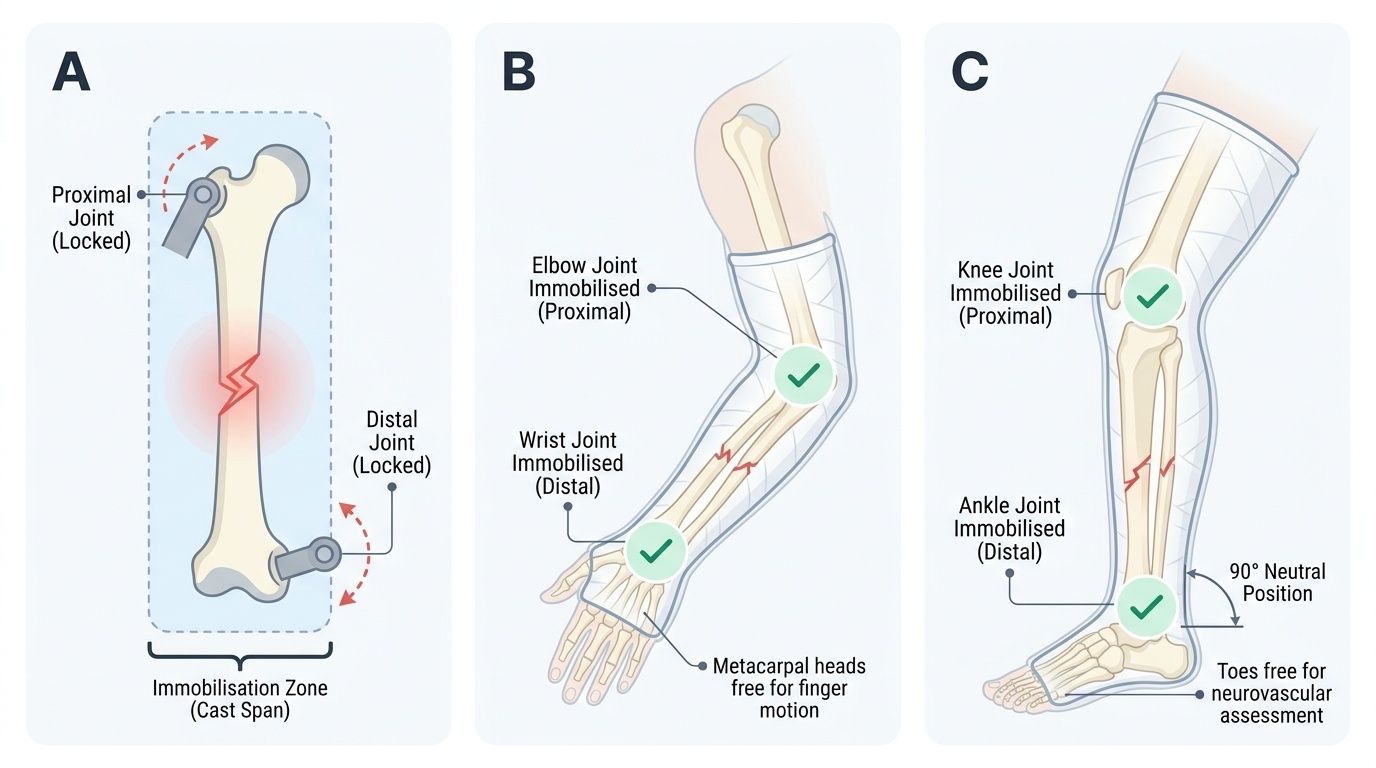
Provided image
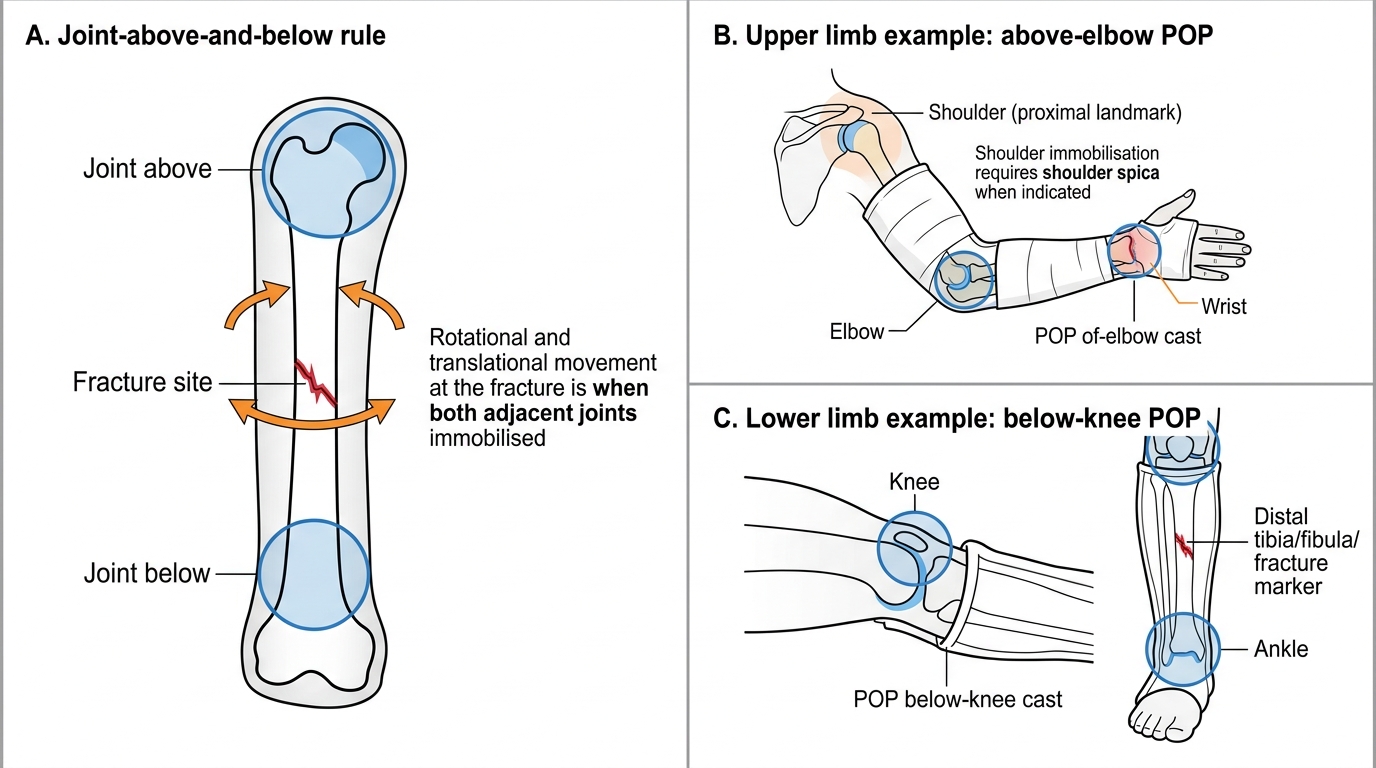
Plaster-of-Paris (POP) immobilisation serves as the cornerstone of non-operative fracture management and as a temporising measure before surgical fixation. The fundamental principle underlying all cast application is immobilisation of the joint above and below the fracture: both the proximal and distal joints to the fracture site must be included within the cast to prevent rotational and translational forces from acting at the fracture ends. Failing to span both joints is one of the most commonly cited reasons for loss of fracture reduction in cast-managed injuries.
The specific cast or splint selected depends on the fracture location, the degree of soft tissue swelling anticipated, and the phase of treatment. An above-elbow POP cast is indicated for fractures of the distal humerus, both-bone forearm fractures, and fractures at or around the elbow that require control of pronation–supination. A below-knee POP cast is used for ankle fractures, distal tibia and fibula fractures, and stable metatarsal injuries, with the ankle held at 90° to prevent equinus contracture. An above-knee POP cast is used when knee control is needed — for example, after tibial plateau fractures in patients unsuitable for surgery, or to prevent knee flexion contracture in certain neuromuscular conditions.
The Thomas splint is a traction splint designed specifically for femoral shaft fractures; it provides provisional stabilisation by applying longitudinal traction through the foot and counter-traction through the ring at the ischial tuberosity, thereby reducing blood loss into the thigh (which can reach 1–2 litres), controlling pain, and aligning the fracture for transport. Shoulder strapping (broad-arm sling or collar-and-cuff) and clavicle strapping (figure-of-eight bandage) are indicated for undisplaced or minimally displaced clavicle fractures and for shoulder trauma where the patient is not a surgical candidate.
The timing of cast application matters. In the acute setting with significant swelling, a full circumferential POP cast should be avoided; a back-slab (posterior slab) is applied first and converted to a full cast after swelling subsides at 5–7 days.
⚑ AI image — pending faculty review (auto-QA score 5/10; best of 3 attempts)
Joint-Above-and-Below Rule in POP Cast Application
Anatomy and Governing Principles of Cast Application
A safe cast application rests on three anatomical principles: knowledge of bony prominences at risk of pressure sores, knowledge of neurovascular structures that may be compressed, and knowledge of the position of function at each joint.
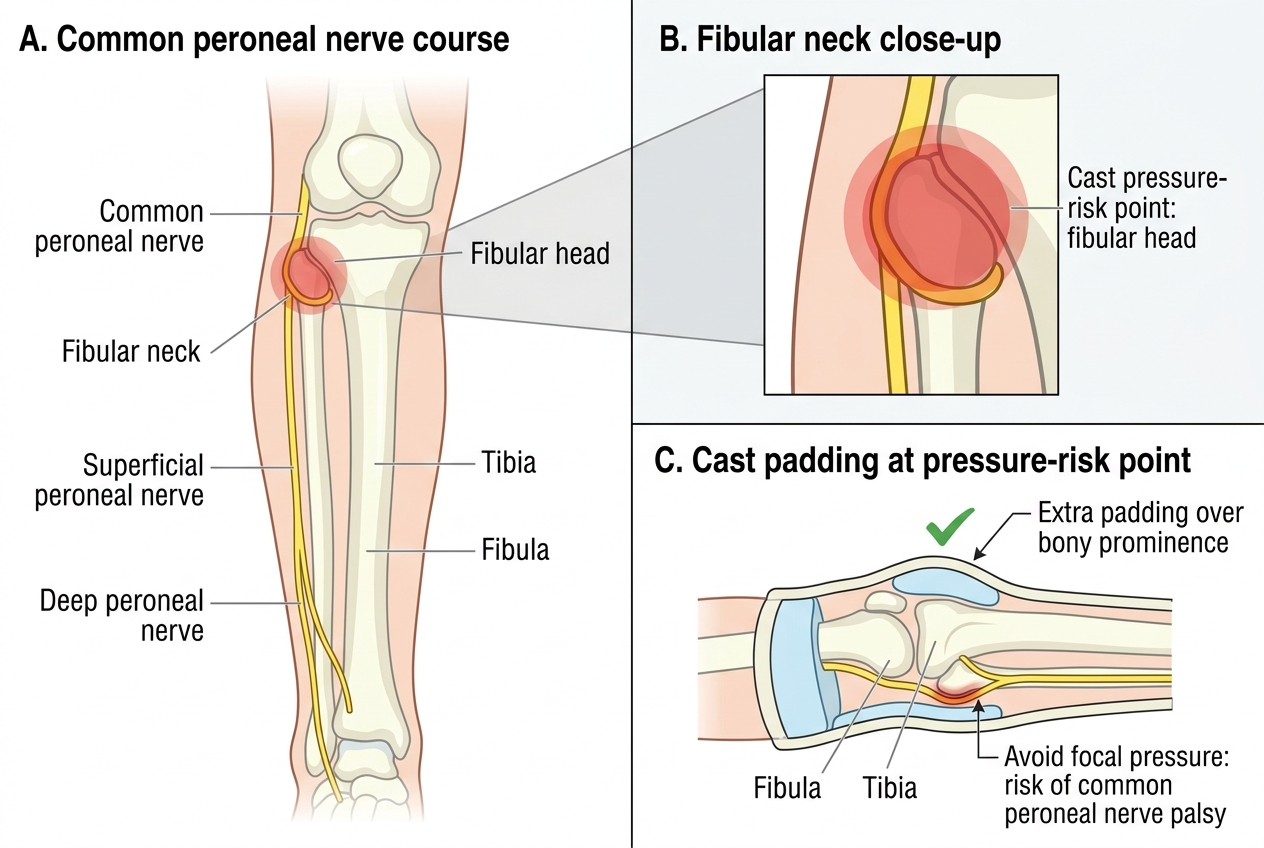
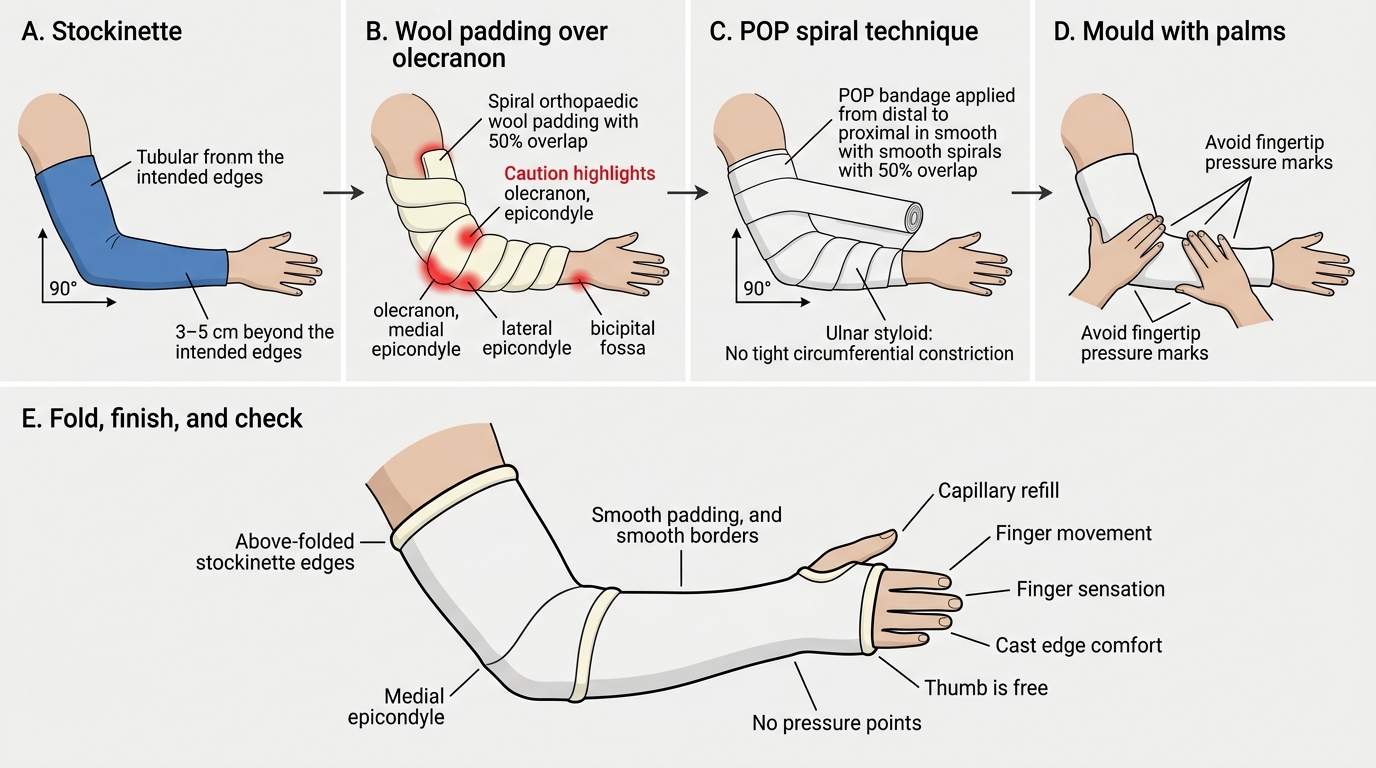
Bony prominences at risk include the olecranon and medial/lateral epicondyles of the elbow in an above-elbow cast; the fibular head and lateral malleolus in a below-knee cast; the heel (calcaneal tuberosity) and Achilles tendon insertion in any hindfoot cast; and the anterior superior iliac spine and greater trochanter in an above-knee cast or spica. These sites must be padded with extra wool layers before POP is applied, because pressure over a bony prominence within a rigid cast produces pressure necrosis within 24–48 hours.
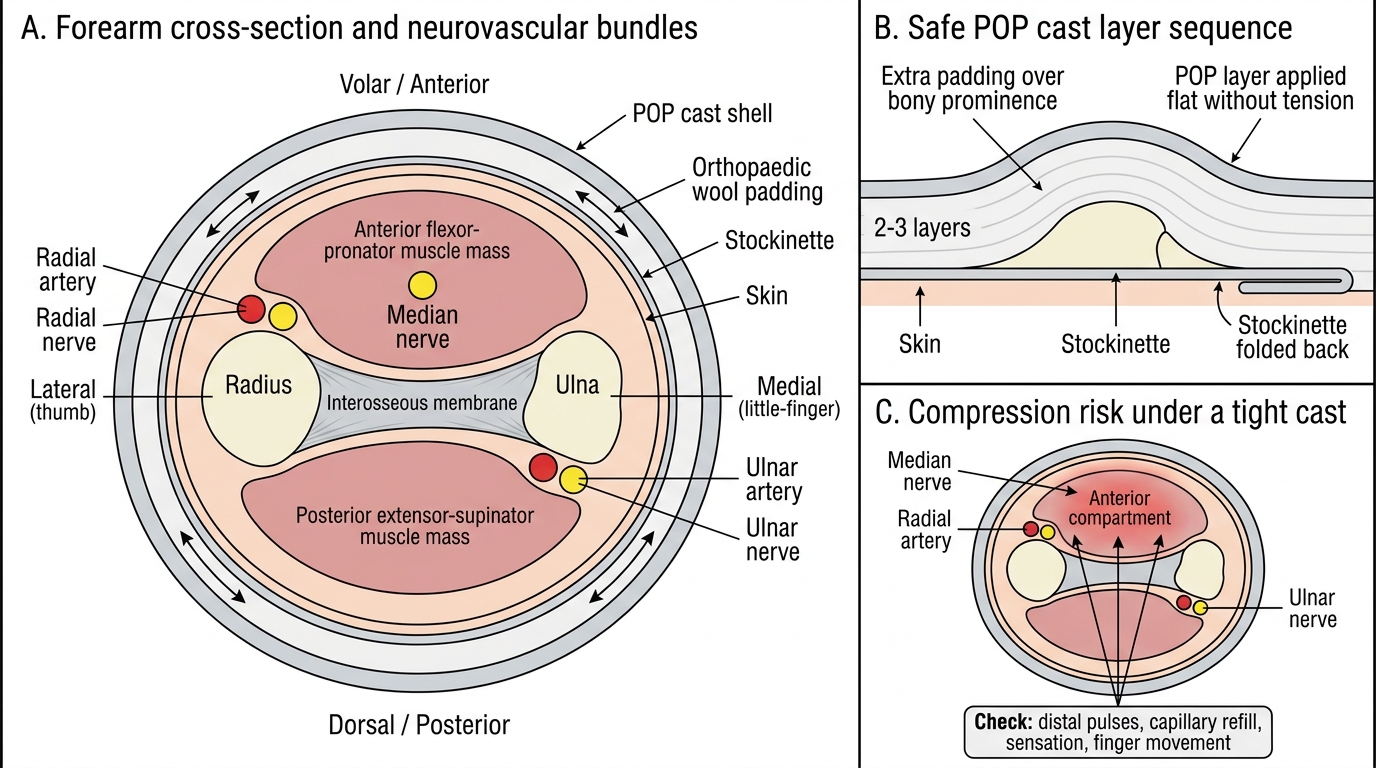
Neurovascular structures at risk include the common peroneal nerve as it winds around the neck of the fibula in any below-knee or above-knee cast — compression here produces foot drop (weakness of dorsiflexion and eversion). In an above-elbow cast, the radial nerve in the distal forearm and the ulnar nerve at the medial epicondyle are at risk. The radial, ulnar, and median pulses (at the wrist), and the posterior tibial and dorsalis pedis pulses (at the foot), constitute the distal neurovascular check that must be documented before and after every cast application.
Position of function is the resting joint position that minimises deformity if stiffness develops. For the wrist this is 20–30° of dorsiflexion; for the elbow it is 90° of flexion in neutral rotation; for the ankle it is 90° (neutral, not plantar-flexed) to prevent equinus; for the knee it is 5–10° of flexion. Deviation from the position of function must be intentional, documented, and clinically justified.
The chemistry of POP: calcium sulphate hemihydrate (CaSO₄ · ½H₂O) reacts with water to form calcium sulphate dihydrate (CaSO₄ · 2H₂O), a process that is exothermic. The heat generated during setting is usually tolerable but can cause burns if hot water is used or if the cast is insulated during setting. The average POP bandage takes 10–15 minutes to set and reaches full strength within 24–48 hours when dry. Fast-setting (plaster of Paris with starch accelerator) and slow-setting (with retarder, used for more complex casts) variants exist.
Common Peroneal Nerve and Fibular Head Cast Pressure Risk
Forearm Compartments and Neurovascular Safety in POP Cast Application
Procedure and Technique: POP Cast Application
Provided image
The systematic technique for POP cast application follows a fixed sequence: prepare, protect, apply, mould, and check. Deviating from this order increases the risk of skin complications and poor cast mechanics.
Preparation: assemble POP bandages of appropriate width (10 cm for below-knee, 15 cm for above-knee, 7.5–10 cm for above-elbow), a bucket of clean water at room temperature (NOT hot), stockinette, orthopaedic wool/cotton padding, plaster shears, and cast spreader.
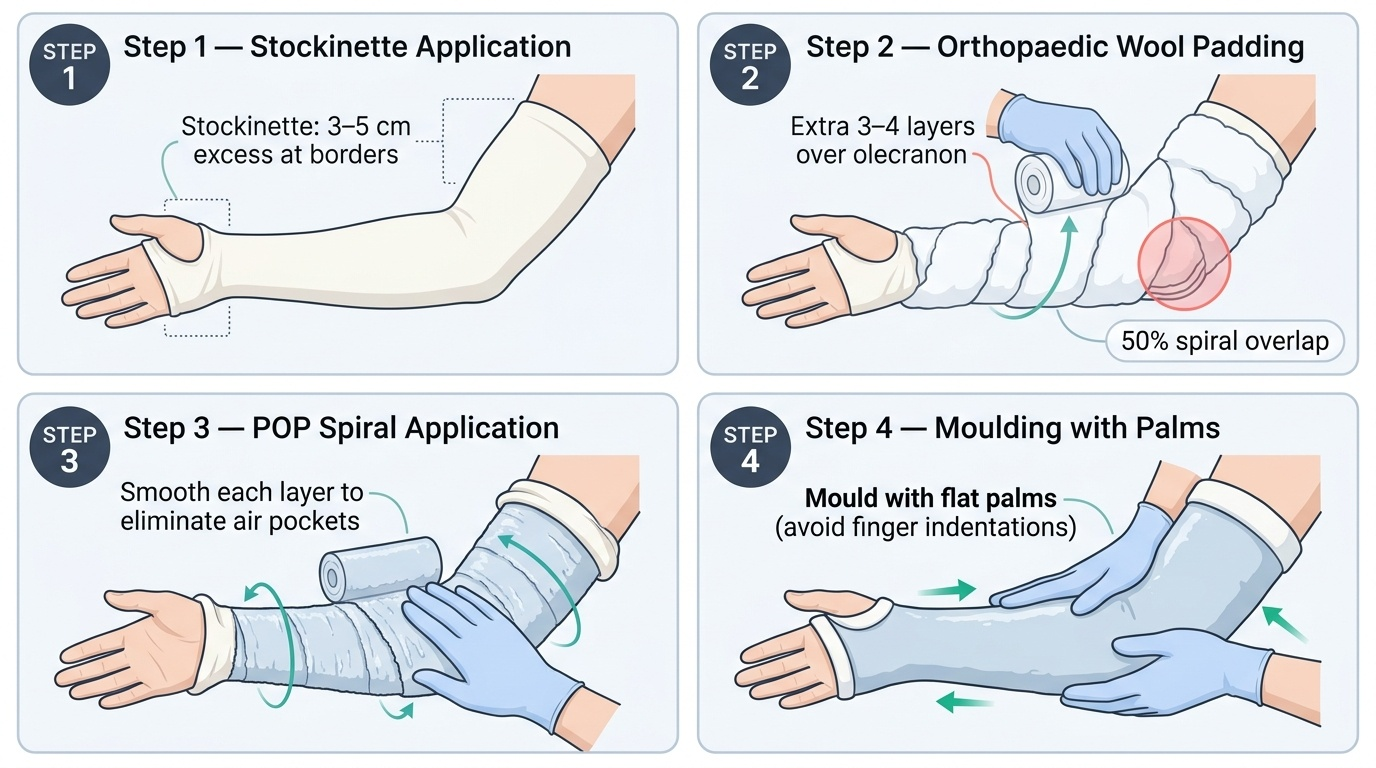
Step 1 — Stockinette: apply a tube of stockinette that extends 3–5 cm beyond each end of the intended cast. This will later be folded back over the cast ends to create a smooth, comfortable border.
Step 2 — Orthopaedic wool (padding): apply two to three layers of orthopaedic wool in a spiral fashion, starting distally and working proximally with 50% overlap. Apply extra layers (3–4 additional) over all bony prominences identified in the anatomical review above.
Step 3 — POP application: dip the POP bandage in room-temperature water and gently squeeze (do not wring) to remove excess. Apply in a spiral fashion, working proximally from the distal end with 50% overlap, keeping the bandage flat against the limb without excessive tension. Use wet hands to smooth each layer, eliminating air pockets and ensuring laminar bonding. Six to eight layers provide adequate strength for most casts; a slab (back-slab or U-slab) typically uses 6–10 layers folded back and forth.
Step 4 — Moulding: while the POP is still soft (the window is approximately 3–5 minutes), mould the cast with the palms (not the fingertips) to conform to the limb contours. Moulding with fingertips produces ridges that indent the soft POP and create internal pressure points. For a distal radius fracture, the classic three-point moulding corrects the dorsal angulation.
Step 5 — Finishing: fold back the stockinette ends over the cast edges and apply a final thin POP layer to secure them. Trim any overlong cast edges with plaster shears.
Step 6 — Immediate post-application check: perform a full distal neurovascular check, document the findings, and instruct the patient on cast care (keep dry, elevate limb, report pain/swelling/numbness/colour change immediately).
For a below-knee back-slab, the posterior slab is prepared separately (8–10 layers of POP folded accordion-style to match leg length from toes to tibial tubercle), applied to the posterior aspect of the leg with the ankle at 90°, and secured with a crepe bandage — NOT circumferential POP — to allow for swelling.
⚑ AI image — pending faculty review (auto-QA score 6/10; best of 3 attempts)
Above-Elbow POP Cast Application Technique

Three-Point Moulding of Below-Elbow Cast