Page 7 of 14
OR13.2 | Polytrauma Resuscitation Team Skills — SDL Guide (Part 3)
Procedure and Technique: Endotracheal Intubation and Splintage
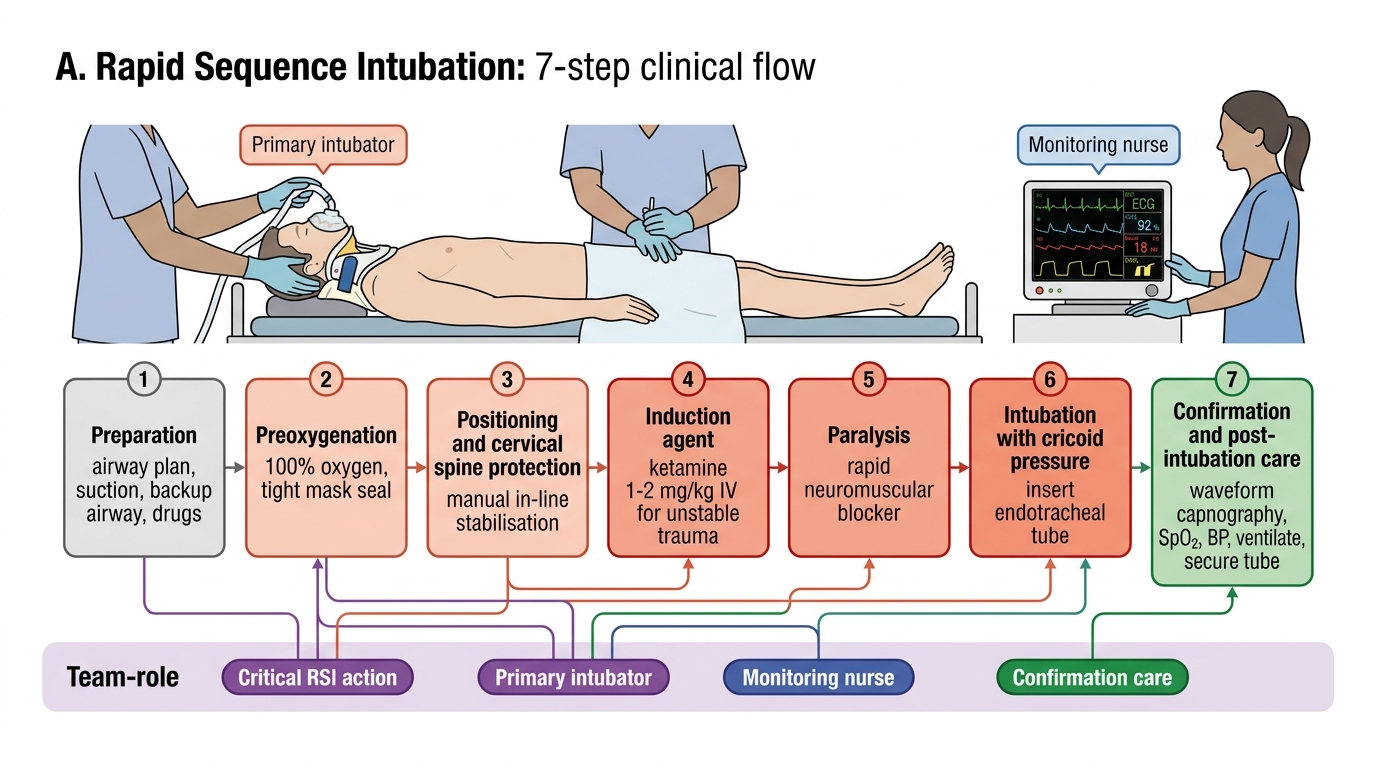
Endotracheal intubation in trauma is almost always performed as Rapid Sequence Intubation (RSI) to minimise the risk of pulmonary aspiration of gastric contents in a patient with a presumed full stomach. The OR13.2 competency requires you to participate as a team member, which means understanding the RSI sequence and having a specific role — applying cricoid pressure, holding the cervical spine in neutral, or passing equipment — even if you are not the primary intubator. Understanding the rationale behind each RSI step is what allows a team member to anticipate the next move and act without being told: when the anaesthetist reaches for the syringe of suxamethonium, you know to position your hands on the cricoid; when the tube is advanced and the cuff is inflated, you know to release cricoid pressure and hand over the capnography connector. That anticipatory synchrony is what makes a trauma team function as a unit rather than as five individuals performing parallel tasks. It is acquired only through deliberate simulation practice — watching a video of RSI is categorically not equivalent. As a final-year student you must have performed cricoid pressure and C-spine stabilisation on a simulator at least twice before your first real trauma call.
RSI sequence (the '7 P's'):
1. Preparation: assemble the laryngoscope (check light), ETT (size 8.0 for adult male, 7.5 for adult female), 10 mL syringe (balloon inflation), suction (Yankauer catheter on), IV access confirmed, monitoring connected (SpO₂, ECG, ETCO₂).
2. Pre-oxygenation: 100% oxygen via non-rebreather mask for 3 minutes (denitrogenation; extends the safe apnoea time to 3–8 minutes in a healthy adult, less in the critically ill).
3. Pre-treatment: consider IV lignocaine 1.5 mg/kg if head injury (blunts ICP rise with laryngoscopy); atropine in children <5 years (prevents bradycardia).
4. Paralysis with induction: simultaneous administration of induction agent (ketamine 1–2 mg/kg IV in haemodynamically unstable patients — preserves BP and bronchodilates; thiopentone 3–5 mg/kg if ICP raised) and neuromuscular blocker (suxamethonium 1–1.5 mg/kg IV for rapid onset 60 seconds, duration 8–10 minutes).
5. Protection (cricoid pressure / Sellick's manoeuvre): a team member applies firm posterior pressure on the cricoid cartilage to compress the oesophagus between the cartilage and the vertebra, reducing passive regurgitation. Maintained until the cuff is inflated and correct placement is confirmed.
6. Placement of tube: laryngoscopy, intubation, inflate cuff.
7. Post-intubation management: confirm placement (bilateral auscultation, chest rise, ETCO₂ waveform), secure the tube (20–23 cm at the lips for adults), connect to ventilator.
Splintage as part of the polytrauma team response: after the primary survey and resuscitation, each fracture is splinted to reduce pain, haemorrhage, and further soft-tissue injury. The Thomas splint is applied for femoral shaft fractures (see SDL 1, this cluster). Above-elbow and below-knee back-slabs are applied for extremity fractures. The key principle in the trauma context is that splintage must not delay haemorrhage control — it is performed in the D/E phase, not during C.
Rapid Sequence Intubation: 7-Step Trauma Team Flow
SELF-CHECK
A haemodynamically unstable trauma patient requires RSI for endotracheal intubation. Which induction agent is most appropriate?
A. Thiopentone 3–5 mg/kg — because it is the fastest-acting
B. Propofol 2 mg/kg — because it is the standard agent
C. Ketamine 1–2 mg/kg — because it maintains haemodynamic stability and bronchodilates
D. Midazolam 0.1 mg/kg — because it provides reliable amnesia
Reveal Answer
Answer: C. Ketamine 1–2 mg/kg — because it maintains haemodynamic stability and bronchodilates
Ketamine 1–2 mg/kg IV is the preferred induction agent in haemodynamically unstable trauma because it stimulates sympathetic tone (maintaining blood pressure) and produces bronchodilation (beneficial in chest trauma). Thiopentone and propofol both cause dose-dependent vasodilatation and hypotension — dangerous in a patient already in haemorrhagic shock. Midazolam alone is not a reliable induction agent and also causes hypotension.
Interpretation of Findings: Monitoring the Resuscitation Response
Interpreting the response to resuscitation is as important as the procedures themselves. A team member who can read the monitoring data and communicate deterioration to the team leader adds significant value beyond the mechanical execution of tasks. The physiological targets of trauma resuscitation — blood pressure, heart rate, urine output, lactate clearance, and end-tidal CO₂ — are not independent variables: they form a composite physiological picture that tells you whether the patient is improving, plateauing, or deteriorating under your care. A blood pressure of 95/60 mmHg means one thing in a patient whose lactate is falling and whose urine output is 40 mL/h; it means something entirely different in one whose lactate is rising and whose urine output is 5 mL/h. The skill of interpretation is learning to read these variables together as a system rather than reacting to each in isolation. This section maps those interpretive frameworks so that you can function as a genuinely informed participant in the resuscitation, not merely a task-executor.
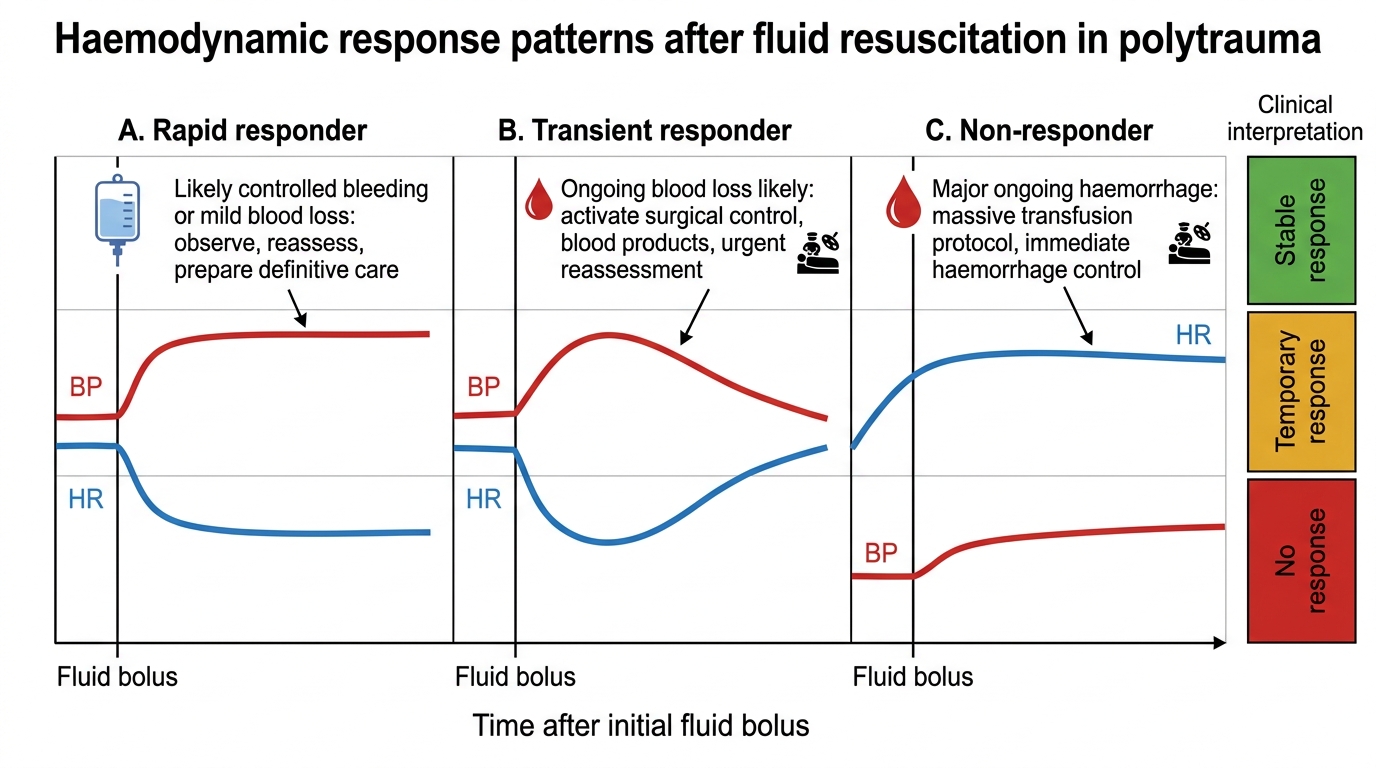
Haemodynamic response to fluid resuscitation is classified as:
- Rapid responder: BP and HR normalise rapidly and remain stable — suggests limited haemorrhage, probably controlled. These patients need surgical assessment but are not immediately operative.
- Transient responder: BP improves initially then deteriorates — ongoing haemorrhage, most likely intra-abdominal or pelvic. These patients require urgent surgical haemorrhage control (laparotomy or angioembolisation). Do not keep giving fluid — address the source.
- Non-responder: no improvement despite resuscitation — catastrophic haemorrhage or non-haemorrhagic cause (tension pneumothorax, cardiac tamponade). Immediate operative or procedural intervention.
Urine output as a resuscitation marker: once the bladder catheter is in place, urine output is measured hourly. A falling urine output (<0.5 mL/kg/h in adults) despite apparent haemodynamic improvement suggests under-resuscitation, renal injury, or acute tubular necrosis from prolonged hypoperfusion. In contrast, a large initial output (>500 mL in the first 30 minutes) after catheterisation may indicate chronic urinary retention rather than adequate perfusion — clinical correlation is essential.
Airway adequacy monitoring: after intubation, the end-tidal CO₂ (ETCO₂) waveform is the gold-standard confirmation of tracheal placement. A normal capnography waveform (rectangular, with phase III plateau representing alveolar CO₂) confirms intratracheal position with >99% sensitivity. A loss of the ETCO₂ waveform after confirmed placement indicates: tube displacement (DOPE — Displaced, Obstructed, Pneumothorax, Equipment failure) — begin systematic check immediately.
Lactate and base deficit are biochemical markers of tissue hypoperfusion. A lactate >4 mmol/L or a base deficit worse than −6 mEq/L indicates severe shock and predicts the need for massive transfusion. Clearance of lactate toward normal (<<2 mmol/L) over the first 2–4 hours of resuscitation correlates with survival.
Haemodynamic Response Patterns to Fluid Resuscitation
Applied and Supervised Practice: Team Roles in Polytrauma Resuscitation
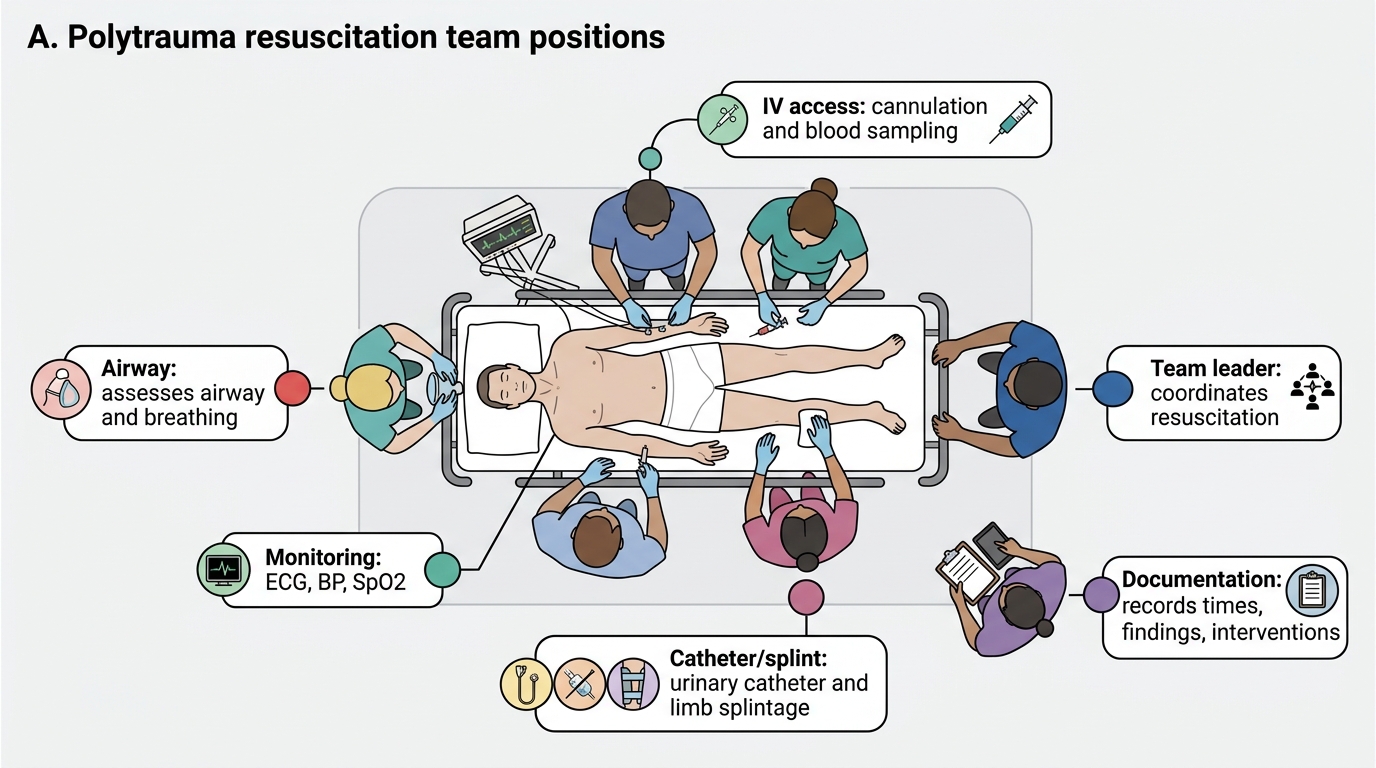
Effective polytrauma resuscitation is a team performance, not an individual one. Research on trauma team performance (MacKenzie, Trauma Audit Research Network) consistently shows that teams with clearly assigned roles, closed-loop communication, and a designated team leader have significantly lower preventable mortality than ad-hoc improvised responses. As a Phase III student and new intern, your competency target is to perform your assigned role reliably while simultaneously developing situational awareness of the whole team's activities. This dual cognitive demand — executing your own task while monitoring the patient and the team — is the most challenging aspect of trauma resuscitation, and it requires deliberate practice in simulation environments before it becomes automatic in a real resuscitation.
Assigned roles for a Phase III student/intern in a polytrauma team:
1. Peripheral IV access: you are expected to insert a large-bore cannula in the antecubital fossa on command, collect blood samples, and commence IV fluid infusion without interrupting the team leader's assessment.
2. Bladder catheterisation: you perform the contraindication check (examine the meatus), report findings to the team leader before proceeding, and execute the catheterisation technique as described above.
3. Cervical spine stabilisation during intubation: apply manual in-line stabilisation with both hands on the mastoid processes while the primary intubator performs laryngoscopy — maintain neutral alignment throughout.
4. Splintage: apply Thomas splint (femur) or extremity back-slabs under supervision after the primary survey is complete and haemorrhage is controlled.
5. Documentation: record the time of each intervention, the IV cannula gauge and site, the catheter size, and all vital signs — resuscitation documentation is a legal and clinical requirement.
Simulation practice before real-patient exposure:
- Practise IV cannulation on vascular arm trainers until insertion is smooth and blood sampling is completed within 90 seconds.
- Practise catheterisation on urological simulation models, including the contraindication decision scenario (simulate blood at meatus → report → do not catheterise → call for suprapubic).
- Participate in ATLS simulation scenarios as a team member, focusing on communication (using the patient's name, closed-loop read-back of orders, assertive communication if you see an error).
Team Roles in Polytrauma Resuscitation