Page 5 of 44
EN2.2 | Headlamp Based ENT Examination Workflow — SDL Guide
Learning Objectives
- Demonstrate the correct use and positioning of the headlamp (conventional head mirror or LED headlamp) for ENT examination
- Perform anterior rhinoscopy using a Thudichum nasal speculum with correct technique
- Use a tongue depressor to examine the oropharynx, tonsils, and posterior pharyngeal wall
- Elicit laryngeal crepitus as part of the neck examination
- Integrate the findings from the ear, nose, throat, and neck examination into a coherent clinical assessment
INSTRUCTIONS
ENT examination requires hands-free, coaxial illumination — light and line of sight must come from the same direction so that the examiner can see into body cavities (ear canal, nasal cavity, oropharynx) without shadows. The headlamp is the instrument that enables this. This module teaches the complete conventional ENT examination workflow: from correct headlamp positioning through the systematic examination of the ear, nose, throat, and neck — the foundational clinical skill on which all diagnosis in otorhinolaryngology rests.
References
- Dhingra PL, Dhingra S. Diseases of Ear, Nose and Throat & Head and Neck Surgery, 8th ed. Ch 2 (textbook)
- Hazarika P. Textbook of Ear, Nose and Throat & Head Neck Surgery, 3rd ed. Ch 4 (textbook)
- Scott-Brown's Otorhinolaryngology Head and Neck Surgery, 8th ed. Vol 1, Ch 5 (textbook)
Version 2.0 | NMC CBUC 2024
CLINICAL SCENARIO
You are in the ENT outpatient department on your first morning. A 45-year-old woman sits in front of you complaining of a blocked nose and a persistent sore throat for 6 weeks. You have a headlamp, a Thudichum speculum, and a tongue depressor on the tray. Your senior resident steps out for 5 minutes and says: 'Examine her and tell me the findings when I'm back.' You put on the headlamp and realise — you have watched this done many times, but you have never been the one doing it. Where do you position the light? Which way do you hold the speculum? How do you get the tongue down without triggering a gag? And what exactly are you looking for in each cavity?
WHY THIS MATTERS
EN2.2 is one of the most practically assessed competencies in the ENT posting because it is testable at the bedside in real time. The OSCE examiner can watch you perform the examination, observe your technique, and see immediately whether you are using the instruments correctly. This is not a competency you can pass by knowing the theory — you must have internalised the sequence so thoroughly that the steps flow without hesitation. Beyond the examination, this skill is the gateway to every ENT clinical decision: a diagnosis of CSOM, allergic rhinitis, tonsillar hypertrophy, or a pharyngeal tumour cannot be made without this examination. The specific techniques in EN2.2 — headlamp, nasal speculum, tongue depressor, laryngeal crepitus — are also required in primary care settings and casualty, where an ENT specialist may not be immediately available. The doctor who can perform this examination confidently can identify a peritonsillar abscess, a foreign body, or a suspicious mucosal lesion and act on it; the one who cannot will miss these diagnoses entirely.
RECALL
Before practising the technique, anchor it in anatomy. The external auditory canal is an S-shaped tube approximately 2.4 cm long in adults — the outer third is cartilaginous, the inner two-thirds are bony. Straightening the canal requires pulling the pinna upward and backward in adults (and downward and backward in infants) to align the cartilaginous and bony portions and bring the tympanic membrane into view. The tympanic membrane is a semi-transparent oval membrane inclined at approximately 55° to the canal floor; it has three regions — the pars tensa (taut lower portion), the pars flaccida (Shrapnell's membrane, loose upper portion above the anterior and posterior malleolar folds), and the handle of malleus visible as a white streak from umbo to short process. The nasal cavity is divided by the septum into two passageways; each side has three turbinates (inferior, middle, superior); anterior rhinoscopy visualises the inferior turbinate and the nasal septum. The oropharynx contains the palatine tonsils (between the anterior and posterior pillars), the soft palate, uvula, and posterior pharyngeal wall. The larynx lies at the C3-C6 level; it can be displaced laterally against the cervical vertebrae to produce laryngeal crepitus — a crunching sensation that is normally present but absent in postcricoid and hypopharyngeal pathology (Muller sign / Chevalier Jackson's sign).
Clinical Indication: When and Why We Use the Headlamp
The fundamental challenge of ENT examination is anatomical: the structures of interest — the tympanic membrane, the nasal mucosa, the tonsils, the posterior pharyngeal wall — are all located inside narrow body cavities that cannot be examined without directed light and a clear line of sight. Ordinary room lighting is inadequate because it comes from above and behind the examiner, casting the examiner's own head as a shadow into the very cavity they are trying to inspect. The solution is coaxial illumination: the light source and the examiner's line of sight must be aligned on the same axis, so that the beam enters the cavity directly along the line of observation.
The conventional head mirror achieves this by reflecting a bright external light source (usually a 100W bulb in an examination lamp positioned to the patient's side) through a central hole in a concave mirror worn on the examiner's forehead. The examiner looks through the hole and the reflected beam converges at a focal point approximately 25–30 cm in front of the mirror — the working distance for ENT examination. The LED headlamp is the modern alternative: a battery-powered LED light mounted on a headband, projecting a focused beam in the same coaxial direction. Both achieve the same functional goal: hands-free, coaxial illumination that leaves both hands free to hold instruments.
The indication for the headlamp examination is any patient presenting with an ENT symptom: ear pain, hearing loss, discharge, nasal obstruction, rhinorrhoea, epistaxis, sore throat, hoarseness, dysphagia, or neck swelling. The examination is also a routine part of any systematic physical examination in general practice, as ENT abnormalities are common incidental findings. Critically, the headlamp examination is the method by which the diagnosis is confirmed or refuted — it is not a preliminary step before 'real' investigation, but the primary investigative tool.
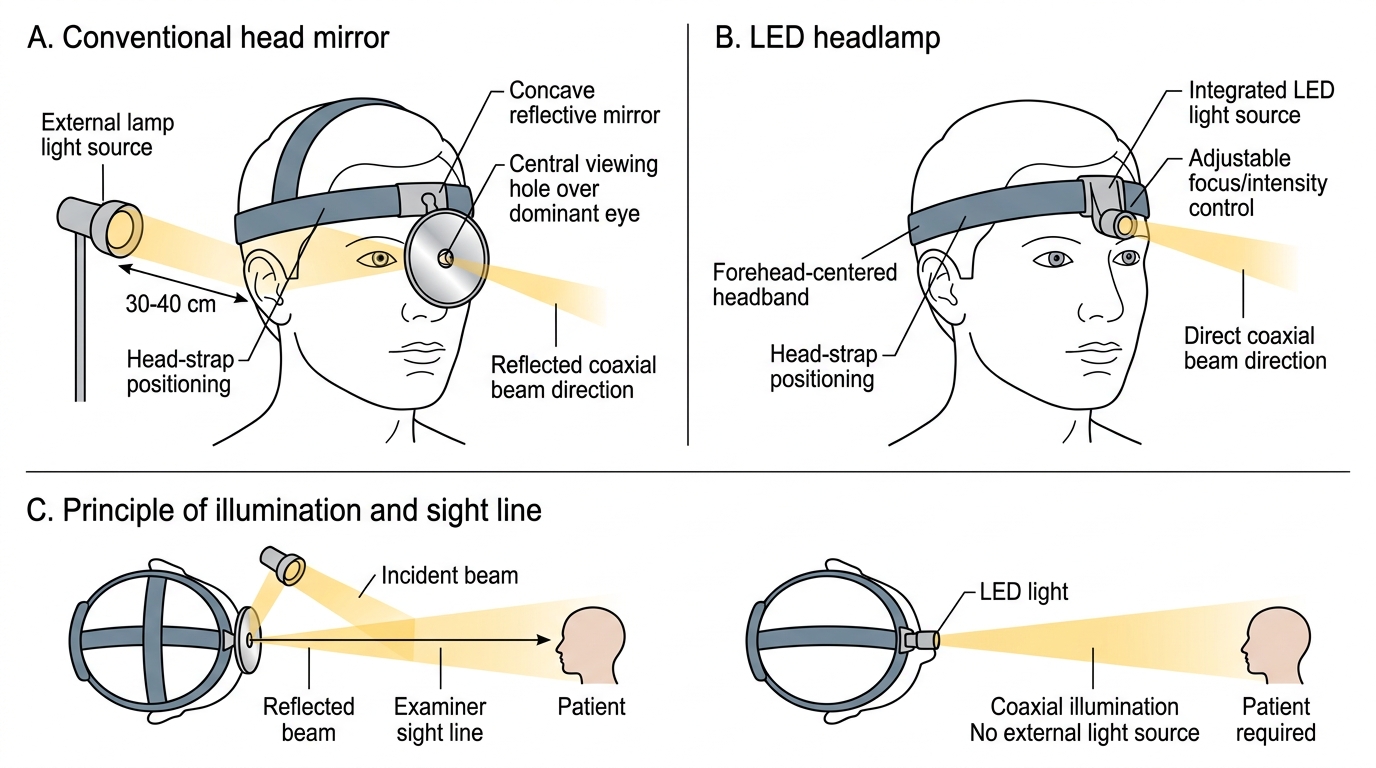
Conventional Head Mirror and LED Headlamp
The Headlamp, Nasal Speculum, and Tongue Depressor: Principles
Each instrument in the ENT examination tray has a specific design that serves a defined physical function. Using the wrong instrument, or using the right instrument incorrectly, defeats the purpose of the examination and can cause injury.
Head mirror (conventional): The mirror is concave (focal length approximately 25 cm) with a central hole of approximately 2 cm diameter. It is mounted on a universal joint attached to a head-strap. Correct positioning: centre the hole over the dominant eye, tilt the mirror to reflect the external lamp beam forward. The mirror must be positioned so that the examiner can look through the central hole with the dominant eye while the reflected beam illuminates the examination field. The external lamp is positioned approximately 30–40 cm to the side and slightly behind the patient's head.
LED headlamp: Worn on a headband centred on the forehead, with the beam aimed straight ahead. The light intensity and focus are adjustable. The LED headlamp has replaced the head mirror in many settings because it is portable, requires no external light source, and is faster to set up.
Thudichum nasal speculum: The Thudichum speculum is a spring-loaded bivalve instrument with two short blades that, when inserted and released, dilate the nares laterally to expose the anterior nasal cavity. It is held between the thumb and index finger of the left hand, with the blades closed during insertion and then released once inside the nares (inserted approximately 1 cm — no deeper, to avoid pain and mucosal trauma). The examiner's left hand rests on the patient's forehead to steady and direct the head. This is distinct from the Vienna nasal speculum (longer-bladed, used for posterior rhinoscopy) and the Killian speculum (used in formal anterior rhinoscopy or epistaxis). For Year-3 bedside examination, the Thudichum speculum is the standard instrument.
Tongue depressor: A flat, smooth-edged wooden or metal spatula, approximately 15 cm long. The technique is to place the blade on the anterior two-thirds of the tongue — not the posterior third, which triggers the gag reflex — and apply firm downward pressure while asking the patient to say 'Ah'. This depresses the tongue base and elevates the soft palate, exposing the oropharynx. The patient is positioned with the head slightly extended, mouth wide open, and breathing through the mouth (not through the nose, which raises the soft palate and obscures the view). Good light is essential: the tongue depressor without coaxial illumination reveals almost nothing in the posterior oropharynx.
SELF-CHECK
During anterior rhinoscopy with a Thudichum speculum, the examiner should insert the blades to a depth of approximately:
A. 3–4 cm, to reach the middle turbinate
B. 1 cm only, to dilate the nares without traumatising the mucosa
C. 5 mm, just inside the vestibule
D. As deep as necessary to see the posterior choana
Reveal Answer
Answer: B. 1 cm only, to dilate the nares without traumatising the mucosa
The Thudichum nasal speculum is inserted only approximately 1 cm into the nares. Inserting deeper causes pain, mucosal trauma, and epistaxis, and is not necessary for anterior rhinoscopy — the structure of interest (inferior turbinate, nasal septum, nasal floor) is visible from the anterior approach with the speculum held at this shallow depth. The posterior choana is not visible on anterior rhinoscopy with a standard speculum; posterior rhinoscopy or nasopharyngoscopy is required.
Ear and Nose Examination Technique
The examination proceeds in a systematic head-to-toe sequence for each region. The ear is examined first, followed by the nose, and then the throat and neck. This order is not arbitrary — it mirrors the flow of the ENT history and ensures that no region is inadvertently skipped in a busy clinical environment.
Ear examination technique:
Step 1 — Inspect the pinna and periauricular region. Look for shape abnormalities, scars (previous surgery), pre-auricular sinuses or pits, skin lesions, and swelling of the mastoid process (Battle's sign). Palpate the tragus (tenderness in otitis externa), the mastoid tip (tenderness in acute mastoiditis), and the pre- and post-auricular lymph nodes.
Step 2 — Straighten the ear canal. In adults, grasp the pinna at the upper margin between the thumb and index finger and pull gently upward and backward. This straightens the S-shaped external auditory canal, aligning the cartilaginous and bony segments. (In infants and young children, pull downward and backward.)
Step 3 — Examine the EAC. With the opposite hand holding the otoscope (or, in a full headlamp-only examination, by direct inspection), look for wax, foreign bodies, discharge (character and colour), skin changes (oedema, erythema in otitis externa, fungal debris in otomycosis), and the integrity of the canal walls.
Step 4 — Examine the tympanic membrane. Identify the landmarks in order: handle of malleus (white streak from umbo to short process), light reflex (cone of light: normally in the antero-inferior quadrant), pars flaccida (upper portion), pars tensa (lower portion), and the annulus. Note any perforations: central perforations (safe, tubotympanic CSOM) vs attic or marginal perforations (unsafe, atticoantral CSOM with cholesteatoma). Note colour, translucency, and bulging (acute otitis media).
Anterior rhinoscopy technique:
Step 1 — Position the patient and yourself. The patient sits upright, head at the examiner's eye level. The examiner holds the closed Thudichum speculum between the left thumb and index finger, with the other fingers resting on the patient's cheek for stability.
Step 2 — Insert and dilate. Direct the speculum blades into the vestibule with the blades horizontal (opening toward 3 and 9 o'clock, not 12 and 6 — which would hit the septum and cause pain). Insert approximately 1 cm, then relax finger pressure to allow the spring to gently dilate the nares.
Step 3 — First position (head erect). With the head erect, look at the nasal floor, inferior turbinate (pinkish-grey, large, scroll-shaped), nasal septum (for deviation, perforations, spurs, bleeding points), and inferior meatus. Note the colour of the turbinate mucosa (pale and boggy = allergy; red and inflamed = infective rhinitis) and any polyps (smooth, pale, glistening, insensate mass — absence of pain on probing is a classical polyp feature).
Step 4 — Second position (head tilted back). Ask the patient to tilt the head back approximately 30°. This brings the middle turbinate and middle meatus into view — look for mucopus in the middle meatus (indicating ethmoid or maxillary sinusitis), middle turbinate shape, and the agger nasi region.
Step 5 — Withdraw. Close the blades before withdrawing to avoid catching the vestibular hairs.
Anterior Rhinoscopy Technique