Page 13 of 20
EN4.44 | Tracheostomy and Tracheostomy Care — SDL Guide
Learning Objectives
- Describe the indications for tracheostomy and distinguish them from the indications for cricothyroidotomy
- Describe the relevant anatomy of the anterior neck for tracheostomy including the correct level of the tracheal incision
- Describe the steps involved in surgical tracheostomy and identify the components of a tracheostomy tube
- Describe the principles of tracheostomy care including tube management, suction, complications and decannulation criteria
INSTRUCTIONS
Tracheostomy is one of the oldest surgical procedures in medicine — described in ancient texts and still performed daily in ENT, thoracic, and intensive care units. Understanding tracheostomy is not only a surgical skill for ENT residents; as an MBBS graduate you will encounter tracheostomy patients on general surgical wards, ICU, rehabilitation units, and at home. Knowing how to recognise a blocked tube, respond to accidental decannulation, maintain the stoma, and prepare a patient for decannulation are competencies that save lives in the ward setting. This SDL covers the full scope of the EN4.44 competency — indications, anatomy, technique, tube types, post-operative care, and decannulation.
References
- Dhingra PL, Dhingra S — Diseases of Ear, Nose and Throat and Head and Neck Surgery, 8th ed., Ch. 77-78 (textbook)
- Hazarika P, Nayak DR — Textbook of ENT and Head and Neck Surgery, 3rd ed., Ch. 54-55 (textbook)
- Gleeson M et al — Scott-Brown's Otorhinolaryngology, Head and Neck Surgery, 8th ed., Vol 2, Tracheostomy chapter (textbook)
Version 2.0 | NMC CBUC 2024
CLINICAL SCENARIO
It is 3 AM and you are the surgical intern on call. A nurse calls urgently from the ward: 'The tracheostomy patient in bed 7 is making a gurgling sound and his oxygen saturation is dropping.' You run to the bedside and find a 65-year-old man who had a total laryngectomy four days ago. He is distressed, working hard to breathe, and his SpO2 is 87%. You look at the tracheostomy: the inner tube is missing from the holder — the nurse removed it an hour ago to clean it and has not been able to reinsert it. The outer tube is in place but its lumen appears occluded with thick, dried secretions. What do you do first? And what would you do differently if the outer tube were completely displaced from the stoma?
WHY THIS MATTERS
Tracheostomy — the surgical creation of an opening in the anterior tracheal wall — is one of the most frequently performed procedures in ENT and intensive care medicine. India's large population of patients with laryngeal malignancy, head injury, Guillain-Barré syndrome, burns, and post-neurosurgical airway management creates a constant demand for tracheostomy services. As an MBBS graduate, you may not perform the operation itself — but you will be the first clinician to see tracheostomy complications on the ward or in the emergency setting. A blocked inner tube, accidental decannulation, or early post-operative haemorrhage from a tracheostomy stoma can kill a patient within minutes if the initial response is wrong. The EN4.44 competency is designated at the KH level (Knowledge and Hands-on skill observation), reflecting this clinical importance: you must know the indications, understand the procedure, and be able to manage the tracheostomised patient on the ward. The critical known-trap for this SDL is the tracheostomy vs cricothyroidotomy distinction — these are two different procedures performed at two different sites for two different clinical contexts, and confusing them is a potentially fatal error.
RECALL
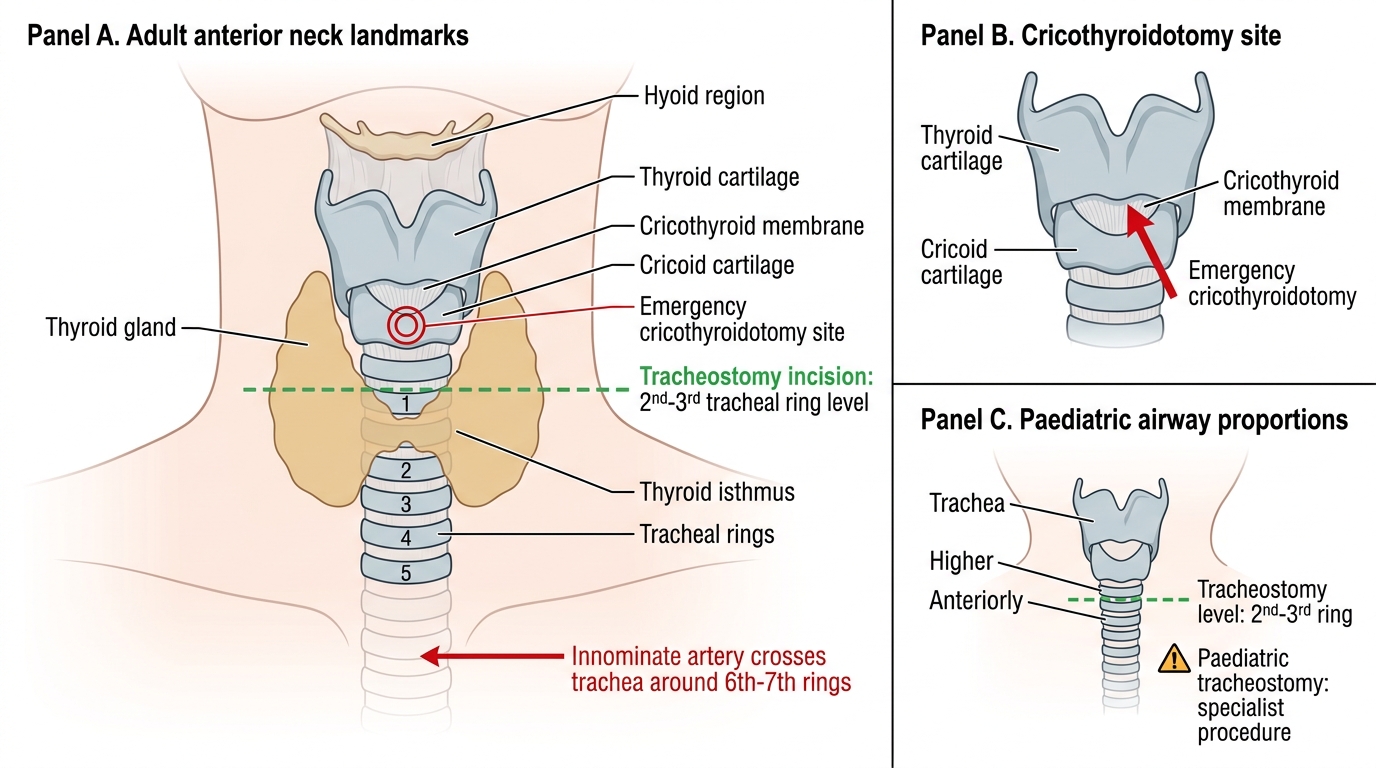
Recall from your anatomy teaching the midline structure of the anterior neck, which forms the surgical field for tracheostomy. Working from superior to inferior: the hyoid bone (at the level of C3), the thyroid cartilage (the prominence of the Adam's apple, at C4-C5), the cricothyroid membrane (a fibromuscular membrane between the lower border of the thyroid cartilage and the upper border of the cricoid cartilage), the cricoid cartilage (at C6 — the only complete cartilaginous ring of the entire airway), and below it the tracheal rings (numbered 1 through 10+ proceeding downward). The thyroid isthmus — the bridge of thyroid tissue connecting the two lobes — crosses the anterior trachea at the level of the 2nd to 4th tracheal rings. Below the thyroid, the innominate artery (brachiocephalic trunk) crosses the trachea anteriorly at approximately the 6th-7th ring. This anatomical knowledge is essential for understanding why the tracheostomy is performed at the 2nd-3rd ring (not the 1st, which risks the cricoid and subglottic stenosis; not too low, which risks the innominate artery). The cricothyroid membrane — a palpable landmark even in an obese or muscular neck — is the site of the emergency cricothyroidotomy, not the tracheostomy.
Clinical Indication and Relevance of Tracheostomy
The decision to perform a tracheostomy is based on one of four clinical scenarios, each representing a different underlying reason why the patient cannot adequately breathe or clear secretions through the normal upper airway route. Understanding these indications — and how they differ from the indication for cricothyroidotomy — is the starting point for all tracheostomy practice.
Indication 1 — Airway obstruction: When the laryngeal or upper tracheal lumen is obstructed by a lesion that cannot be rapidly resolved (bilateral vocal cord palsy, large laryngeal carcinoma, subglottic stenosis, severe supraglottic oedema from burns or angioedema, post-radiation fibrosis, trauma), a tracheostomy bypasses the obstruction by creating an opening in the trachea below the lesion. This is the indication most directly relevant to ENT practice. The tracheostomy provides a secure, maintained airway below the pathology, allowing the patient to breathe safely while the underlying condition is investigated and treated.
Indication 2 — Prolonged mechanical ventilation: In the ICU, patients who require prolonged endotracheal intubation (beyond approximately 7-14 days) are often given a tracheostomy. Compared with an endotracheal tube, a tracheostomy reduces anatomical dead space (improving ventilation efficiency), reduces the work of breathing, allows the patient to be more comfortable and potentially awake, facilitates oral feeding (the tracheostomy does not pass through the mouth), reduces the risk of subglottic and laryngeal damage from a translaryngeal tube, and simplifies weaning from the ventilator.
Indication 3 — Pulmonary toilet: Patients who cannot effectively cough and clear bronchopulmonary secretions — due to neuromuscular disease (motor neurone disease, Guillain-Barré syndrome, muscular dystrophy), head or spinal cord injury, or post-operative airway dysfunction — may require a tracheostomy to allow regular endotracheal suction. The tracheostomy provides direct access to the trachea for suctioning and prevents recurrent aspiration pneumonia from secretion pooling.
Indication 4 — Prophylactic (pre-operative) tracheostomy: Before major head and neck surgery — total laryngectomy, hypopharyngectomy, extensive mandibulectomy, or resection of large oropharyngeal tumours — a prophylactic tracheostomy may be placed to secure the airway before significant post-operative oedema develops and before the definitive airway anatomy is altered by the resection.
The critical distinction — tracheostomy vs cricothyroidotomy:
This is the single most important known-trap for this SDL and a classic ENT examination question. The two procedures must never be confused:
- Tracheostomy: elective or semi-elective procedure, performed in the operating theatre under general anaesthesia or under local anaesthesia with sedation in a cooperative patient; site = 2nd-3rd tracheal ring; purpose = planned airway management.
- Cricothyroidotomy: emergency procedure, performed at the bedside or in the casualty department; site = the cricothyroid membrane (between the thyroid and cricoid cartilages); purpose = to gain urgent airway access in the 'can't intubate, can't oxygenate' scenario; it is a temporising measure that MUST be converted to a formal tracheostomy within 24-48 hours to prevent pressure necrosis of the cricoid cartilage and subglottic stenosis.
Relevant Anatomy for Tracheostomy
Precise knowledge of the anterior neck anatomy allows the surgeon to perform the tracheostomy at the correct level, avoid critical vascular structures, and identify the correct landmarks for cricothyroidotomy in an emergency. The relevant anatomy can be systematically organised from the skin surface inward and from the hyoid bone downward.
The anterior neck landmarks palpable from the skin are, in order from superior to inferior: the hyoid bone (horseshoe-shaped, at C3 level), the thyroid notch and thyroid cartilage (the largest cartilage, forming the 'Adam's apple'), the cricothyroid membrane (a palpable, triangular soft spot just below the thyroid cartilage — typically 0.9 cm in height and 3 cm wide, located approximately 1-1.5 cm below the thyroid notch), the cricoid cartilage (the first complete cartilaginous ring, palpable as a firmer ridge below the membrane), and the tracheal rings below (softer, less easily palpated individually through the skin unless the neck is thin).
The cricothyroid membrane contains the cricothyroid arteries — branches of the superior thyroid artery that run across the superior third of the membrane on each side, forming an anastomotic arch. An emergency cricothyroidotomy incision should be made in the inferior two-thirds of the membrane to avoid these vessels. The membrane is avascular in its central inferior portion, making it the safest emergency access point.
The thyroid isthmus crosses the trachea at the level of the 2nd-4th rings. During tracheostomy, it must be divided between ligatures and sutures or retracted superiorly (in some patients with a small isthmus) to expose the 2nd-3rd ring level. The isthmus is highly vascular and must not be simply cut without ligation.
The innominate artery (brachiocephalic trunk) rises from the aortic arch and crosses the anterior trachea at approximately the 6th-7th ring level, sometimes ascending higher in short-necked or obese patients. Tracheostomies placed too low risk erosion into this artery — a catastrophic complication (tracheo-innominate fistula) producing massive haemorrhage.
Anterior Neck Landmarks for Cricothyroidotomy and Tracheostomy
For paediatric tracheostomy, the anatomy is proportionally smaller and the trachea is higher and more anterior. The thyroid cartilage is softer, the tracheal rings are smaller, and the landmark distances are significantly compressed. The tracheostomy is still placed at the 2nd-3rd ring, but the precision required is greater because the consequences of misplacement are proportionally larger. Paediatric tracheostomy is generally considered a specialist procedure.
SELF-CHECK
A 45-year-old man is brought to casualty following a road traffic accident with severe maxillofacial trauma and inability to intubate (multiple attempts have failed). He has an SpO2 of 75% and is rapidly becoming cyanotic. His neck is not injured. The most appropriate immediate airway intervention is:
A. Elective surgical tracheostomy at the 2nd-3rd tracheal ring under general anaesthesia
B. Emergency cricothyroidotomy through the cricothyroid membrane, followed by conversion to formal tracheostomy within 24-48 hours
C. Nasopharyngeal airway and bag-mask ventilation until tracheostomy is possible
D. Oropharyngeal airway with high-flow oxygen and urgent referral to ENT
Reveal Answer
Answer: B. Emergency cricothyroidotomy through the cricothyroid membrane, followed by conversion to formal tracheostomy within 24-48 hours
This is a 'can't intubate, can't oxygenate' scenario — the definitive indication for emergency cricothyroidotomy. The cricothyroid membrane is identified by palpating the soft spot between the thyroid cartilage above and the cricoid below; a scalpel incision is made in the lower two-thirds of the membrane; a tracheal hook or haemostat dilates the opening; an endotracheal or tracheostomy tube is inserted. This procedure provides immediate, temporary airway access. It must be converted to a formal surgical tracheostomy at the 2nd-3rd tracheal ring within 24-48 hours to prevent pressure necrosis of the cricoid cartilage. Elective surgical tracheostomy in the operating theatre is inappropriate in this acute scenario — it takes too long to set up. Nasopharyngeal airway and bag-mask ventilation are unlikely to succeed with maxillofacial trauma and failed intubation.
Tracheostomy Technique and Tube Types
The surgical tracheostomy is a controlled procedure performed in the operating theatre under general anaesthesia (in most cases) or under local anaesthesia with sedation in patients for whom general anaesthesia carries unacceptable risk. The procedure involves careful dissection of the midline anterior neck to expose the trachea at the 2nd-3rd ring level, creation of a tracheal opening, and insertion of the tracheostomy tube. The steps of the procedure are defined and ordered, but they are also governed by two anatomical imperatives: every incision and every instrument must stay in the midline (to avoid the anterior jugular veins, the thyroid vasculature, and the carotid vessels laterally), and the tracheal incision must be at the correct level — the 2nd-3rd ring. Deviating from the midline causes haemorrhage; placing the tracheal opening at the wrong level causes subglottic stenosis (if too high, at the cricoid or 1st ring level) or risks the innominate artery (if too low). This is why the procedure demands careful anatomical identification before any incision is made into the trachea itself.
Step-by-step surgical tracheostomy:
1. Patient positioning: supine with a sandbag or shoulder roll under the upper back and lower neck to extend the neck, bringing the trachea anteriorly and making the anterior neck landmarks more prominent. The head must be in the midline to prevent vessel injury.
2. Skin incision: a horizontal (transverse) skin incision approximately 4-5 cm long, placed 1.5-2 cm below the lower border of the cricoid cartilage (approximately at the level of the 2nd tracheal ring). A vertical (longitudinal) incision may be used in emergencies — it is faster but produces a less cosmetically acceptable scar.
3. Dissection: using a combination of scissors, retractors, and diathermy, the subcutaneous fat and platysma are divided. The paired strap muscles (sternohyoid and sternothyroid) are separated along the midline raphe (a relatively avascular plane) and retracted laterally. The thyroid isthmus is identified and either retracted superiorly or divided between sutures to expose the 2nd-3rd tracheal ring.
4. Tracheal opening: stay sutures are placed on either side of the intended incision through the tracheal wall. The tracheal opening can be made as: an inferior-based flap (Bjork flap — a U-shaped flap from the 2nd-3rd ring, hinged inferiorly and sutured to the skin, making the stoma easy to reinsert in emergency); a simple vertical incision between two tracheal rings; or an excision of a small window of the 2nd-3rd ring. A hook is used to lift the trachea anteriorly. The anaesthetist is asked to retract the endotracheal tube to just above the incision before it is made.
5. Tube insertion: the tracheostomy tube (with the obturator/introducer inside) is inserted through the tracheal opening. The obturator — a solid, smooth introducer that occludes the lumen to allow smooth insertion — is immediately removed after the tube is placed (failure to remove the obturator is a critical error). The cuff, if present, is inflated. The tube is secured with tapes around the neck (tight enough for one finger under the tapes — too loose = accidental decannulation; too tight = venous congestion and skin necrosis).
Tracheostomy tube components and types:
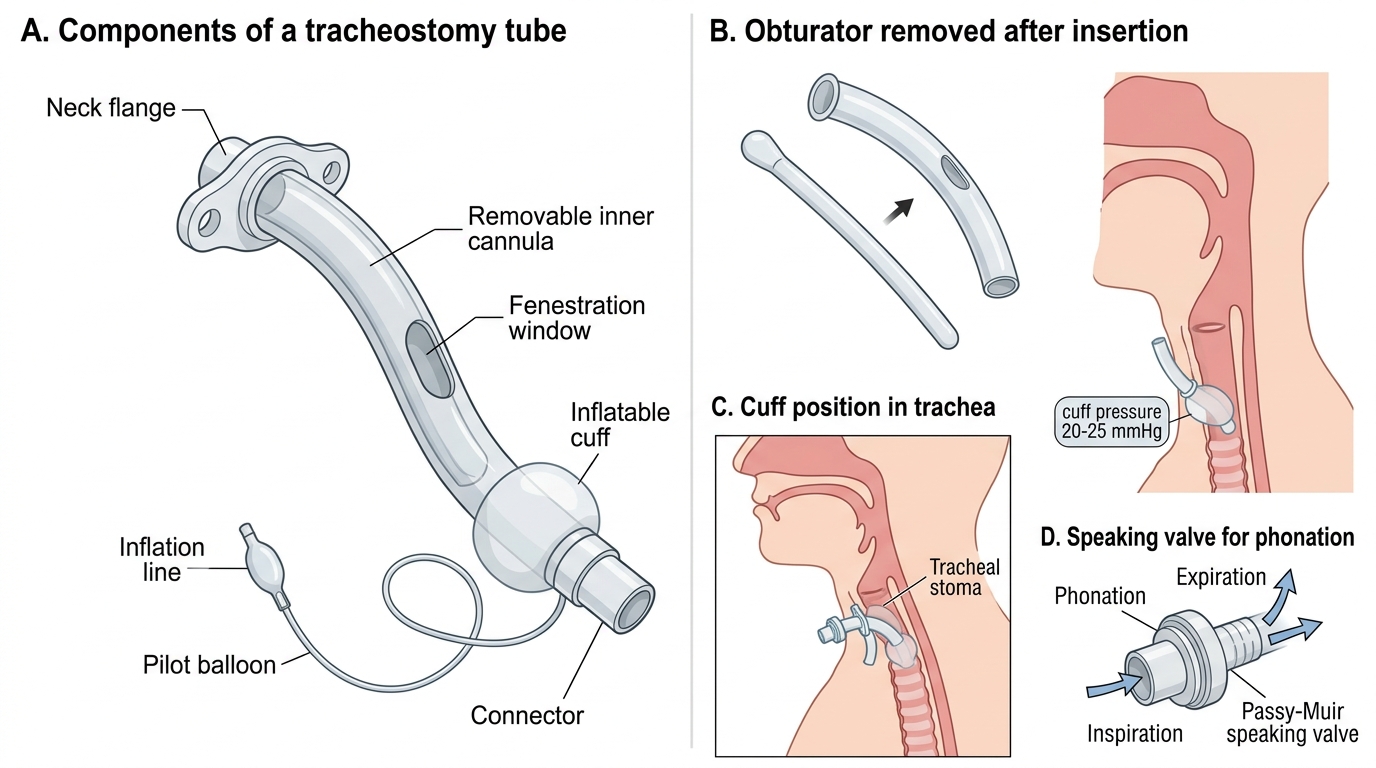
Components of a Tracheostomy Tube
All tracheostomy tubes have: an outer tube (the main tube that sits in the stoma); a removable inner tube (a cannula that fits within the outer tube and can be removed for cleaning without displacing the outer tube — this is the key safety feature); and an obturator (introducer, with a smooth rounded tip, which fills the lumen during insertion and is immediately removed after the tube is placed in the trachea).
Tube variants:
- Uncuffed tubes: no inflatable cuff around the outer tube; used for patients who are breathing spontaneously, can protect their own airway, and do not require positive pressure ventilation. Standard for long-term tracheostomy.
- Cuffed tubes: have an inflatable cuff that seals against the tracheal wall to prevent air leak around the tube (during positive pressure ventilation) and to reduce aspiration of secretions. The cuff must be maintained at 20-25 mmHg (15-20 cmH2O) to prevent tracheal mucosal ischaemia — above this pressure, the tracheal mucosa becomes ischaemic and may necrose, leading to tracheomalacia or a tracheo-innominate fistula.
- Fenestrated tubes: the outer tube has a window (fenestration) in its posterior wall; when the inner tube is removed and the stoma is capped, air can flow upward through the fenestration, through the glottis, and out through the mouth and nose — allowing the patient to phonate and facilitating weaning. Not suitable for patients at high aspiration risk.
- Speaking valve (Passy-Muir valve): a one-way valve that fits onto the outer tube opening; it opens during inspiration (allowing air in through the tube) and closes during expiration (forcing the exhaled air to pass upward through the trachea, through the glottis, and out of the mouth and nose). This allows phonation and swallowing coordination. The cuff MUST be completely deflated when using a speaking valve — if the cuff is inflated with the speaking valve in place, there is no route for exhaled air to escape and the patient will suffocate.
SELF-CHECK
A nurse calls you about a patient with a tracheostomy who has increasing respiratory distress and dropping SpO2. On examination, the tracheostomy tube appears to be in situ, but when you try to pass a suction catheter through it, you cannot advance the catheter beyond 3 cm. The inner tube is in place. The most appropriate immediate management is:
A. Administer nebulised adrenaline and call the ENT registrar urgently
B. Remove the inner tube, inspect it for secretions, clean it or replace it, and then pass the suction catheter through the outer tube
C. Deflate the cuff and attempt to breathe through the upper airway
D. Change the entire tracheostomy tube over a catheter introducer
Reveal Answer
Answer: B. Remove the inner tube, inspect it for secretions, clean it or replace it, and then pass the suction catheter through the outer tube
The clinical picture — respiratory distress with a tracheostomy in situ and inability to pass a suction catheter beyond 3 cm — indicates that the inner tube is blocked with inspissated secretions. The suction catheter cannot pass the blockage. The first and correct response is to remove the inner tube (it is designed to be easily removed without displacing the outer tube), inspect it for dried secretions, clean it with a brush and water or replace it with a clean spare inner tube, then pass the suction catheter through the outer tube. This is the core purpose of the two-tube design — the inner tube can be removed and cleaned at the bedside without disturbing the outer tube or the stoma. Changing the entire outer tube (a more complex procedure) is only required if the outer tube itself is displaced or damaged, or if the blockage cannot be cleared from the inner tube. Nebulised adrenaline and deflating the cuff do not address a mechanical tube blockage.