Page 17 of 42
PE23.9-11 | Gastrointestinal Procedures — SDL Guide
Learning Objectives
- Perform nasogastric (NG) tube insertion on a manikin following the standard paediatric technique
- Verify correct NG tube placement using aspiration and auscultation methods
- Perform intravenous (IV) cannulation on a model, selecting appropriate sites for paediatric patients
- Describe and demonstrate intraosseous (IO) access technique on a manikin
- Recognise indications, contraindications, and complications of each procedure
INSTRUCTIONS
Vascular access and tube feeding are among the most frequently performed emergency and critical-care procedures in paediatric practice. A child in severe dehydration or cardiac arrest who cannot be accessed intravenously may die within minutes if the clinician cannot secure IO access. Similarly, a malnourished child who cannot self-feed requires correct NG tube placement for life-saving nutritional rehabilitation. Mastery of these three procedural skills — NG tube insertion, IV cannulation, and IO access — is a mandatory competency before you manage acutely ill children unsupervised.
References
- Ghai Essential Pediatrics, 9th Ed, Ch 4 (procedures) (textbook)
- Nelson Textbook of Pediatrics, 21st Ed, Ch 71 (emergency procedures) (textbook)
- PALS (Paediatric Advanced Life Support) guidelines — AHA/IAP (guideline)
- WHO/UNICEF: Management of Severe Acute Malnutrition, 2007 (guideline)
Version 2.0 | NMC CBUC 2024
CLINICAL SCENARIO
It is 11 PM in a district hospital paediatric ward. A 14-month-old girl is brought in after 2 days of profuse watery diarrhoea and vomiting. She is lethargic, her eyes are deeply sunken, her skin turgor is severely reduced, and she is not drinking. She weighs 9 kg. You need to start a 20 mL/kg resuscitation bolus of Ringer's lactate immediately. Three attempts at peripheral IV access fail — her veins are collapsed from dehydration. The PALS-trained nurse looks at you: 'Should we go IO?' You have trained on a manikin but never performed an IO insertion on a live patient. What are your next steps, and what is the one anatomical landmark you must identify correctly to avoid the growth plate?
WHY THIS MATTERS
The three procedural skills in this module — NG tube insertion, IV cannulation, and intraosseous (IO) access — collectively represent the procedural safety net for a critically ill child. Peripheral IV access is the routine pathway for all parenteral therapy; when it fails, IO access becomes the only immediately life-saving alternative and is endorsed by PALS guidelines as first-line in cardiac arrest when IV access is not immediately achievable. NG tube insertion is essential for enteral nutrition in children who cannot self-feed — including children with severe acute malnutrition (SAM) being managed on F-75/F-100 therapeutic feeds — and for nasogastric administration of medications and oral rehydration fluids. Competence in these procedures directly determines patient outcomes: a child's survival in severe dehydration with circulatory collapse depends on your ability to secure vascular access within minutes.
RECALL
Before studying these procedures, ensure you recall the following foundation concepts. The Holliday-Segar formula for maintenance fluids: 100 mL/kg/day for the first 10 kg, 50 mL/kg/day for the next 10 kg, and 20 mL/kg/day for each additional kilogram — so a 20 kg child needs 1,500 mL/day. The standard emergency fluid bolus for severe dehydration is 20 mL/kg of Ringer's lactate IV or IO, to be given over 15–30 minutes, repeated as needed with reassessment. Recall the IMNCI classification of dehydration severity (no / some / severe). The normal paediatric IV fluid choice for maintenance is 0.9% NaCl + dextrose or Ringer's lactate — not hypotonic solutions in acute illness. For NG tube nutrition in SAM, starter F-75 at 100 mL/kg/day is given for days 1–7 before transitioning to F-100. Recall that confirmation of NG tube placement requires verification before every feed — never assume correct placement from the previous insertion.
Clinical Indications and Relevance
Each of the three procedures serves a distinct but complementary clinical purpose in the spectrum of paediatric care — from scheduled nutritional support to emergency resuscitation. Recognising which procedure is indicated in a given clinical scenario is the first practical skill you must develop, because deploying the wrong tool wastes critical time.
Nasogastric (NG) tube insertion is indicated when a child cannot or should not feed by mouth but the gut is functional. Key indications include: (1) severe acute malnutrition with poor appetite or inability to drink therapeutic feeds; (2) altered consciousness or encephalopathy where aspiration risk prevents oral feeding; (3) postoperative patients before oral intake is established; (4) administration of medications in a child who cannot swallow; and (5) therapeutic suctioning for bowel obstruction or post-surgical ileus. Contraindications to NG insertion include suspected basal skull fracture (use OG route instead), severe facial trauma, oesophageal obstruction, and recent oesophageal surgery.
Intravenous (IV) cannulation is the standard route for all parenteral fluid therapy, blood products, medications, and intravenous nutrition. In a ward or clinic setting, IV access is routinely established in any child requiring parenteral therapy. In emergencies (severe dehydration, septic shock, resuscitation), establishing IV access rapidly is the clinical priority. The challenge in paediatrics is that peripheral veins are small, collapse during circulatory shock, and move — making cannulation technically demanding.
Intraosseous (IO) access provides emergency vascular access when IV access cannot be established rapidly. The marrow cavity of long bones communicates directly with the central venous circulation via emissary veins and can accept any drug or fluid that can be given intravenously. PALS guidelines recommend IO access when 2 IV attempts fail or when 90 seconds have elapsed in cardiac arrest without IV access. IO access should not be delayed out of discomfort — in a child in cardiac arrest or severe shock, it is as effective as central venous access and far faster.
| Procedure | Primary indication | Emergency threshold | Key contraindication |
|---|---|---|---|
| NG tube | Unable/unsafe to feed orally | Immediate in severe SAM | Basal skull fracture, oesophageal obstruction |
| IV cannulation | Parenteral therapy in ward/emergency | First attempt in all emergencies | Local infection at site |
| IO access | Emergency vascular access | After 2 IV fails or 90 sec in arrest | Fracture at same bone, previous IO at same site <24 h |
NG Tube Anatomy: Nasopharyngeal Route and NEX Measurement
Anatomy and Governing Principles
A sound understanding of the relevant anatomy prevents the most common procedural complications and guides the correct technique for each intervention.
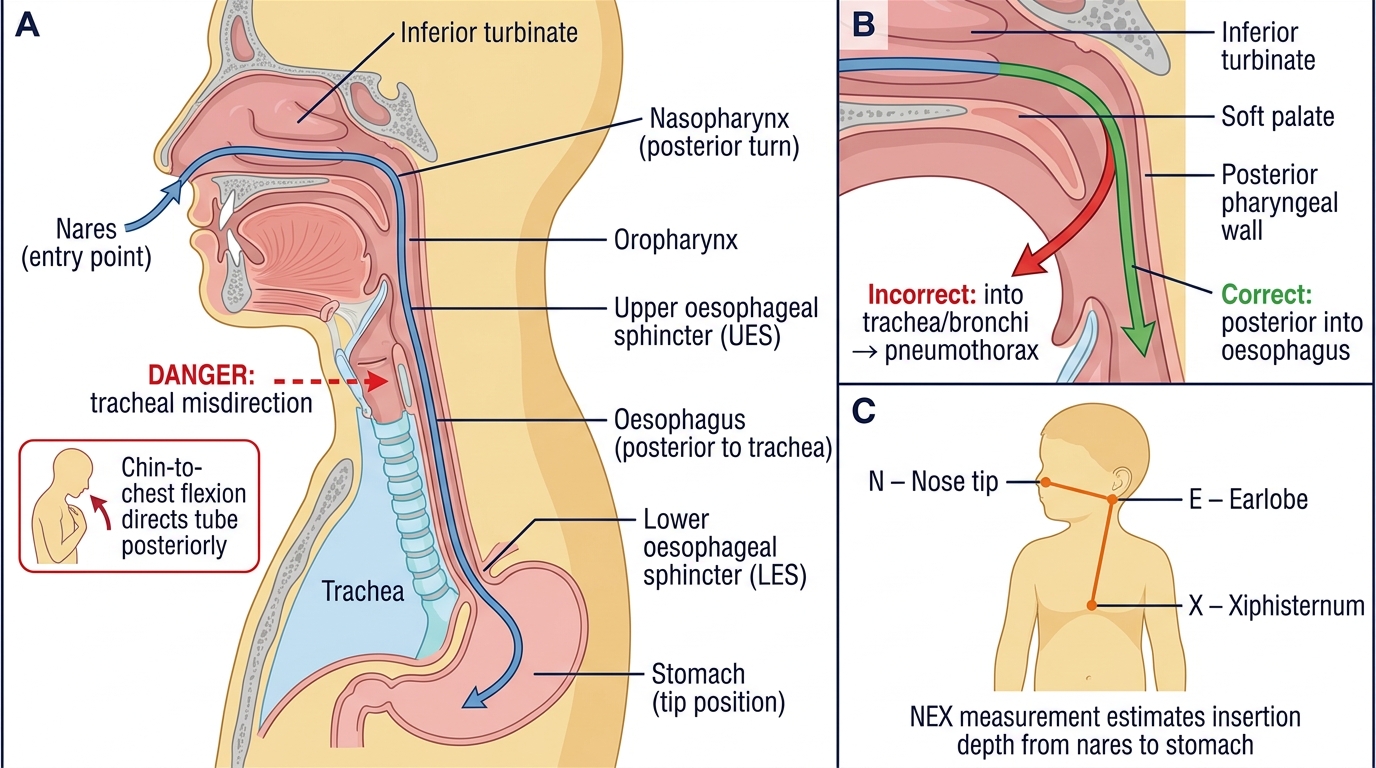
NG tube anatomy: The nasopharyngeal route passes from the nares through the inferior turbinate, the nasopharynx (a right-angled turn posteriorly), down the posterior oropharynx, through the upper oesophageal sphincter, along the oesophagus (posterior to the trachea), and through the lower oesophageal sphincter into the stomach. The key anatomical danger is the trachea: if the tube is misdirected anteriorly instead of posteriorly at the nasopharyngeal turn, it enters the trachea and bronchi, causing respiratory distress or pneumothorax. Flexing the neck (chin to chest) during insertion helps direct the tube posteriorly. The correct depth is estimated by the NEX (Nose-Ear-Xiphoid) measurement: the distance from the tip of the nose to the earlobe to the xiphisternum, which approximates the distance from nares to the stomach.
IV cannulation anatomy: In children, the most accessible peripheral veins are the dorsum of the hand (dorsal metacarpal veins), the antecubital fossa (median cubital vein), the dorsum of the foot (dorsal venous arch), the saphenous vein at the medial ankle, and scalp veins in neonates and young infants (frontal, parietal, temporal veins — note that blood flows TOWARD the heart in scalp veins so the needle must be directed proximally as usual). Veins feel like a soft cord under the skin, compressible on pressure. In shock, veins collapse and are harder to palpate — using a tourniquet, warm compresses, or transillumination (in neonates) helps. The governing principle: advance the needle at 10–15° to the skin, feel the 'give' as you enter the lumen, then lower the angle and advance the cannula while withdrawing the needle.
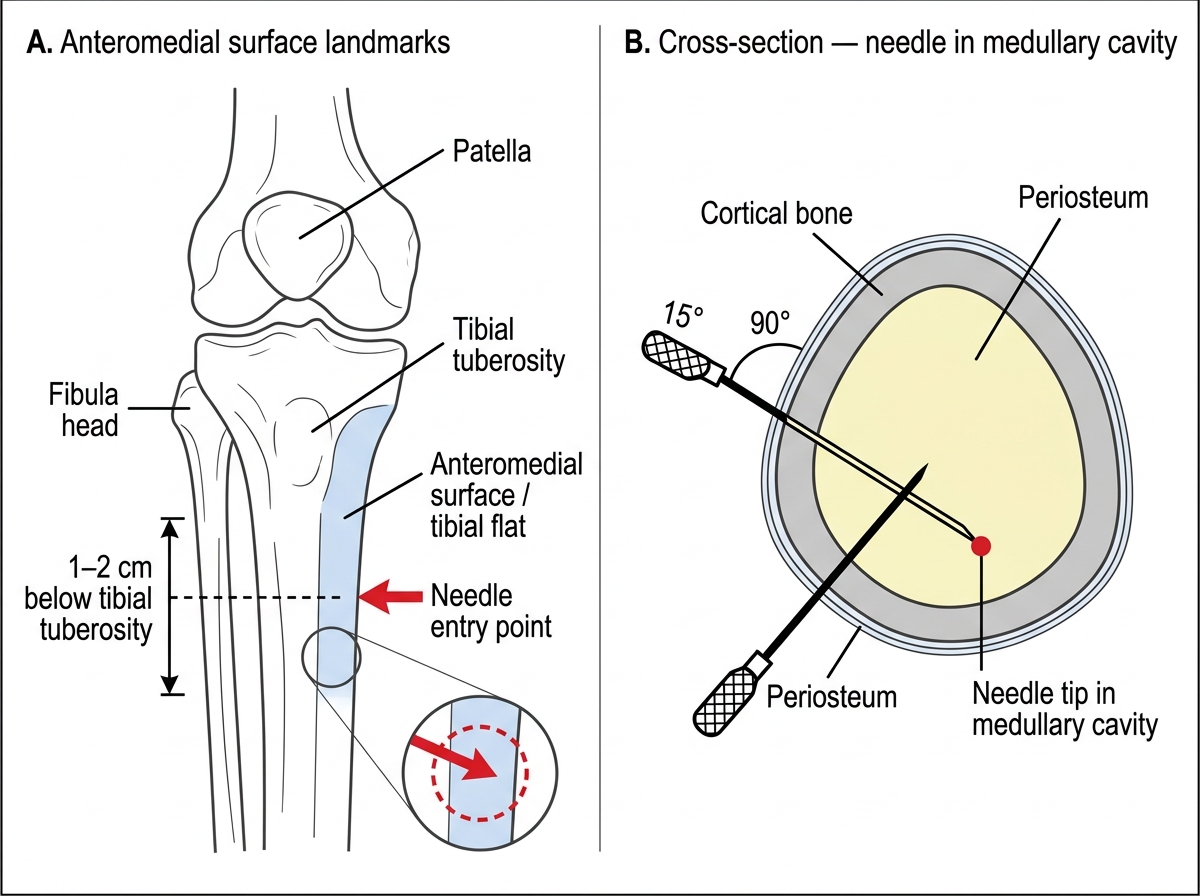
IO access anatomy: The preferred site in children is the proximal tibia, specifically the anteromedial flat surface of the tibia, 1–2 cm below the tibial tuberosity (the bony prominence just below the kneecap). This site is away from the growth plate (epiphyseal plate), which is located at the tibial head superiorly — inserting above the tuberosity risks growth plate injury. The tibial cortex is thin in children (1–2 mm), allowing easy penetration. The medullary cavity connects to the systemic venous circulation; drugs and fluids infused into the marrow pass directly into the systemic circulation with pharmacokinetics similar to central venous administration. Alternative IO sites include the distal femur, distal tibia, and humeral head.
Intraosseous Access Site — Proximal Tibia
SELF-CHECK
During NG tube insertion in a 3-year-old, you estimate the tube depth using the NEX measurement and get 22 cm. After insertion to this depth, aspiration yields a clear fluid with pH of 8. What is the most likely problem and what should you do?
A. The tube is correctly placed in the stomach — pH 8 is normal for gastric contents
B. The tube may be in the trachea or oesophagus — withdraw, confirm placement by re-aspiration or auscultation before use
C. The tube is in the duodenum — pull back 3 cm and re-verify
D. pH 8 fluid confirms intestinal placement — proceed with tube feeding
Reveal Answer
Answer: B. The tube may be in the trachea or oesophagus — withdraw, confirm placement by re-aspiration or auscultation before use
Gastric contents should have a pH of 5 or less (typically 1–4). A pH of 8 suggests the tube tip is NOT in the stomach — it may be in the trachea/bronchi (respiratory secretions are alkaline) or in the lower oesophagus. The tube must be withdrawn, repositioned, and placement re-verified before any feed is administered. Never administer feeds through an unverified NG tube — respiratory aspiration of feeds can be fatal.
Procedure and Technique
Consistent technique across all three procedures reduces complications and builds the procedural memory that allows you to perform under pressure in emergencies. Each procedure below is presented as a numbered step sequence designed for manikin practice; the physical sensations described — the 'give' of IO cortex penetration, the 'flashback' of blood in an IV cannula hub, the sound of air over the epigastrium during NG verification — are the confirmatory cues you must learn to recognise and trust. Practise these steps until they become automatic, because the stressed brain in a real emergency defaults to procedural memory rather than conscious deliberation. The following standard sequences should be practised verbatim on manikins before adapting them to individual patient anatomy under supervision.
Consistent technique across all three procedures reduces complications and builds the procedural memory that allows you to perform under pressure in emergencies. The following stepwise approach is designed for manikin practice and applies directly to supervised clinical practice.
NG tube insertion — step by step:
1. Prepare equipment: NG tube of appropriate size (Fr = age/2 + 12, or refer to age-based chart — a common approximation: Fr 6–8 for infants, Fr 8–10 for toddlers, Fr 10–12 for school-age children), 10 mL syringe, pH paper, hypoallergenic tape, lubricant, gloves.
2. Measure the tube: with the child upright or semi-reclined, measure from the tip of the nose → earlobe → xiphisternum (NEX measurement) and mark this length on the tube with tape.
3. Position the child: for cooperative children, head slightly flexed (chin toward chest — facilitates posterior passage). For infants, have an assistant hold the head in neutral or slight flexion.
4. Lubricate and insert: lubricate the tube tip with water-soluble gel. Insert gently through the more patent nostril, directing the tube straight back (not upward — the floor of the nose is horizontal). When the tube reaches the nasopharynx, ask the child to swallow (or give a sip of water if safe) and advance during swallowing. Advance smoothly to the marked depth.
5. Verify placement: (a) Aspirate gastric contents with a 10 mL syringe — pH should be ≤5 on pH paper. (b) Auscultate over the epigastrium while injecting 5–10 mL of air — a gurgling sound is heard. X-ray is the gold-standard but not required for routine placement if aspiration confirms pH ≤5.
6. Fix the tube: secure with hypoallergenic tape to the nose and cheek. Document the tube size, insertion depth, and verification method.
IV cannulation — step by step:
1. Site and size: choose a vein by inspection and palpation. For most children, the dorsum of the hand is first choice; for critically ill children in shock, antecubital or saphenous access may be larger. Cannula size: 24G for neonates/small infants, 22G for children, 20G for older children and adolescents.
2. Prepare: apply tourniquet 5–7 cm above the site. Clean with chlorhexidine swab, allow to dry. Distract the child (parental presence, play, sucrose in neonates).
3. Insert: hold the skin taut. Insert the cannula at 10–15° to the skin, bevel up. A 'flashback' of blood into the cannula hub confirms entry into the vein. Lower the needle angle to 5°, advance the cannula 1–2 mm further into the lumen, then advance the plastic cannula off the needle while withdrawing the needle.
4. Verify and secure: release the tourniquet. Flush with 0.9% saline — smooth, painless flush with no swelling confirms intravascular placement. Secure with transparent dressing and tape.
5. Document: site, cannula gauge, flush result, date and time.
IO access — step by step:
1. Equipment: EZ-IO drill system (preferred) or Jamshidi manual IO needle; 10 mL syringe; 0.9% saline for flush; local anaesthetic if child is conscious (1% lignocaine 0.5 mL locally over the insertion site).
2. Landmark: identify the tibial tuberosity (bony bump below the kneecap). Move 1–2 cm below and slightly medial onto the flat anteromedial surface of the tibia. This is the insertion point. Flex the knee slightly and stabilise the leg.
3. Insert: hold the EZ-IO drill perpendicular to the bone surface (90°). Drill through the cortex with gentle downward pressure — you will feel a 'give' as the cortex is breached and the needle enters the marrow cavity. A loss of resistance indicates correct placement.
4. Verify: (a) the needle stands upright without support; (b) aspiration of marrow (if possible — not always possible); (c) flush 10 mL of 0.9% saline freely without swelling — if saline infuses easily and there is no extravasation, the needle is correctly placed.
5. Administer: connect IV tubing. All IV drugs and fluids can be administered via IO; manual pressure or an infusion pump may be needed to push fluids through the marrow against resistance.
6. Remove within 24 hours: IO access is temporary — remove as soon as IV access is established (maximum 24 hours) to prevent osteomyelitis.

NG Tube Insertion in a Child — Step-by-Step Procedure
CLINICAL PEARL
The 'give' feeling in IO insertion is your most reliable feedback. When you drill through the tibial cortex with an EZ-IO, the sudden loss of resistance as the needle tip enters the marrow cavity is tactile and unmistakable on a manikin — practise feeling it repeatedly so you recognise it in a live patient under stress. The second confirmatory sign is that the needle stands upright unsupported in the marrow. If saline flushes without swelling and the child's condition begins to improve after a fluid bolus, your IO is working. Conversely, if you see progressive swelling around the insertion site during infusion (extravasation into soft tissue), the needle has not penetrated the cortex properly — remove, reassess the landmark, and retry. Common IO mistakes: (1) inserting too high (above the tibial tuberosity) — risks the growth plate; (2) inserting on the medial side of the tibia too far posteriorly (soft tissue, not bone); (3) inadequate pressure during drilling (the cortex is not penetrated). For IV cannulation in a collapsed infant: use a warm compress for 1–2 minutes over the dorsum of the hand, place the arm in a dependent position, and transilluminate with a bright torch in a dark room — this reveals scalp and dorsal hand veins in neonates that are invisible to the naked eye.