Page 26 of 34
PE26.{10-15,17} | Hemato-Oncology Examination and Investigations — SDL Guide (Part 2)
Procedure and Technique: Peripheral Blood Smear Preparation and Reading
The peripheral blood smear remains the most informative and cost-accessible haematological investigation in any setting. Proficiency requires mastery of both preparation and systematic interpretation. Errors in technique — too thick a film, too thin a spread, uneven or over-stained preparation — make morphological interpretation impossible and lead to missed diagnoses, including the catastrophic missed diagnosis of blast cells. Understanding why each step of the preparation is performed the way it is — the angle of the spreader, the phosphate buffer pH, the exact staining time — allows you to troubleshoot failures in field conditions and to judge the quality of a smear before committing your interpretation to the clinical record. A poorly prepared smear should be rejected and repeated; acting on a technically unacceptable smear is clinically dangerous. The Leishman stain method described here is the Indian standard for routine haematology and is universally available; the May-Grünwald-Giemsa (MGG) technique used in some referral centres provides superior detail for blast morphology but requires the same underlying smear quality.
Smear preparation (Leishman stain method):
1. Place a small drop (~4 µL) of EDTA-anticoagulated blood 1 cm from the frosted end of a clean glass slide.
2. Place a spreader slide at a 30–45° angle, draw it back to touch the drop, wait for the blood to spread along the edge by capillary action, then push forward smoothly in one motion.
3. A well-made smear has a feathered edge — cells are single-layered and evenly spread. Too steep an angle → thin film with artefactually small cells; too shallow → thick film with cell overlap.
4. Air-dry completely (1–2 minutes), then flood with Leishman stain for 1 minute, add equal volume of phosphate buffer (pH 6.8), mix by blowing gently, leave for 10–15 minutes, wash with buffer, and air-dry upright.
5. The result should show purple-stained leukocyte nuclei and pink/orange erythrocyte cytoplasm.
Systematic reading protocol:
- Low power (10×): assess cellularity, platelet clumping (artefact that causes falsely low platelet count), gross morphological patterns.
- High-dry (40×): red cell morphology (size, colour, shape, inclusions), WBC differential (count 100 cells).
- Oil immersion (100×): blast morphology, nuclear details, parasites, Howell-Jolly bodies.
- Zone: read in the zone where cells are single-layered, approximately 2/3 from the thick end.
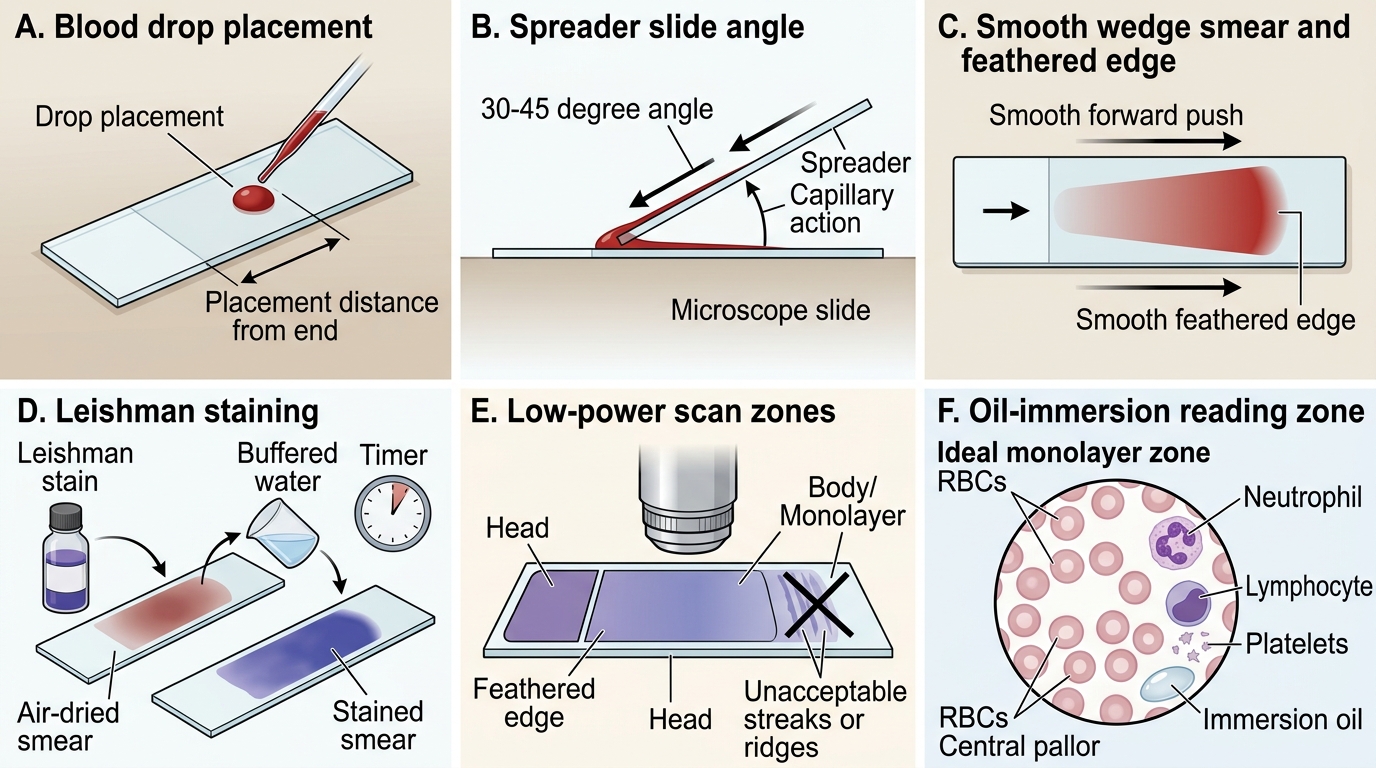
Peripheral Blood Smear Preparation and Reading Zones
Procedure and Technique: Bone Marrow Aspiration
Bone marrow aspiration (BMA) is a procedure performed by a trained clinician to obtain a marrow sample for morphological examination when the peripheral smear or clinical picture suggests a primary haematological disorder that cannot be diagnosed from peripheral blood alone. The bone marrow is where haematopoiesis occurs; examining marrow morphology directly reveals disorders of cell production — aplastic anaemia (empty marrow with fat cells), leukaemia (replacement by blasts), megaloblastic anaemia (giant metamyelocytes and dyspoiesis), and storage disorders (Gaucher cells, sea-blue histiocytes). Unlike a peripheral smear, which samples only the circulating cells that have survived marrow release, a marrow aspirate provides a window into the cellularity, maturation sequence, and infiltrating pathology of the bone marrow itself. As a final-year student, you must be able to perform this on a manikin, explain every step to a patient's family, and immediately recognise the indications and aftercare requirements. In Indian paediatric haematology centres, BMA under conscious sedation is the standard approach for children, and familiarity with the technique is a CBME competency (PE26.14 level: SH = supervised hands-on on manikin).
Indications for BMA in paediatric practice:
• Unexplained anaemia with abnormal RBC morphology not attributable to IDA or megaloblastic causes
• Suspected acute leukaemia (blast cells on peripheral smear, pancytopenia)
• Thrombocytopenia with suspected aplastic anaemia or infiltrative process
• Fever of unknown origin with organomegaly (to exclude haematological malignancy or storage disorder)
• Staging of lymphoma or neuroblastoma
• Confirmation of haematological response to therapy
Technique (on manikin — PSIS site, child >18 months):
1. Position: lateral decubent (child lies on side), knee-chest position to open up the posterior iliac area.
2. Surface anatomy: identify the posterior superior iliac spine (PSIS) — the bony prominence at the base of the spine, 2 cm medial and 2 cm superior to the gluteal cleft.
3. Aseptic preparation: clean with povidone-iodine, allow to dry, drape.
4. Anaesthesia: local anaesthetic (1% lignocaine, weight-based dose) to periosteum under conscious sedation (procedural sedation with ketamine or midazolam in children).
5. Needle insertion: use a Salah or Jamshidi needle. Advance with a firm rotary motion through the cortex until a 'give' is felt (loss of resistance = entry into marrow cavity). Fix the needle firmly in bone.
6. Aspiration: attach 10–20 mL syringe, aspirate rapidly (sharp suction, ≤0.5 mL to prevent dilution with peripheral blood — dilution is the most common technical error).
7. Smear immediately: expel marrow onto glass slides, make push smears, air-dry, and stain (Leishman, May-Grünwald-Giemsa).
8. Post-procedure: apply firm pressure for 5 minutes, sterile dressing, monitor vital signs. Normal activity resumes in 24 hours; assess for bleeding, infection, haematoma.
Anterior tibial site (infants <18 months): needle inserted perpendicular to the flat medial surface of the tibia, 1–2 cm below the tibial tuberosity; identical aspiration and smear technique.

Pediatric Bone Marrow Aspiration Sites
SELF-CHECK
A 4-year-old child is brought with pallor and a non-tender left flank mass. On examination, the spleen tip is palpable 6 cm below the left costal margin. Which of the following best describes the correct initial step in spleen examination?
A. Begin palpation from the left costal margin and move inferiorly
B. Begin percussion of Traube's space, then start palpation from the right iliac fossa moving toward the left costal margin
C. Place the right hand directly over the left upper quadrant and apply firm pressure
D. Elicit shifting dullness before assessing the spleen
Reveal Answer
Answer: B. Begin percussion of Traube's space, then start palpation from the right iliac fossa moving toward the left costal margin
The correct technique begins with percussion of Traube's space (obliteration indicates splenomegaly even before palpation), followed by starting palpation from the right iliac fossa and moving diagonally toward the left costal margin with each breath. Beginning from the costal margin risks missing a massive spleen that extends far into the abdomen. Shifting dullness assesses free fluid (ascites), not organomegaly.
Interpretation of Findings: CBC, RBC Indices, and Coagulation Profile
Interpreting a complete blood count (CBC) correctly requires applying age-appropriate reference ranges, because paediatric normal values differ substantially from adult values and even vary by age group within childhood. Applying adult cut-offs to a neonate or toddler produces systematic misclassification that can result in either unnecessary investigation of a normal finding or, more dangerously, a missed diagnosis of true pathology. The CBC is not a single test — it is a panel of measurements (haemoglobin, haematocrit, RBC count, WBC count with differential, platelet count) combined with calculated indices (MCV, MCH, MCHC, RDW) that together characterise the three haematopoietic lineages. Reading a CBC intelligently means working through each component systematically rather than looking only at the flagged abnormal values: a laboratory flag on haemoglobin alone without examining the MCV, RDW, and reticulocyte count gives you the diagnosis of anaemia but not its cause. The WHO and IAP define anaemia as haemoglobin <11 g/dL in children 6 months to 5 years; <11.5 g/dL in children 5–12 years; and <12 g/dL in children 12–14 years. Neonates have physiologically elevated haemoglobin (16–18 g/dL at birth) which declines to a physiological nadir of approximately 9–11 g/dL at 8–12 weeks (earlier and lower in premature infants); haemoglobin values below 8 g/dL outside the expected nadir window are pathological and require investigation.
Provided image
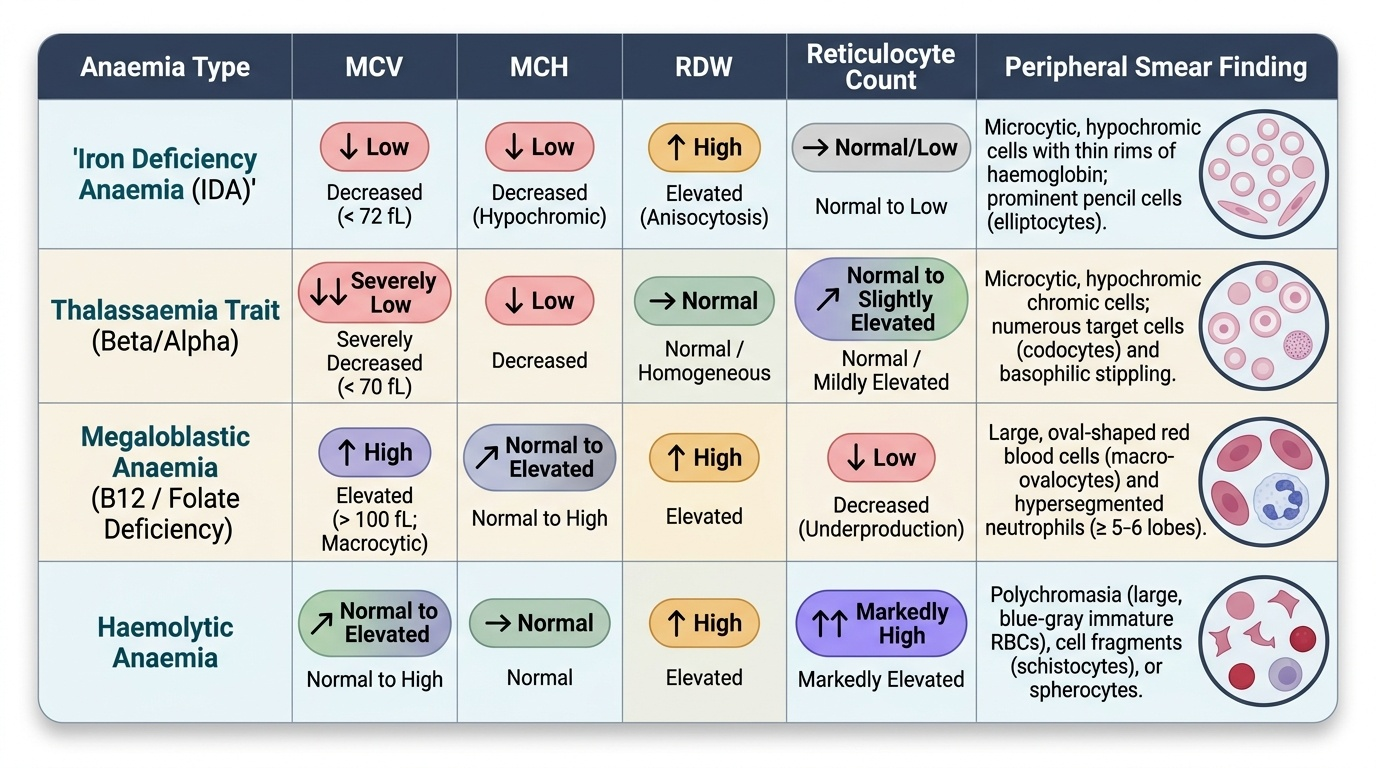
RBC indices and their diagnostic significance:
- MCV (mean corpuscular volume): <72 fL = microcytic (IDA, thalassaemia, anaemia of chronic disease); 72–100 fL = normocytic (haemolysis, blood loss, aplasia); >100 fL = macrocytic (megaloblastic, liver disease, hypothyroidism). Note: MCV normal range is age-adjusted — an MCV of 70 fL is borderline microcytic in a 5-year-old but not in a neonate.
- MCH: mirrors MCV; low MCH = hypochromic cell.
- MCHC: low in IDA and thalassaemia; elevated in hereditary spherocytosis (densely haemoglobinised spherocytes).
- RDW (red cell distribution width): elevated (>14.5%) = anisocytosis. High RDW + low MCV = IDA (marked anisocytosis). Normal RDW + low MCV = thalassaemia trait (uniform microcytosis, little anisocytosis). This IDA vs thalassaemia trait distinction via RDW is a high-yield diagnostic pearl.
- Reticulocyte count: normal 0.5–2% in children. Elevated reticulocytes + anaemia = regenerative (haemolysis, haemorrhage). Low reticulocytes + anaemia = hypoproliferative (aplastic anaemia, leukaemia infiltrating marrow, nutritional deficiency).
Leukocyte and platelet interpretation:
- TLC >50,000/µL in a child with anaemia and splenomegaly raises the suspicion of leukaemia — look for blasts on the smear.
- Pancytopenia (low Hb + low TLC + low platelets) = aplastic anaemia, leukaemia, or megaloblastic anaemia.
- Thrombocytopenia: platelets <150,000/µL; severe <20,000/µL (risk of spontaneous haemorrhage — intracranial bleed is the feared complication).
Coagulation profile (PT/aPTT interpretation):
- PT (prothrombin time)/INR tests the extrinsic and common pathway (factors VII, X, V, II, fibrinogen). Prolonged PT + normal aPTT = factor VII deficiency or early liver disease.
- aPTT tests the intrinsic and common pathway (factors XII, XI, IX, VIII, X, V, II, fibrinogen). Prolonged aPTT + normal PT = haemophilia A (factor VIII) or haemophilia B (factor IX) or vWD type 1.
- Both prolonged = common pathway defect (DIC, liver failure, severe vitamin K deficiency).
- LFT interpretation: in haematological disease, elevated bilirubin (indirect/unconjugated) + normal transaminases = haemolysis; elevated transaminases = hepatocellular disease from iron overload (thalassaemia major) or leukaemia infiltration.
| Age group | Hb (g/dL) | MCV (fL) | TLC (×10³/µL) | Platelets (×10³/µL) |
|---|---|---|---|---|
| Neonate (term) | 14–20 | 95–121 | 9–30 | 150–400 |
| 2–6 months | 9.5–13.5 | 70–86 | 6–17.5 | 150–400 |
| 6 mo–5 yr | 11–14 | 72–86 | 6–17 | 150–400 |
| 5–12 yr | 11.5–15 | 76–90 | 4.5–13 | 150–400 |
| 12–14 yr | 12–16 | 78–95 | 4.5–13 | 150–400 |