Page 5 of 20
AS4.2 | Airway Anatomy Relevant to General Anaesthesia — SDL Guide
CLINICAL SCENARIO
A patient under general anaesthesia cannot breathe for themselves. The anaesthesiologist stands between the patient and death by asphyxiation — and every intervention they perform depends on precise anatomical knowledge. When a laryngoscope blade is inserted, the anaesthesiologist must know exactly which structures will be encountered, in what order, and at what depth. When airway management fails — the feared 'cannot intubate, cannot oxygenate' scenario — the correct emergency surgical rescue depends on knowing exactly where the cricothyroid membrane lies and how it relates to the surrounding cartilages. Airway anatomy is not background knowledge for anaesthesia: it is the blueprint for every action taken to maintain a patient's life.
WHY THIS MATTERS
AS4.2 requires you to describe the anatomy of the airway and its implications for general anaesthesia. This is a foundational SDL: the anatomical structures you learn here directly underpin the procedural SDL on airway management and induction (AS4.3–4.5). Without a clear mental map of the upper airway — from nasal cavity to trachea — you cannot understand why the sniffing position aligns the axes for laryngoscopy, why children are at greater risk of laryngospasm, or why a tumour at the base of the tongue changes your entire intubation strategy. Clinical anaesthesia is applied anatomy.
RECALL
Recall from your anatomy studies: (1) the bony and cartilaginous skeleton of the larynx — thyroid cartilage, cricoid cartilage, arytenoids; (2) the distinction between the upper airway (nose/mouth → laryngopharynx) and the lower airway (trachea → bronchi); (3) the concept of the three axes of the airway — oral, pharyngeal, and laryngeal — and how they relate to intubation; (4) the vocal folds (true cords) are located at the level of the glottis; (5) the cricothyroid membrane lies between the thyroid and cricoid cartilages and is the site for emergency surgical airway access.
Orientation: The Airway as a Clinical Structure
The airway is conventionally divided into the upper airway (from the nasal and oral openings to the larynx) and the lower airway (larynx, trachea, and bronchial tree). In the context of anaesthesia, the clinically relevant zone extends from the nares and lips down to the carina, because all airway management manoeuvres — mask ventilation, supraglottic airway insertion, direct or video laryngoscopy, endotracheal intubation, and surgical airway — intervene somewhere along this corridor. The goal of all these manoeuvres is the same: to establish and maintain a patent, protected conduit for gas exchange, allowing the anaesthesiologist to deliver oxygen and anaesthetic vapour to the alveoli and remove carbon dioxide.
The clinical significance of each anatomical structure is best understood through three lenses: (a) patency — what maintains the airway open versus what causes obstruction; (b) protection — what prevents aspiration of gastric contents into the tracheobronchial tree; and (c) access — where, geometrically, an instrument must be positioned to visualise or enter the airway. Each anatomical region below is discussed with these three considerations in mind.
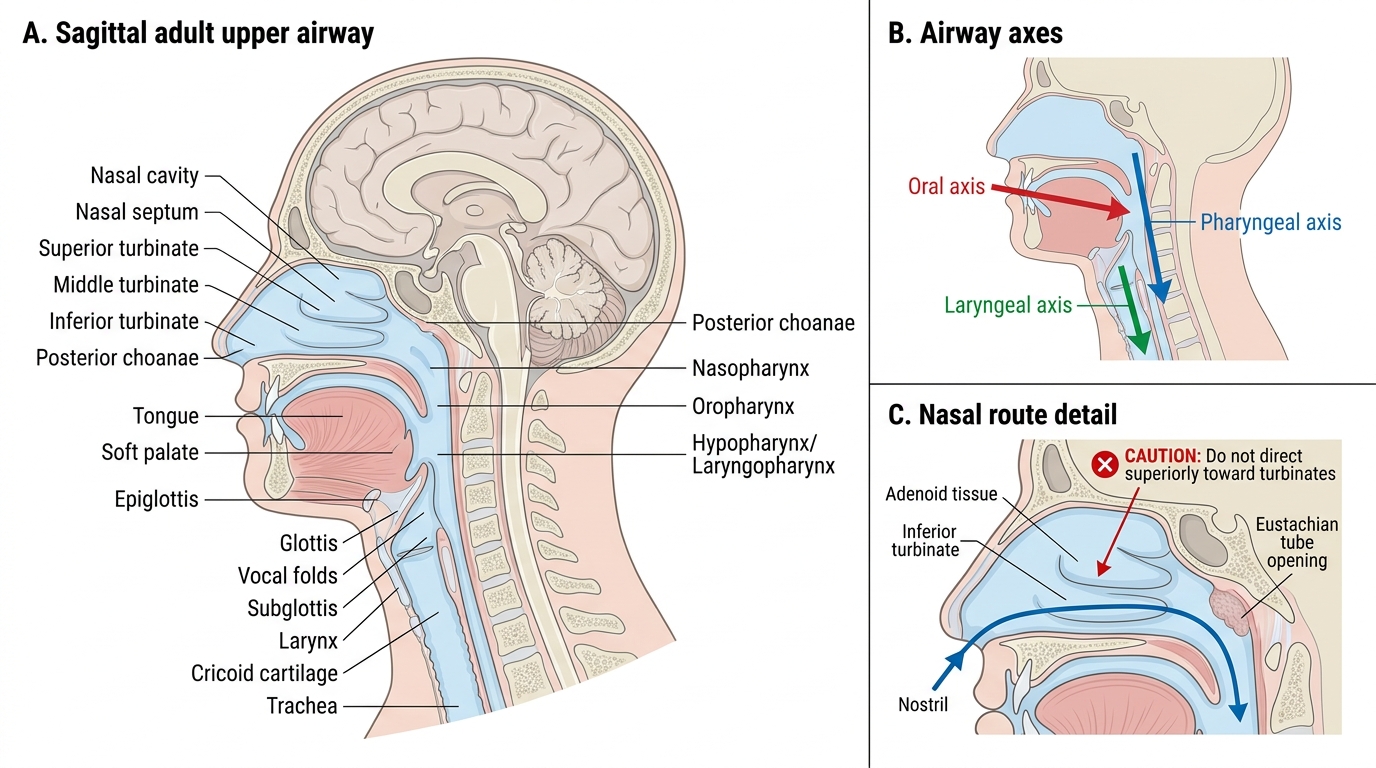
Adult Upper Airway Anatomy and Airway Axes
Nasal Cavity and Nasopharynx
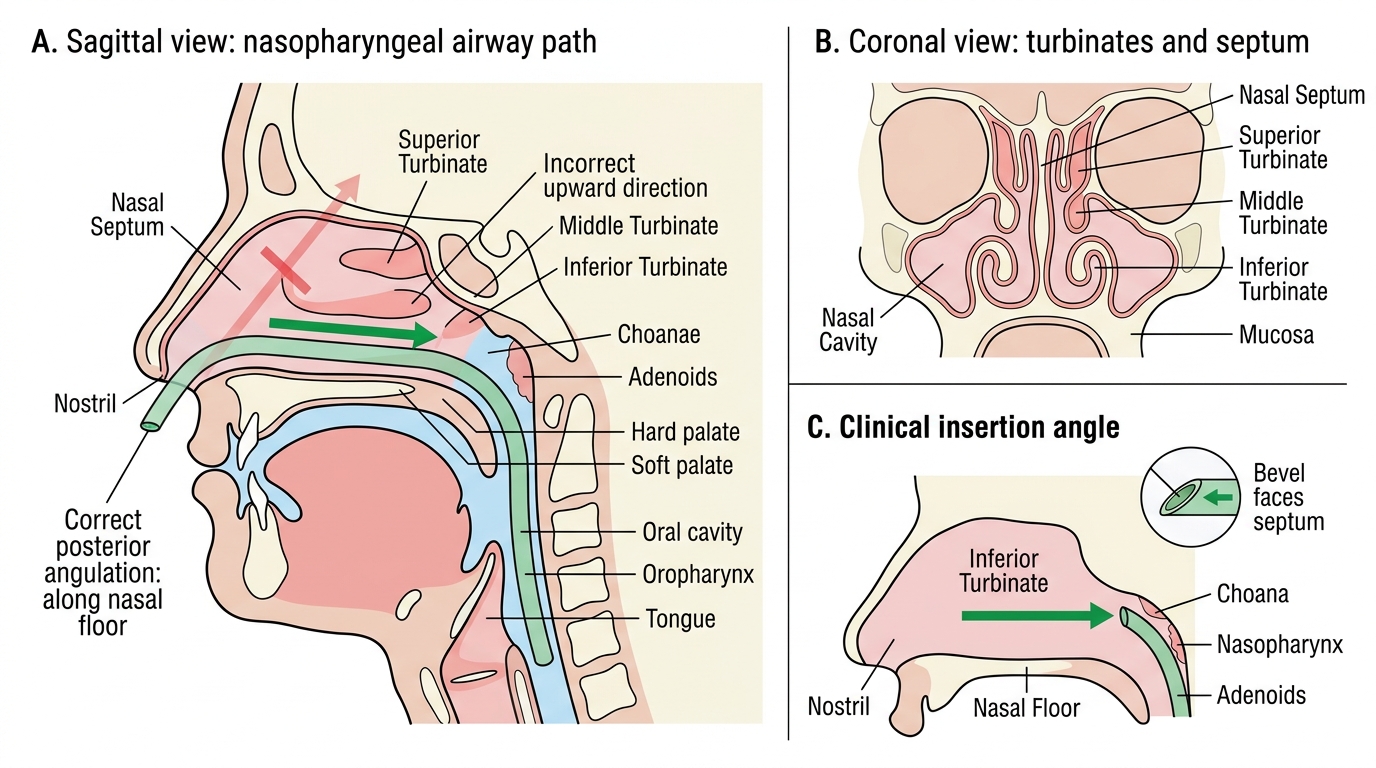
The nasal cavity extends from the anterior nares to the posterior choanae and is divided by the nasal septum into two passages. The lateral walls bear three pairs of turbinates (superior, middle, and inferior) — scroll-shaped bony projections covered by vascular mucosa that warm, humidify, and filter inspired air. From an anaesthetic perspective, the inferior turbinate is the most clinically important structure in the nasal route: it lies at the floor of the nasal cavity and is immediately adjacent to the path of a nasopharyngeal airway or nasotracheal tube. Traumatic insertion without adequate lubrication and correct angulation (directed posteriorly along the floor of the nose, NOT superiorly toward the turbinates) causes haemorrhage from the rich submucosal vascular plexus.
The nasopharynx lies posterior to the nasal cavity and communicates with it through the posterior choanae. It contains the adenoid tissue (pharyngeal tonsil) on its posterior wall — hypertrophied adenoids in children can cause significant nasopharyngeal obstruction, making nasal airway instrumentation difficult and sometimes impossible. The Eustachian tube opens into the lateral wall of the nasopharynx — middle ear pressure changes during anaesthesia can cause barotrauma if the tube is obstructed (a consideration with nitrous oxide, which expands air-filled cavities).
Nasal Cavity Anatomy and Nasopharyngeal Airway Insertion
Oral Cavity, Oropharynx, and the Mallampati Classification
The oral cavity extends from the lips to the oropharynx. Its relevant structures for anaesthesia include the tongue (the most common cause of upper airway obstruction in the unconscious patient, as muscle tone is lost under anaesthesia and the tongue falls posteriorly to occlude the oropharynx), the teeth (loose or capped teeth are at risk during laryngoscopy; dental damage is the most common anaesthesia-related litigation claim), and the hard and soft palate (the soft palate separating the nasopharynx from the oropharynx). The distance from the upper incisors to the glottis — the oropharyngeal distance — determines how much space exists for laryngoscope insertion and endotracheal tube passage. A small mouth (inter-incisor distance <3 cm) limits laryngoscope blade insertion and worsens the laryngoscopic view.
The Mallampati classification (I–IV) assesses the oropharyngeal view with the patient seated, mouth fully open, and tongue protruded — without phonation:
- Class I: entire soft palate, fauces, uvula, and both tonsillar pillars visible
- Class II: soft palate, fauces, and uvula visible; pillars hidden by tongue base
- Class III: soft palate and base of uvula visible only
- Class IV: only the hard palate visible; soft palate not visible at all
Mallampati III–IV predicts difficult laryngoscopy when combined with other predictors (short thyromental distance <6 cm, reduced neck mobility, high Cormack–Lehane grade). Critically: Mallampati grades the oropharyngeal view for airway prediction — it is entirely distinct from the ASA physical status classification (I–VI), which grades systemic disease severity. Do not conflate these two scales.

Mallampati Oropharyngeal Views: Classes I-IV