Page 4 of 18
FM2.{16,25},FM14.6 | Conducting & Reporting the Medico-legal Autopsy — SDL Guide
Learning Objectives
- Describe the examination of clothing, viscera preservation for chemical analysis, and post-mortem artefacts (FM2.16)
- Demonstrate professionalism at autopsy: interpretation, inference/opinion, collection and preservation of biological and trace evidence (FM2.25)
- Conduct and prepare a post-mortem examination report of varied aetiologies in a simulated or supervised environment (FM14.6)
INSTRUCTIONS
Knowing that an autopsy must be performed is one thing; knowing exactly how to perform it, document it, and report it to legal standards is another. This module takes you inside the procedural reality of the medico-legal autopsy — from receiving the authority document to handing the signed report to the police. It covers the critical skill of distinguishing post-mortem artefacts from genuine injuries, the standard viscera preservation protocol, and the professional conduct expected of the forensic physician during and after the examination.
References
- KSN Reddy — Essentials of Forensic Medicine & Toxicology, 34th ed., Ch. 5–6 (textbook)
- BV Subrahmanyam — Modi's Medical Jurisprudence and Toxicology, 24th ed., Ch. 6–7 (textbook)
Version 2.0 | NMC CBUC 2024
CLINICAL SCENARIO
You are the duty forensic medicine officer at a government hospital. At 11 PM, police officers bring in a body with an inquest form under CRPC Section 174: a 35-year-old construction worker found at the base of a building. The officer says 'fall from height, open and shut.' As you begin the external examination, you notice anterior rib fractures on the left side. Before you record these as ante-mortem injuries from the fall, a colleague points out that the hospital register shows paramedics performed CPR for 20 minutes at the scene. How do you proceed? The answer depends on your mastery of autopsy technique and your understanding of post-mortem artefacts.
WHY THIS MATTERS
The medico-legal autopsy report is a legal document that will be submitted to court. Errors in technique — missed viscera preservation, artefacts misidentified as injuries, opinions that exceed the evidence — can lead to wrongful convictions, acquittals of guilty parties, or professional consequences for the forensic physician. FM14.6 requires you to perform this in a supervised environment with varied aetiologies; this module gives you the framework to do so correctly and confidently.
RECALL
Before proceeding, ensure you can: (1) name the CRPC provisions authorising the medico-legal autopsy (from the au1 module); (2) describe the post-mortem changes that allow PMI estimation — rigor mortis, livor mortis, and early decomposition; (3) distinguish the four main wound types (abrasion, contusion, laceration, incised wound) from your FM injury lectures. These are the foundations on which autopsy examination builds.
Professional and Legal Context of the Autopsy Procedure
The medico-legal autopsy begins before the first incision — it begins with the professional and legal context in which the physician accepts the case. FM2.25 specifies that demonstrating professionalism at autopsy encompasses the entire arc from receiving authority to dispatching the report: not merely the technical skill of dissection, but the forensic physician's role as an officer of the court.
The professional context demands three things from the outset. First, verification of legal authority: the PM must not begin without a valid written order — a CRPC Section 174 inquest form or a magistrate's order under Section 176. The doctor who proceeds without documented authority exposes themselves to legal liability and invalidates the evidentiary chain. The authority document should be checked for: the authorising officer's name and designation, the date and time, the identity of the deceased (with police case number), and the specified purpose of the examination.
Second, role clarity: the forensic physician is an independent expert, not an agent of the police or the family. Observations are documented objectively; opinions are stated as professional inferences based on findings, not conclusions dictated by investigating officers. The physician must be prepared to give an opinion that contradicts the police version if the evidence demands it — and must be prepared to defend that opinion in court under cross-examination.
Third, professional conduct with all stakeholders: FM2.25 specifically covers communication with family, law enforcement, and the judiciary. With law enforcement: factual, structured, guarded — do not speculate beyond your findings. With family (when relevant): compassionate, focused on explaining the process, not on sharing findings prematurely — findings are disclosed through official channels. With the judiciary: objective, evidence-based testimony; never advocacy.
Professionalism standard: never allow the investigating officer to be present in the dissection room unless state rules specifically permit it. Their presence can compromise the objectivity of the examination and create grounds for challenging the report in court.
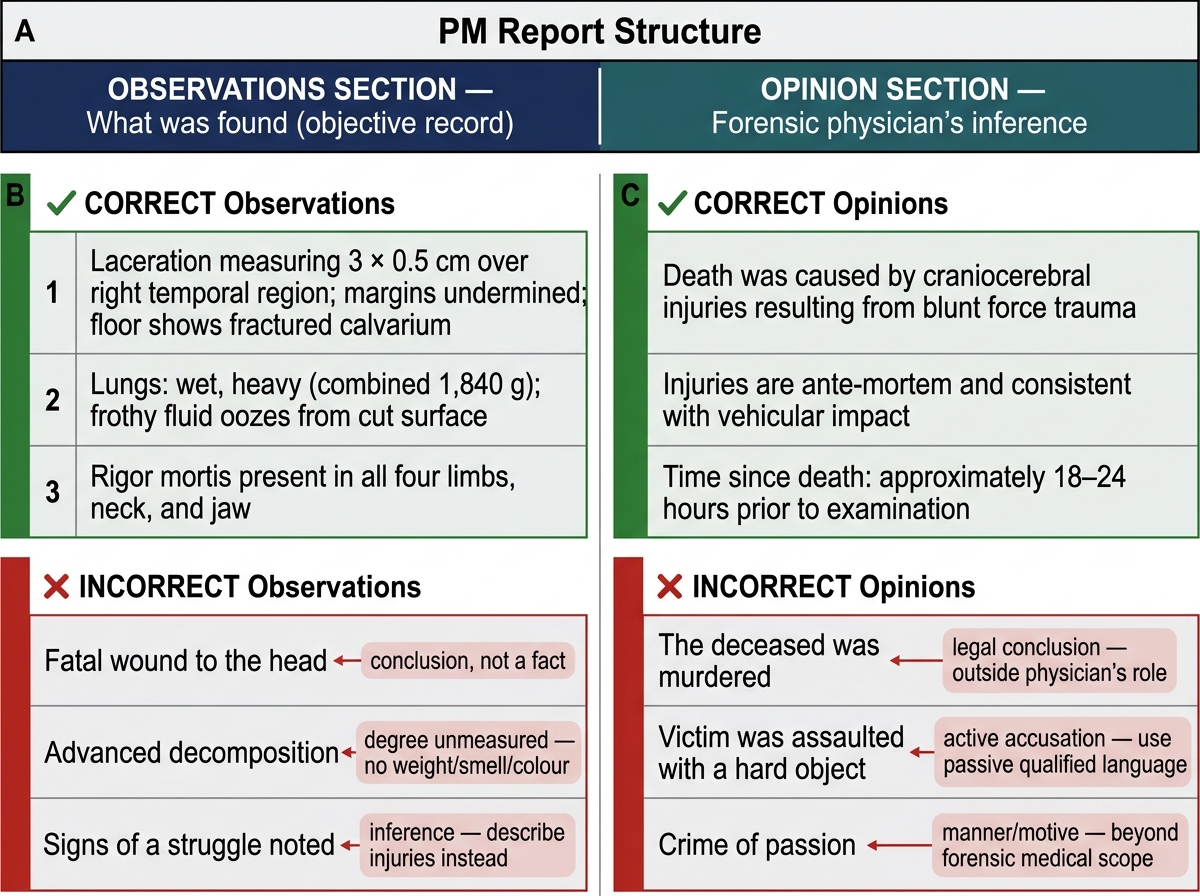
PM Report Structure: Observations vs Opinion — Correct and Incorrect Entry Examples
Governing Principles: Standards and Reference Procedure
The reference procedure for the medico-legal autopsy in India is codified in the Government of India's proforma for post-mortem examination (the standard PM form used by state governments), complemented by the procedural guidance in Reddy's Essentials and Modi's Medical Jurisprudence. International guidance from the United Nations Manual on the Effective Prevention and Investigation of Extra-Legal, Arbitrary and Summary Executions (Minnesota Protocol) is referenced for custody-related cases.
The governing principles that underpin the reference procedure are:
Completeness: every body system must be examined, even when the cause of death appears obvious. A body with a gunshot wound to the head still requires full evisceration — cardiac disease, acute intoxication, or other findings may be relevant to the manner of death determination or to legal proceedings.
Sequence: the examination must follow a systematic, reproducible sequence that prevents overlooking findings and creates a defensible record. Deviation from sequence must be documented and justified.
Documentation at the point of observation: findings must be recorded as they are made, not reconstructed from memory after the examination. The PM form serves as the contemporaneous record. Photography — where equipment is available — supplements written description.
Chain of custody for specimens: every biological and trace evidence specimen collected must be labelled (case number, specimen type, date, examiner), sealed, and handed over under proper documentation — the forwarding letter to the Forensic Science Laboratory (FSL) is a medico-legal document in its own right.
Separation of observation from opinion: the PM report has two distinct sections — the observations section (what was found, described objectively) and the opinion section (the forensic physician's inference). These must never be conflated. Stating 'wounds suggest homicide' in the observations section is a professional error; stating the same as the opinion, with referenced findings, is correct.
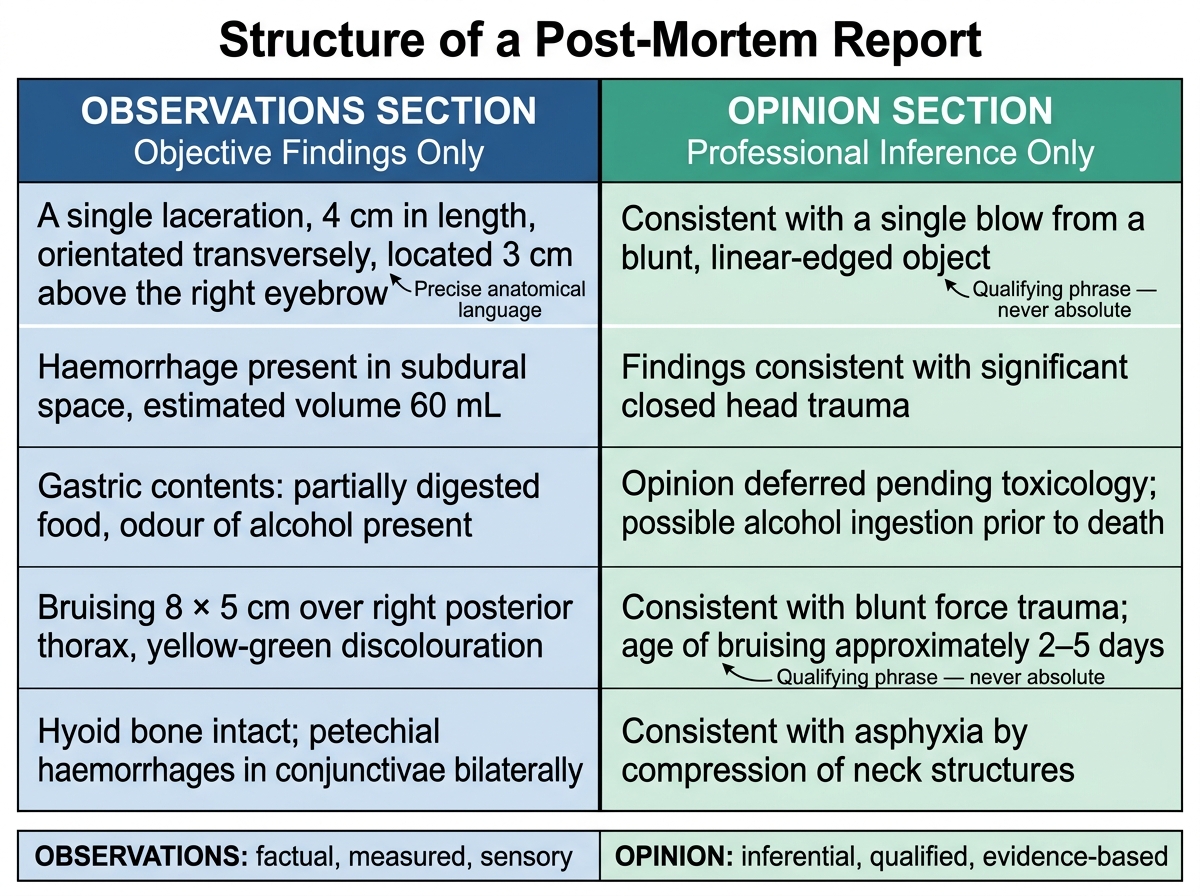
Observations vs Opinion: Two-Column Structure of a Medico-Legal PM Report
SELF-CHECK
During a post-mortem examination, the investigating officer tells the forensic physician 'The family says it was suicide — just write that.' The physician's correct response is:
A. Document 'suicide' as per the officer's direction since the officer has inquest authority
B. Proceed with objective examination; the opinion will be based on findings, not on the officer's suggestion
C. Defer the opinion section and leave it blank pending further police investigation
D. Terminate the examination and request a second doctor to conduct it instead
Reveal Answer
Answer: B. Proceed with objective examination; the opinion will be based on findings, not on the officer's suggestion
The forensic physician's opinion must be based solely on examination findings and professional inference. Accepting a manner-of-death conclusion from an investigating officer would constitute professional misconduct and potentially evidence tampering. The officer has authority to order the PM, not to dictate its conclusion.
Conducting the Autopsy: Method and Documentation
The medico-legal autopsy follows a structured sequence. Mastering this sequence — and understanding why each step precedes the next — is the core skill that FM14.6 requires you to develop in supervised practice.
PHASE 1: Pre-examination
Before the body is disrobed or touched: examine the clothing in situ. Note the type, condition (intact, torn, blood-stained, soiled), location of defects (cuts, bullet holes, burn marks), and any trace evidence (fibres, glass, soil). Clothing is a primary evidence item that must be handled minimally, photographed if possible, and preserved for the FSL. Disrobing destroys the spatial relationship of clothing defects to underlying wounds — it must be done carefully and documented.
PHASE 2: External examination
Systematically examine: (a) general build and nutritional status; (b) post-mortem changes (rigor, lividity, decomposition — with state and whether consistent with scene circumstances); (c) identifying features (height, weight, approximate age, tattoos, scars, birthmarks); (d) injuries — distribution, type, measurements in two dimensions, depth where determinable, age (fresh, healing, healed), direction of impact. Every injury must be mapped and described, not merely counted.
PHASE 3: Internal examination (evisceration)
Three cavities are opened in sequence: thorax first, then abdomen, then cranium. The sequence allows observation of blood/fluid collections before organs are disturbed. The thorax is opened with a Y-incision (or standard midline incision); the ribs are inspected in situ for fractures before the sternum is cut. The abdomen is examined for free fluid, organ position, and anomalies; the alimentary tract, liver, spleen, kidneys, adrenals, and reproductive organs are examined in turn. The cranium requires a coronal scalp incision and careful saw cut — the brain is examined for surface haemorrhages, herniation, and internal lesions; the calvarium and base of skull are inspected for fractures.
PHASE 4: Viscera preservation for chemical analysis
Where poisoning is suspected — or routinely in all medico-legal cases per standard practice — viscera must be preserved according to the standard schedule:
| Specimen | Quantity | Preservative | Container |
|---|---|---|---|
| Stomach with contents | Entire | None (no formalin) | Wide-mouth glass jar |
| Small intestine (upper portion) | 30 cm | None | Separate jar |
| Liver | 250–500 g (¼ lobe) | None | Jar |
| Kidney | One whole kidney | None | Jar |
| Blood | 50–100 mL | Sodium fluoride (anticoagulant + preservative) | Sealed tube |
| Urine | All available | None | Sealed tube |
| Vitreous humour | Both eyes | None | Sealed tube |
| Bile | All available | None | Sealed tube |
Critical rule: no formalin in viscera sent for chemical/toxicological analysis — formalin destroys toxic substances and invalidates the FSL examination. Histology specimens go in formalin in separate, clearly-labelled jars. All containers must be sealed with wax or tamper-evident seals, labelled, and handed to police under a signed receipt.
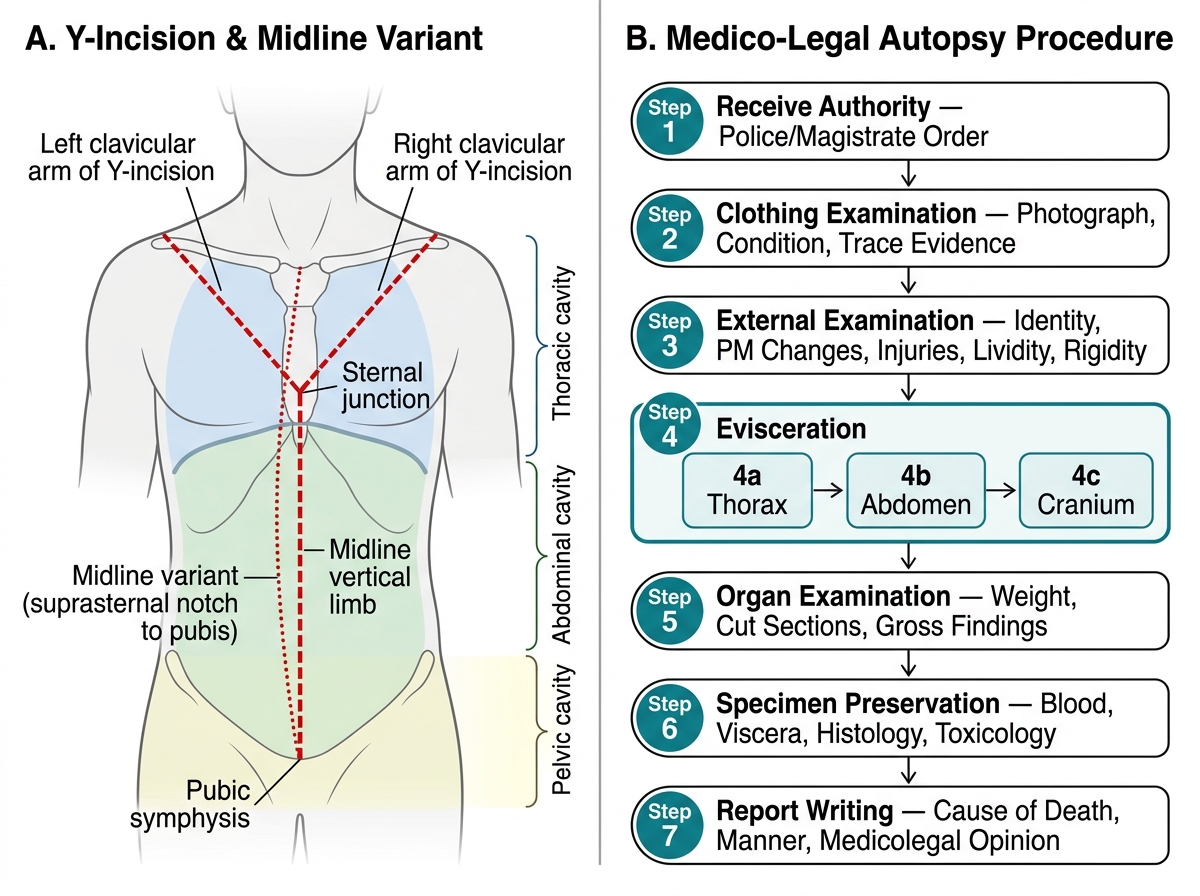
Autopsy Y-Incision Technique and Medico-Legal Autopsy Procedure Flowchart
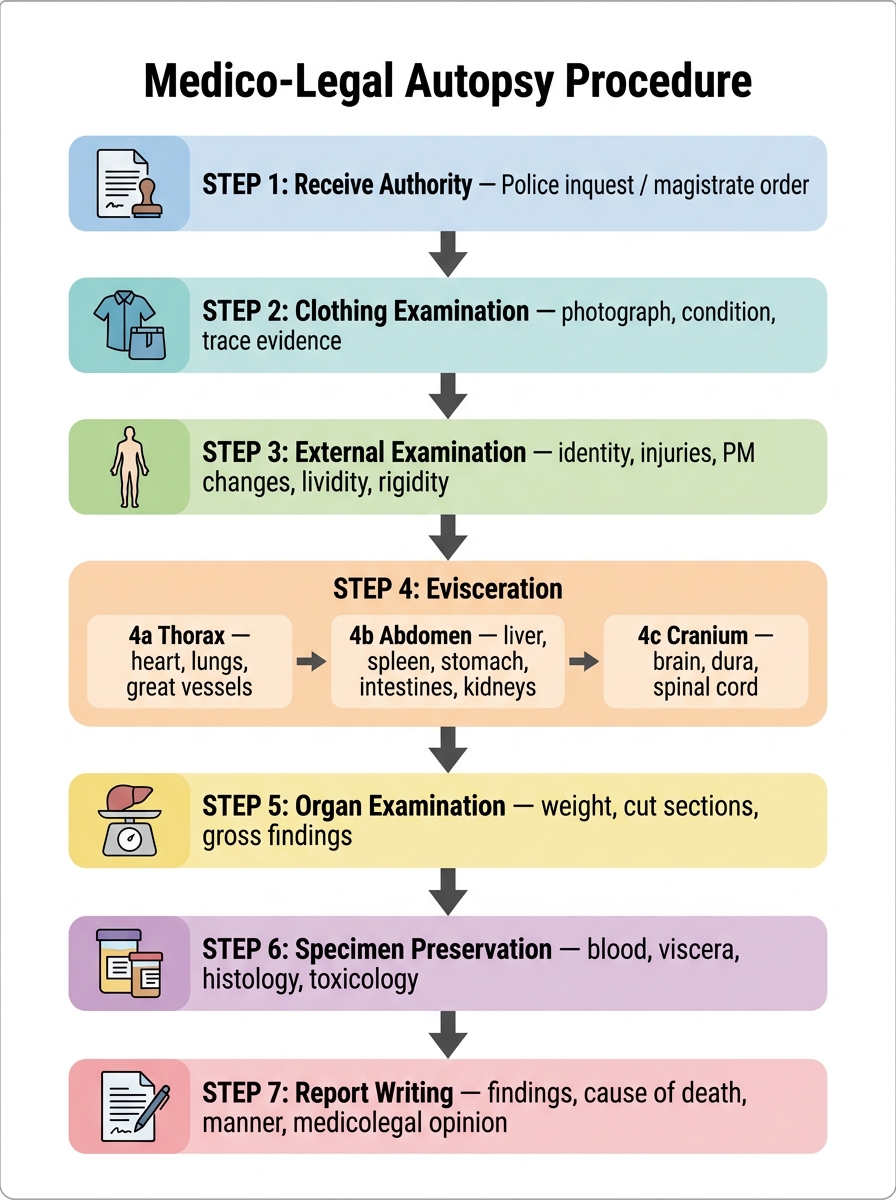
Flowchart of Medico-Legal Autopsy Procedure