Page 13 of 27
OG37.6 | Outlet Forceps, Vacuum and Breech Delivery Observation — SDL Guide
Learning Objectives
- Identify the clinical indications and prerequisites for outlet forceps, vacuum extraction, and vaginal breech delivery
- Describe the anatomical assessments required before assisted delivery — station, position, and engagement
- Follow the sequential steps of an outlet forceps delivery and a vacuum extraction as an informed observer
- Describe the types of breech presentation and the specific manoeuvres used in assisted vaginal breech delivery
- Interpret intraoperative findings to assess progress during instrumental delivery
- Recognise maternal and neonatal complications of assisted delivery and observe the team's immediate response
- Document an observed assisted delivery accurately in the logbook
INSTRUCTIONS
Assisted delivery — instrumental delivery with forceps or vacuum, and vaginal breech delivery — represents the most complex and time-sensitive decision-making in intrapartum obstetrics. As a final-year student you are required to observe and assist (OG37.6, SH level). This module prepares you for that experience by explaining the indications, the anatomy, the procedural steps, and the complications of all three forms of assisted delivery. Read this module before your labour-ward posting and keep it in mind every time a woman in the second stage of labour is not progressing.
References
- DC Dutta's Textbook of Obstetrics, 9th edition, Chapter 32 — Forceps Delivery; Chapter 33 — Vacuum Extraction; Chapter 38 — Breech Presentation (textbook)
- Williams Obstetrics, 26th edition, Chapter 29 — Operative Vaginal Delivery; Chapter 28 — Breech Delivery (textbook)
- RCOG Green-top Guideline No. 26 — Operative Vaginal Delivery, 2011 (updated 2023) (guideline)
- RCOG Green-top Guideline No. 20b — Management of Breech Presentation, 2017 (guideline)
- Hannah ME et al. TERM Breech Trial — Planned C-section vs planned vaginal birth for breech presentation at term. Lancet 2000 (evidence)
Version 2.0 | NMC CBUC 2024
CLINICAL SCENARIO
A 29-year-old primigravida at 40 weeks is in the second stage of labour for 90 minutes. The CTG shows late decelerations recovering to baseline between contractions. The cervix is fully dilated, the membranes are ruptured, the head is visible at the introitus at the peak of bearing down, and the position is confirmed as occiput anterior by examination. The registrar calls for an outlet forceps delivery. As the student on the labour ward that morning, you are invited to observe. Within 5 minutes the baby is born with an Apgar score of 9 at 1 minute. What did you just watch? What anatomy guided each blade placement? What would have happened if the prerequisites had not been met? This module explains it all.
WHY THIS MATTERS
Instrumental delivery — with forceps, vacuum, or for a breech — accounts for approximately 5–15% of all deliveries in well-resourced settings and is one of the most technically demanding procedures in intrapartum care. Recognising when instrumental delivery is appropriate, when it is contraindicated, and when it should be abandoned in favour of emergency CS is a clinical judgment that requires both factual knowledge and observational experience. The NMC OG37.6 competency (SH level) requires you to observe and assist in outlet forceps, vacuum extraction, and breech delivery. This module provides the conceptual preparation that makes that theatre and labour-ward time genuinely educational.
RECALL
Before proceeding, take a moment to recall the key concepts from labour and delivery. Station describes the relationship of the presenting part to the ischial spines: 0 = at the spines, negative numbers = above, positive numbers = below. Engagement is defined as the widest diameter of the presenting part at or below the pelvic inlet; for the fetal head, engagement = biparietal diameter at the pelvic inlet = vertex at 0 station or below. Position describes the relationship of the fetal occiput to the maternal pelvis: OA (occiput anterior) = optimal for delivery; OP (occiput posterior) = may require manual rotation or Kielland's forceps; OT (occiput transverse) = requires rotation. Second stage of labour is defined as the period from full cervical dilatation to delivery. Prolonged second stage (>2 hours nullipara, >1 hour multipara, or >3/2 hours with epidural) is one indication for assisted delivery. Also recall that perineal tears are graded I (skin only) through IV (involves anal sphincter and rectal mucosa) — this grading is directly relevant to the decision about episiotomy.
Why Assisted Delivery? Indications and Prerequisites
Every assisted delivery involves a risk-benefit decision in which the potential benefit of expediting delivery — rescuing a compromised fetus or relieving a mother who cannot complete the second stage — must clearly outweigh the risks of maternal and neonatal trauma from the instrument or manoeuvre chosen. This decision is not made lightly, and it is never made by a single person: it requires the senior obstetrician present to confirm that the clinical situation meets the threshold for instrumental intervention, that the anatomy is favourable, and that all technical prerequisites are in place before the first instrument is placed. As an observer, your preparation for this moment means you should be able to run through the prerequisites mentally as the registrar runs through them clinically — before the procedure begins, not during it. A student who arrives at the scrub table understanding why the decision was made to use forceps today for this patient is positioned to learn from every step that follows.
Indications for assisted vaginal delivery (forceps or vacuum):
- Fetal compromise in the second stage — CTG changes suggesting fetal distress (late decelerations, prolonged bradycardia) when the head is in a position and at a station where safe instrumental delivery is feasible
- Prolonged second stage — exceeding the defined time limits (>2 hours nullipara, >1 hour multipara without epidural; longer limits apply with epidural) without progress despite adequate uterine contractions and maternal effort
- Maternal exhaustion — the mother is unable to push effectively, especially relevant in severe cardiac or respiratory disease where prolonged Valsalva is dangerous
- Prophylactic shortening of second stage in conditions where pushing is contraindicated — severe pre-eclampsia, cardiac disease, intracranial lesions
Prerequisites for any instrumental vaginal delivery (the 'ABCDE' mnemonic used clinically):
- A — Adequate analgesia: instrumental delivery without adequate anaesthesia/analgesia is unacceptable; perineal block, pudendal block, or existing epidural
- B — Bladder empty: an indwelling catheter empties the bladder and reduces risk of bladder injury
- C — Cervix fully dilated: attempted delivery through an incompletely dilated cervix causes cervical laceration
- D — Descent and position confirmed: exact position and station must be known before instrument placement; never apply forceps to an unengaged head
- E — Equipment ready: experienced operator, neonatal resuscitation team available, CS available as immediate backup if trial of instrumental delivery fails
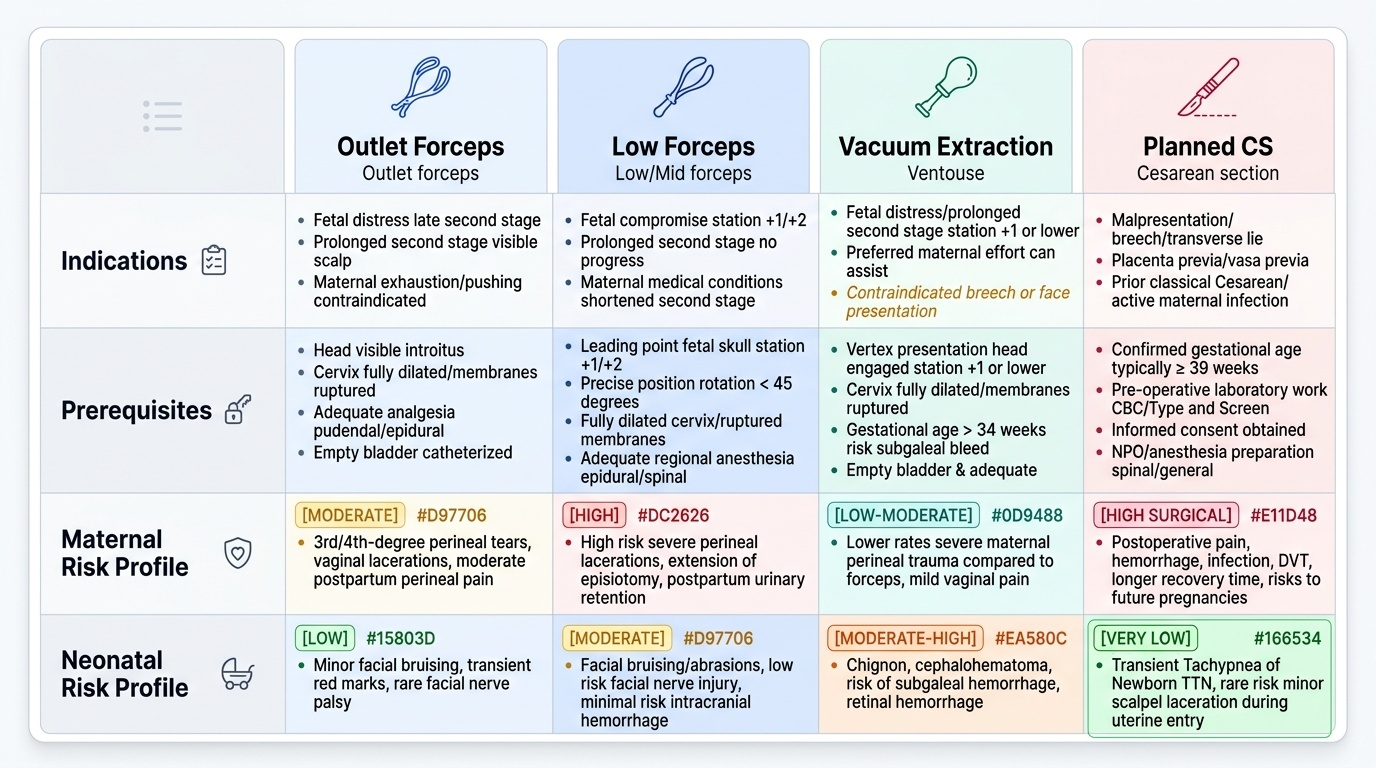
Classification of forceps by station:
Outlet forceps (most safe — head at perineum, visible without parting labia), Low forceps (head at or below +2 station, rotation ≤45 degrees), Mid forceps (head above +2 station — rarely used today, high risk). Nearly all instrumental deliveries in current practice are outlet or low forceps.
Provided image
Anatomy and Assessment Relevant to Assisted Delivery
Safe instrumental delivery begins with a careful vaginal examination to confirm four key findings: the exact station, the exact position, complete dilatation, and the absence of caput or moulding that might indicate CPD. An error in any of these assessments before instrument placement can result in catastrophic injury to the mother and baby. This is why the senior obstetrician or registrar personally performs the assessment — it is not delegated.
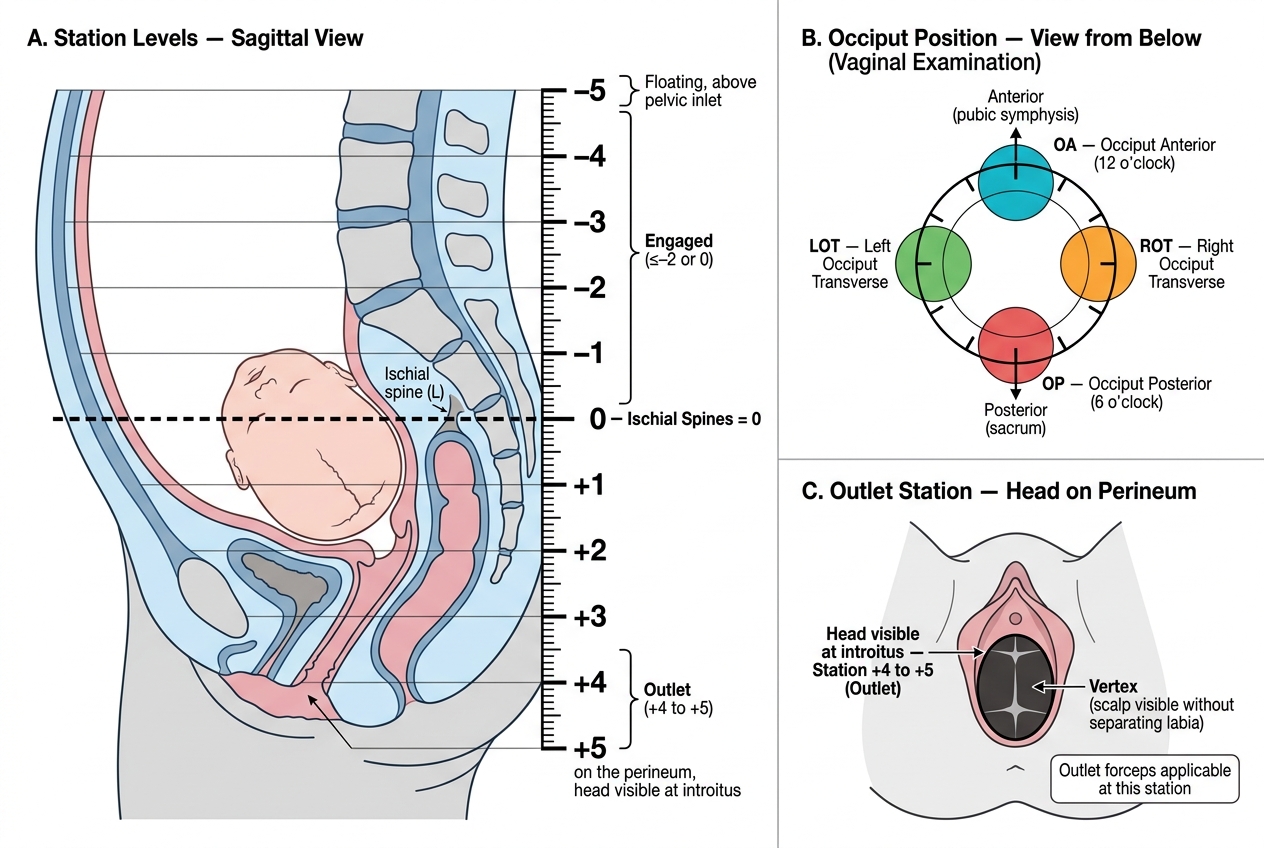
Station assessment is made by vaginal examination, identifying the ischial spines by palpation (they are bony prominences felt on each lateral pelvic wall at the mid-level of the pelvis) and estimating the distance of the leading part of the head relative to those spines in centimetres. The vertex at the level of the ischial spines = 0 station; below the spines = positive station (+1 to +5, where +5 = on the perineum); above the spines = negative station. Outlet forceps requires the head to be visible at the introitus (+5 station or nearly) or at least at +3 station with scalp visible.
Position assessment requires identifying the fetal occiput relative to the maternal pelvis quadrants. The posterior fontanelle (small, triangular, three suture lines) identifies the occiput; the anterior fontanelle (larger, diamond-shaped, four suture lines) identifies the bregma. OA (occiput anterior, 12 o'clock position) = ideal for forceps delivery. OP (occiput posterior, 6 o'clock) = the head is deflexed; forceps traction in this position must account for the need to flex the head. OT (occiput transverse) = requires rotation.
Caput succedaneum (oedematous swelling of fetal scalp soft tissue due to pressure against the cervix) and moulding (overlapping of fetal skull bones at suture lines due to compressive forces) are assessed by the degree of bony overlap and soft tissue swelling palpated during vaginal examination. Severe moulding (+++) with caput suggests significant CPD — an important contraindication to instrumental delivery even if the station appears favourable.
Pelvic adequacy is clinically assessed by noting whether the pelvis is android, gynaecoid, anthropoid, or platypelloid in shape (Caldwell-Moloy classification) and whether clinical measurements are adequate. In an obstructed labour with severe moulding and prominent ischial spines, any attempt at instrumental delivery is dangerous.
Fetal Head Station and Occiput Position on Vaginal Examination
SELF-CHECK
A senior registrar is about to perform outlet forceps delivery for a primigravida with fetal tachycardia. On examination, the occiput is felt at the 4 o'clock position (left occiput anterior), the head is on the perineum, the bladder has been catheterised, and the patient has an epidural. Which prerequisite is confirmed by the fact that the head is 'on the perineum'?
A. Cervix fully dilated
B. Bladder empty
C. Station at outlet — head visible, confirming it is an outlet rather than low or mid forceps situation
D. Adequate analgesia
Reveal Answer
Answer: C. Station at outlet — head visible, confirming it is an outlet rather than low or mid forceps situation
The head being 'on the perineum' and visible confirms that this is an outlet forceps application — the vertex is at or near the perineal skin (+4 to +5 station). This is the most favourable station for instrumental delivery with the lowest risk of complications. The other prerequisites (full dilatation, empty bladder, analgesia) are confirmed by separate assessments — catheterisation and epidural are mentioned separately in the scenario.
Outlet Forceps Delivery — Step-by-Step Observation
Outlet forceps delivery with Wrigley's forceps (the standard instrument for outlet application) follows a logical anatomical sequence. The two blades — left and right — are mirror images of each other, curved to match the shape of the fetal head (cephalic curve) and the maternal pelvis (pelvic curve). The observer who understands the anatomy of each step will follow the procedure without confusion.
Step 1 — Instrument check. The forceps are assembled on the trolley, checked for correct locking and symmetry, and lubricated. The observer watches the scrub nurse present the instruments and notes how the operator holds each blade — left blade in left hand, right blade in right hand.
Step 2 — Episiotomy. A mediolateral episiotomy is usually performed before or after blade insertion (timing varies by operator preference and perineal tautness). It is made at the 4–5 o'clock position (right mediolateral), angled at approximately 45–60 degrees from the midline, using scissors during a contraction when the perineum is stretched and the ischiorectal fossa is displaced. Episiotomy is not mandatory for every instrumental delivery but is commonly used to prevent uncontrolled perineal tears and to give the instruments space.
Step 3 — Left blade insertion. The left blade (with the knob pointing to the patient's left) is inserted first. The operator introduces the left hand into the vagina posterolaterally on the left side, protecting the vaginal wall, and the left blade is guided down between the operator's hand and the fetal head, sliding along the left parietal bone until the blade sits at the level of the ear. The knob points toward the left inguinal ligament (pelvic curve orientation).
Step 4 — Right blade insertion. The right blade is similarly guided down the right side of the fetal head with the operator's right hand protecting the vaginal wall. When both blades are correctly positioned — one on each side of the fetal head, over the parietal bones, with the tips at the level of the ear — the blades lock at the shanks without force. If they do not lock easily, a blade is malpositioned and must be reinserted.
Step 5 — Check before traction. After locking, the operator checks the application: shanks should be parallel (not crossed), the posterior fontanelle should be palpable midway between the blades, no maternal tissue should be caught in the blades. A gentle downward pull without a contraction tests whether the head is well-applied.
Step 6 — Traction. Traction is applied only with contractions and simultaneous maternal pushing, directed downward and slightly posteriorly (following the pelvic curve: Pajot's manouevre — one hand pulling the handle forward while the other provides downward suprapubic pressure). As the head crowns, traction direction shifts upward to deliver the occiput under the pubic symphysis.
Step 7 — Disarticulation and head delivery. As the vertex crowns, the blades are unlocked and removed (disarticulated) one at a time, and the head is delivered over the perineum by the modified Ritgen manoeuvre. The body delivers with the next contraction.

Sequential Application of Wrigley's Forceps