Page 8 of 23
OG9.3 | Early Pregnancy Evacuation — SDL Guide (Part 2)
Interpretation of Findings
After completing an evacuation procedure, confirmation that the uterine cavity is completely empty is as important as the evacuation itself. The two most serious complications of missed incomplete evacuation are persistent haemorrhage from retained placental tissue and endometritis or sepsis from retained products that become infected — both of which are preventable if incomplete evacuation is recognised before the patient leaves the procedure room. The clinical confirmation that the uterus is adequately evacuated is made in three steps: intraoperative feel and observation during the procedure itself, careful visual inspection of the aspirated tissue in the bowl to identify chorionic villi (the structural proof that pregnancy tissue has been removed), and where available, a post-procedure ultrasound to confirm an empty uterine cavity. An incomplete evacuation is not in itself a procedural failure — it is a recognised occurrence that is managed by repeat aspiration; the failure occurs when it is MISSED and the patient is discharged with retained tissue. The framework below ensures this does not happen.
Step 1 — Intraoperative clinical signs of complete evacuation:
- The uterus contracts down and grips the cannula (the operator feels resistance increase — gritty feel) — this is the most reliable intraoperative sign that the endometrial surface is stripped
- The syringe fills with foamy pink fluid (no further tissue) after initial aspiration of villi/sac
- The uterus feels firm on bimanual palpation after the procedure
- Bleeding from the os decreases as the uterus contracts
Step 2 — Tissue inspection:
- All aspirated tissue should be emptied into a kidney dish of water
- The operator must identify chorionic villi — fluffy, grape-like, floating pink-white structures; at ≥6 weeks, a gestational sac and, at ≥8 weeks, recognisable fetal parts
- Absence of villi after a procedure at ≥6 weeks must prompt immediate concern for: (a) failed evacuation — intrauterine retained sac, (b) ectopic pregnancy — there was no intrauterine pregnancy to evacuate, (c) very early pregnancy with no formed villi yet, or (d) uterine anomaly (bicornuate uterus — wrong horn evacuated)
- All tissue must be sent for histopathology — this is the only way to detect hydatidiform mole (the grape-like villi look similar to chorionic villi to the naked eye but differ on microscopy and immunostaining for p57KIP2)
Step 3 — Post-procedure ultrasound (where available):
- Empty uterine cavity with thin endometrial echo (<15 mm) confirms complete evacuation
- Any heterogeneous echogenic material in the cavity, or a visible gestational sac, indicates incomplete evacuation requiring repeat aspiration
- Doppler may show a vascular focus in retained trophoblastic tissue
Intraoperative findings suggesting complications:
- Sudden loss of resistance + clear fluid in syringe → uterine perforation (stop immediately)
- Inability to pass sound/cannula despite apparent adequate dilatation → false passage (do not force; reposition tenaculum and reassess uterine axis)
- Excessive fresh bleeding → check: tissue vs atony vs cervical laceration
SELF-CHECK
After an MVA at 8 weeks, the aspirated tissue is inspected and no chorionic villi are found in the bowl. What is the MOST IMPORTANT next step?
A. Reassure the patient — the procedure was successful and villi dissolve in water
B. Immediately consider ectopic pregnancy and order a serum β-hCG plus pelvic ultrasound
C. Schedule a repeat MVA in one week
D. Give ergometrine to contract the uterus and observe
Reveal Answer
Answer: B. Immediately consider ectopic pregnancy and order a serum β-hCG plus pelvic ultrasound
Absence of chorionic villi after evacuation of an assumed intrauterine pregnancy at 8 weeks is an ectopic pregnancy until proven otherwise. The procedure may have evacuated decidual tissue from the uterus while the ectopic remained in the fallopian tube. Immediate serum β-hCG (to confirm ongoing trophoblastic activity) and pelvic ultrasound (to look for an adnexal mass and empty uterus) are mandatory. A repeat MVA is inappropriate without first determining whether any intrauterine pregnancy existed.
Applied and Supervised Practice
As a Phase III MBBS student, your NMC competency OG9.3 specifies that you should be able to 'describe the steps and observe or assist in the performance of an MTP evacuation' — this competency level (SH = Skill in the Hospital setting) means you are expected to observe and assist, not to perform the procedure independently. The quality of your observation is directly proportional to your preparation: a student who understands every step in advance will recognise when the operator deviates from the norm, when a complication is developing, and when the patient needs reassurance. A student who enters the procedure room without preparation will watch without learning. This section prepares you for intelligent, engaged observation — knowing what instruments are on the tray, what each step produces, what normal looks like, and what signs should prompt concern. It also covers post-procedure care and complication recognition, which are as important as the procedure itself and are frequently tested in viva examinations.
What the student observes during a supervised MVA/EVA:
- Setup: the scrub nurse's instrument layout (Sims speculum, tenaculum, Hegar dilators in sequence, Karman cannula set, MVA syringe, uterine sound, ring forceps with gauze, kidney dish with water)
- Patient positioning and aseptic preparation: lithotomy, iodine-based preparation, sterile draping
- Bimanual exam by the operator and verbal communication of uterine size and position
- Paracervical block technique: the injection sites, the wait time, and the patient's comfort response
- Dilatation sequence: the Hegar dilators passed in series; any resistance noted and how the operator responds
- Cannula insertion and suction: the change in resistance as the internal os is passed; the creation of vacuum
- Evacuation phase: the rotational movement of the cannula; the colour and consistency of aspirated material
- End-point recognition: the operator communicates 'grittiness' and shows you the syringe contents
- Tissue inspection: the doctor demonstrates the villi in the water bowl
Post-procedure monitoring and care (what you will ensure and document):
- Vital signs every 15–30 minutes for 1–2 hours until haemodynamically stable
- Uterine fundal height and tone palpated — a soft, enlarged uterus suggests atony and haemorrhage risk
- Misoprostol 400–600 µg sublingual/rectal may be given post-procedure for uterotonic effect if oxytocin is unavailable
- Anti-D immunoglobulin: all Rh-negative women receive 50 µg (<12 weeks) or 300 µg (≥12 weeks) IM within 72 hours of the procedure
- Contraceptive counselling: immediate post-procedure is an ideal time to discuss and offer contraception; barrier methods, OCP, IUCD (can be inserted at the time of MVA/EVA in appropriate cases), or progesterone implant
- Follow-up: return in 1–2 weeks; symptoms of complication to watch for (fever, persistent heavy bleeding, no return of periods after 6 weeks)
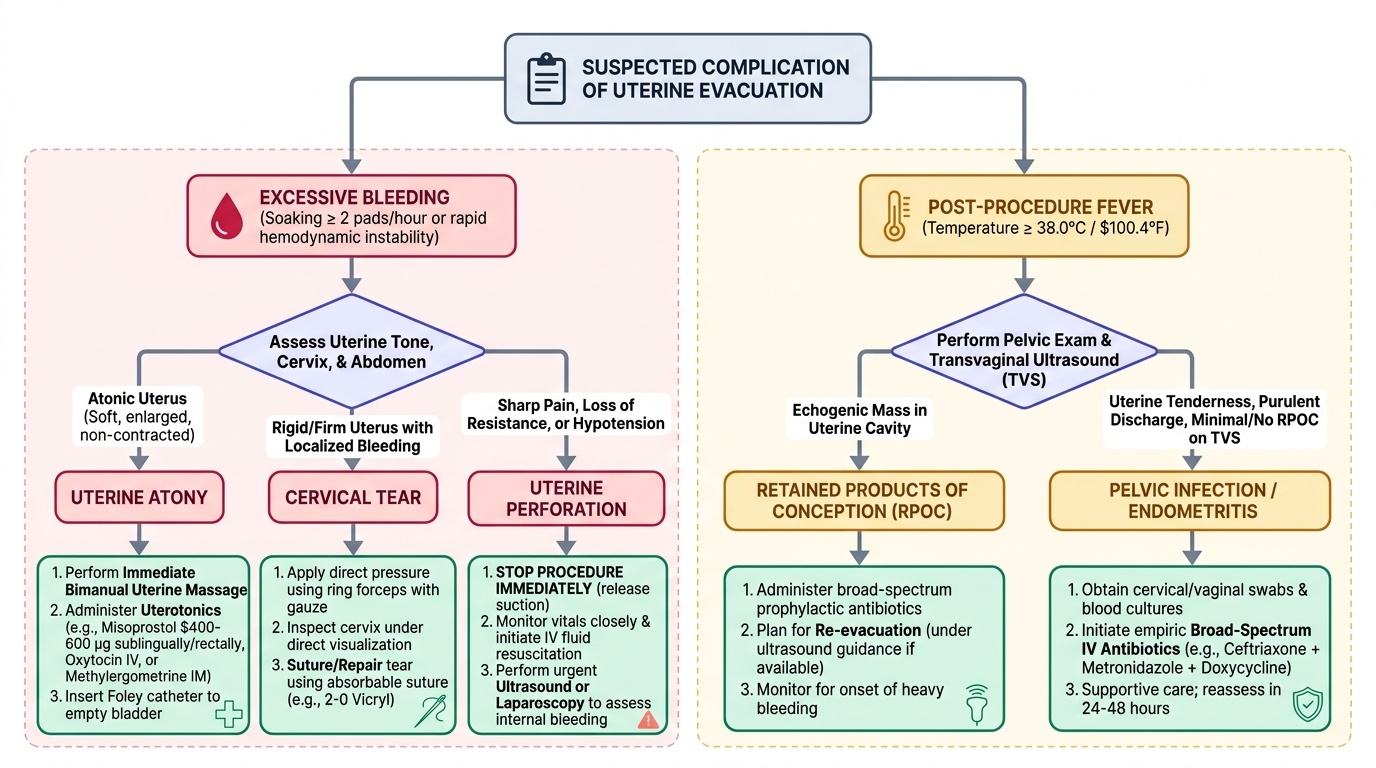
Complications and their recognition:
| Complication | Signs | Management |
|---|---|---|
| Uterine perforation | Sudden loss of resistance, clear fluid in syringe, soft uterus | Stop immediately; observe; laparoscopy/laparotomy if evidence of visceral injury |
| Haemorrhage | Heavy bleeding per os or haemodynamic compromise | Bimanual compression; uterotonic (oxytocin IV, misoprostol); re-evacuation for RPOC |
| Retained products | Incomplete evacuation; persistent bleeding/pain; intrauterine tissue on USG | Repeat MVA or medical management |
| Infection (endometritis) | Fever >38°C, uterine tenderness, purulent discharge post-procedure | Broad-spectrum antibiotics (ampicillin + gentamicin + metronidazole); re-evacuation if RPOC |
| Cervical laceration | Visible tear on speculum post-procedure | Haemostatic suture |
| Asherman syndrome (late) | Amenorrhoea, subfertility months later | Hysteroscopic adhesiolysis |
Provided image
CLINICAL PEARL
The two most dangerous errors in evacuation procedures are: (1) Not accounting for a retroverted uterus — always perform bimanual examination and confirm uterine position BEFORE inserting any instrument. If the uterus is retroverted and you insert anteriorly, you will perforate the fundus. Repositioning the tenaculum to the posterior cervical lip corrects the axis in a retroverted uterus. (2) Discharging a patient after evacuation without confirming anti-D status — Rh isoimmunisation from a procedure at even 8 weeks can destroy subsequent pregnancies. Check Rh type and administer anti-D before the patient leaves the ward, every single time, without exception.
Self-Assessment
Use these questions to consolidate your learning before your next clinical posting in the gynaecology unit. The NMC competency OG9.3 is tested in viva examinations specifically on three levels: knowledge of the legal framework (MTP Act gestational limits and RMP requirements), understanding of the procedural sequence (MVA steps from bimanual exam to tissue inspection), and the ability to reason through complications (no villi → ectopic; sudden loss of resistance → perforation; post-procedure fever → endometritis vs retained products). As a student observer during evacuation procedures, your depth of preparation directly determines the quality of what you learn from watching. Each question below targets a specific part of the competency. Think through each answer in the full clinical sequence: indication → anatomy → technique → confirming completion → recognising complications → post-procedure care. Do not simply name the step — explain the reasoning behind it.
- Name four clinical situations in which early pregnancy evacuation is indicated in a case of spontaneous abortion (not MTP).
- A woman presents with a 10-week pregnancy and requests termination. What legal requirements must be met under the MTP Act 2021?
- You are about to perform a bimanual examination before an MVA. How do you determine uterine position, and why does it matter?
- List the step-by-step sequence of an MVA procedure from patient positioning to end-point recognition.
- After an MVA at 9 weeks, the bowl shows no chorionic villi. What is the most important differential diagnosis you must exclude?
- A patient develops fever and uterine tenderness 48 hours after MVA. What antibiotic regimen do you prescribe?
SELF-CHECK
A woman with blood group AB-negative (Rh-negative) undergoes MVA for incomplete abortion at 10 weeks. Which anti-D immunoglobulin dose should she receive, and within what time frame?
A. 300 µg IM within 72 hours
B. 50 µg IM within 72 hours
C. No anti-D needed for abortion before 12 weeks
D. 300 µg IV immediately in theatre
Reveal Answer
Answer: B. 50 µg IM within 72 hours
For gestation <12 weeks, the recommended dose of anti-D immunoglobulin is 50 µg (250 IU) IM, administered within 72 hours of the sensitising event (here, the evacuation procedure). For ≥12 weeks, the dose increases to 300 µg (1500 IU) to cover larger feto-maternal haemorrhage volumes. The IV route is not used for anti-D prophylaxis. Failure to give anti-D risks Rh isoimmunisation and haemolytic disease of the fetus and newborn in future pregnancies.