Page 1 of 32
OP10.1 | Extraocular Movement Examination: Uniocular and Binocular Technique — SDL Guide
Learning Objectives
- Describe the anatomical basis for extraocular movement testing including the six muscles and their cranial nerve supply
- Demonstrate the correct technique for uniocular duction testing
- Demonstrate the correct technique for binocular version and vergence testing
- Perform and interpret the cover/uncover and alternate cover tests
- Perform the Hirschberg corneal reflex test and estimate deviation
- Recognise characteristic movement patterns in CN III, IV, and VI palsies
INSTRUCTIONS
Extraocular movement (EOM) examination is a cornerstone clinical skill in ophthalmology. Diplopia, strabismus, and oculomotor palsy are common presentations that require systematic, reproducible testing. This module walks you through both the uniocular (monocular) and binocular components of EOM examination, from the anatomical foundation to the practical technique, and builds your ability to interpret abnormal findings at the bedside.
References
- Khurana AK. Comprehensive Ophthalmology, 7th ed. New Age International, 2019. Ch. 17 (Strabismus) (textbook)
- Parsons JH (revised by Ramanjit Sihota, Radhika Tandon). Diseases of the Eye, 23rd ed. Elsevier, 2022. Ch. 24 (Squint) (textbook)
Version 2.0 | NMC CBUC 2024
CLINICAL SCENARIO
A 52-year-old man with known diabetes mellitus presents to the eye casualty at 8 AM complaining that he woke up with double vision and a drooping right eyelid. He denies headache. On inspection his right eye appears to turn outward and downward. Your registrar asks you to formally examine his extraocular movements. You reach for a pen torch — but where do you start? Uniocular? Binocular? Cover test? This module will give you the systematic answer.
WHY THIS MATTERS
Diplopia has a broad differential that ranges from benign decompensated phoria to life-threatening posterior communicating artery aneurysm. The ability to perform a structured EOM examination lets you localise the problem to a specific muscle and its nerve supply, distinguish comitant from incomitant deviation, screen for CN palsies, and decide which patients need urgent neuroimaging. For CBME, OP10.1 is a competency at the P (procedural) level — you are expected to demonstrate the technique, not merely describe it.
RECALL
Before examining EOM you need the anatomical scaffold already in place. Recall from your anatomy posting that the orbit contains six extraocular muscles (EOMs): four recti (medial, lateral, superior, inferior) and two obliques (superior, inferior). Each eye's muscles are coordinated with the fellow eye by Hering's law (equal and simultaneous innervation of yoke muscles) and Sherrington's law (reciprocal innervation — agonist contracts, antagonist relaxes). From physiology, the extraocular muscles move the globe in three planes: horizontal, vertical, and torsional. From your clinical postings, you will have seen that a patient with a CN VI palsy fails to abduct the affected eye and describes horizontal diplopia, worst on gaze to the affected side.
Why EOM Examination Matters: Clinical Indication and Red Flags
Formal extraocular movement examination is indicated whenever a patient presents with diplopia (double vision), a noticeable or reported deviation of one eye (strabismus), ptosis combined with any abnormal eye position, nystagmus, or an abnormal head posture (head tilt or turn adopted to fuse images). It is also a mandatory component of the neurological examination following head trauma, in assessment for raised intracranial pressure (where CN VI palsy may be a false-localising sign), in the workup of thyroid eye disease (where muscle restriction produces a characteristic pattern), and in pre-operative assessment before any squint surgery or orbital decompression.
The clinical importance of this examination lies in its localising power. An isolated limitation of abduction with horizontal diplopia maximal on ipsilateral gaze points to CN VI pathology. Limitation of elevation with or without a dilated pupil and ptosis implicates CN III. Limitation of depression in adduction (the patient tilts their head away to compensate) points to CN IV. These signatures are only apparent if you examine systematically rather than making a global impression.
Red flags that mandate urgent investigation rather than outpatient follow-up include: painful third-nerve palsy with or without pupil dilatation (posterior communicating artery aneurysm until proven otherwise), acute diplopia with headache, diplopia with papilloedema, and any progressive diplopia in an older adult (giant cell arteritis, intracranial mass).
For the MBBS examiner, the most common clinical scenario is a patient with concomitant (comitant) esotropia or exotropia, or a patient simulating CN VI palsy — the examination is expected to distinguish these reliably.
Anatomy Recall: The Six Muscles and Their Cranial Nerve Innervation
A reliable memory scaffold underpins examination technique. The six extraocular muscles per eye and their cranial nerve supply are anchored by two mnemonics: LR6SO4 (lateral rectus = CN VI; superior oblique = CN IV) with all remaining four muscles — medial rectus, superior rectus, inferior rectus, and inferior oblique — supplied by CN III. CN III also supplies the levator palpebrae superioris and the pupillary sphincter via its parasympathetic fibres, which explains why a complete CN III palsy presents with ptosis, a dilated fixed pupil, and an eye resting in the "down and out" position.
The primary, secondary, and tertiary actions of each muscle differ by the position of the eye at the time of testing. In the primary (straight-ahead) position, the recti are the major movers: the medial rectus adducts and the lateral rectus abducts (pure horizontal movers); the superior rectus primarily elevates; the inferior rectus primarily depresses. The obliques are primarily torsional movers in the primary position: the superior oblique intorts, depresses secondarily (primary depression occurs when the eye is adducted — i.e. it is the depressor of the adducted eye), and abducts slightly; the inferior oblique extorts, elevates secondarily (the elevator of the adducted eye), and also abducts slightly.
This anatomy directly determines testing positions: the superior rectus is best tested by asking the patient to look up and out (abduction), while the inferior oblique is best tested by asking for elevation in adduction (up and in). The superior oblique's depression is best demonstrated when the eye is adducted.
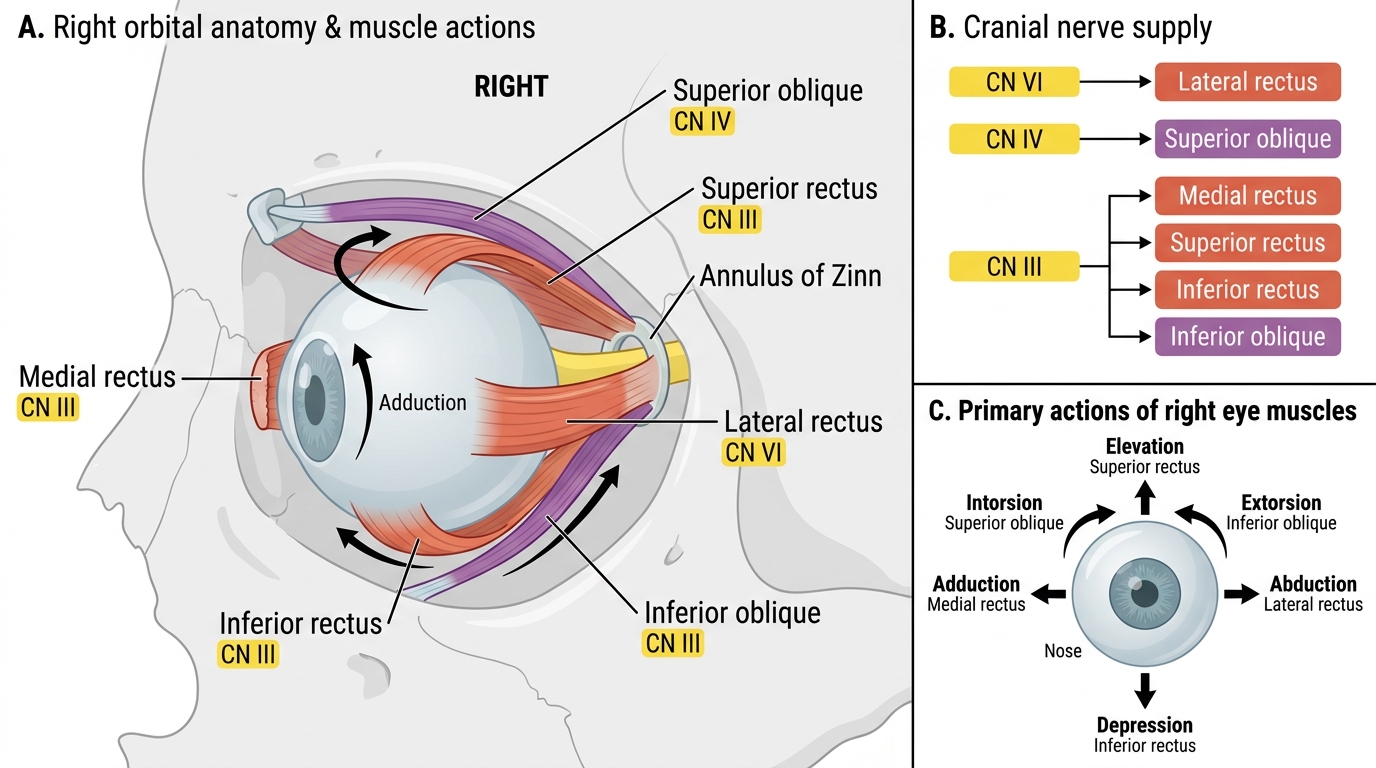
Right Orbit: Extraocular Muscles, Nerve Supply, and Primary Actions
Uniocular (Monocular) Testing — Ductions
Ductions are the monocular rotations of a single eye tested in isolation while the fellow eye is occluded. Duction testing is the cornerstone of differentiating a true muscle restriction or paresis from a comitant deviation: in a comitant childhood squint the ductions are full and symmetrical in both eyes, while a paretic or restricted muscle produces a deficiency of movement of the affected eye that is only revealed when the fellow eye is covered and binocular cues are removed. Duction testing should therefore precede the cover test in any patient where an incomitant deviation or neurological cause is suspected. In thyroid orbitopathy, for example, the inferior rectus becomes fibrotic and restricts elevation — the duction test unmasks this elevation deficiency even before the cover test quantifies the deviation. In a patient with orbital blow-out fracture and inferior rectus entrapment, the duction test shows reduced elevation of the affected eye while the fellow eye has completely normal excursions. Without duction testing, these restrictions could be confused with a contralateral elevator palsy.
Technique for duction testing:
1. Position the patient: seated comfortably, examiner at eye level, approximately 40–50 cm in front.
2. Occlude the fellow eye using an occluder or the patient's own palm.
3. Target: use a fine target — a pen torch tip, a muscle light, or a small fixation target held at the end of an arm. A pen torch is preferred because it illuminates the corneal reflex and allows simultaneous Hirschberg assessment.
4. Instruct the patient: "Follow the light with your open eye only. Keep your head still."
5. Move the target smoothly and slowly through the six cardinal positions: right (abduction), left (adduction), up-right, up-left, down-right, down-left. Note the extent of rotation in each direction. Normal duction allows the limbus to reach within 1–2 mm of the medial and lateral canthi on horizontal gaze, and the superior and inferior limbus to move approximately 10–12 mm on vertical gaze.
6. Record: note any limitation (which direction, how severe — graded −1 to −4 relative to full excursion) or any nystagmus elicited at extremes of gaze (endpoint nystagmus is a normal finding at extreme lateral gaze — sustained coarse nystagmus in mid-gaze is abnormal).
7. Repeat for the fellow eye after removing the occluder.
Common errors: failing to occlude the fellow eye (binocular cues compensate for restriction); moving the target too fast (patient cannot follow); holding the target too far away (vergence effort confounds results); not maintaining target at a constant distance from the patient's face.