Page 6 of 30
OP2.2 | Lid and Lacrimal Procedures: Bell Phenomenon, Ptosis Evaluation, Massage and Epilation — SDL Guide (Part 2)
Technique: Bell's Phenomenon Test and Ptosis Assessment
Both Bell's phenomenon and ptosis measurements are bedside procedures requiring no specialised equipment beyond a ruler, a pen torch, and a slit-lamp for confirmation. Standardisation of technique is critical — inter-examiner variability in MRD-1 and levator function measurements can significantly change the surgical plan.
Technique: Bell's phenomenon test. Ask the patient to close their eyes gently first (note if lagophthalmos is already present). Then — with your thumbs placed lightly on the patient's cheeks and your index fingers on the upper lids — ask the patient to close their eyes firmly while you gently resist lid closure (enough to see the globe but not so much that you hurt the patient). Alternatively, after asking the patient to close the eyes, gently lift the upper lid to observe the globe position. Observe whether the cornea rotates upward (positive Bell's), partially rotates (equivocal), or remains centred (negative Bell's). Document the result for each eye separately. If the patient is anaesthetised or uncooperative, gently prise the lids apart after asking them to close — the reflex still occurs.
Technique: MRD-1 measurement. Seat the patient at eye level. Hold a pen torch directly in front of the patient's face at arm's length. Ask the patient to look straight at the light (primary gaze). With a millimetre ruler (or the slit-lamp beam calibrated in millimetres), measure the distance from the corneal light reflex to the upper lid margin. In a ptotic eye, the lid margin may obscure the reflex — in this case, MRD-1 is expressed as a negative number (e.g., –1 mm if the lid is 1 mm below the corneal reflex).
Technique: Levator function. Place your thumb firmly on the patient's brow to prevent any contribution from frontalis. Ask the patient to look down as far as possible — note the position of the upper lid margin. Then ask the patient to look up as far as possible — note the new position. The difference (in mm) is the levator function. Use the slit-lamp millimetre scale for precision. Always measure both eyes to compare.
Technique: Lacrimal Sac Massage in Congenital Dacryocystitis
Congenital nasolacrimal duct obstruction (CNLDO) affects approximately 6% of newborns and is caused by failure of canalisation of the lower end of the nasolacrimal duct at the valve of Hasner. The clinical presentation is epiphora (watering) beginning in the first few weeks of life, with or without mucopurulent discharge from the nasal canthus. In 90% of cases the obstruction resolves spontaneously within the first year; massage accelerates this and is the recommended first-line treatment.
Crigler's massage technique (lacrimal sac massage) works by building hydrostatic pressure within the lacrimal sac to force open the obstructing membrane at the distal end of the nasolacrimal duct. It is taught to the parents to perform at home before each feed (4–6 times daily) for practical adherence.
Step-by-step technique: (1) Wash hands thoroughly. (2) Place the index fingertip (or a cotton-tipped applicator for gentleness) over the lacrimal sac fossa — the soft depression on the medial side of the nose, just below the inner canthus of the eye, between the anterior and posterior lacrimal crests. The lacrimal sac lies in this fossa. Do NOT press on the bony bridge of the nose — the sac is just medial to the canthus, not on the nasal bones. (3) Apply firm, downward stroking pressure toward the nose (toward the nasolacrimal duct orifice at the inferior meatus), approximately 10 strokes per session. (4) Any mucopurulent material expressed during massage is wiped away with a clean cotton ball from inner to outer corner. (5) If topical antibiotic drops (e.g., tobramycin or chloramphenicol) have been prescribed for the associated conjunctival discharge, instil them after massage, not before (so the massage pressure reaches the sac without displacing the drops).
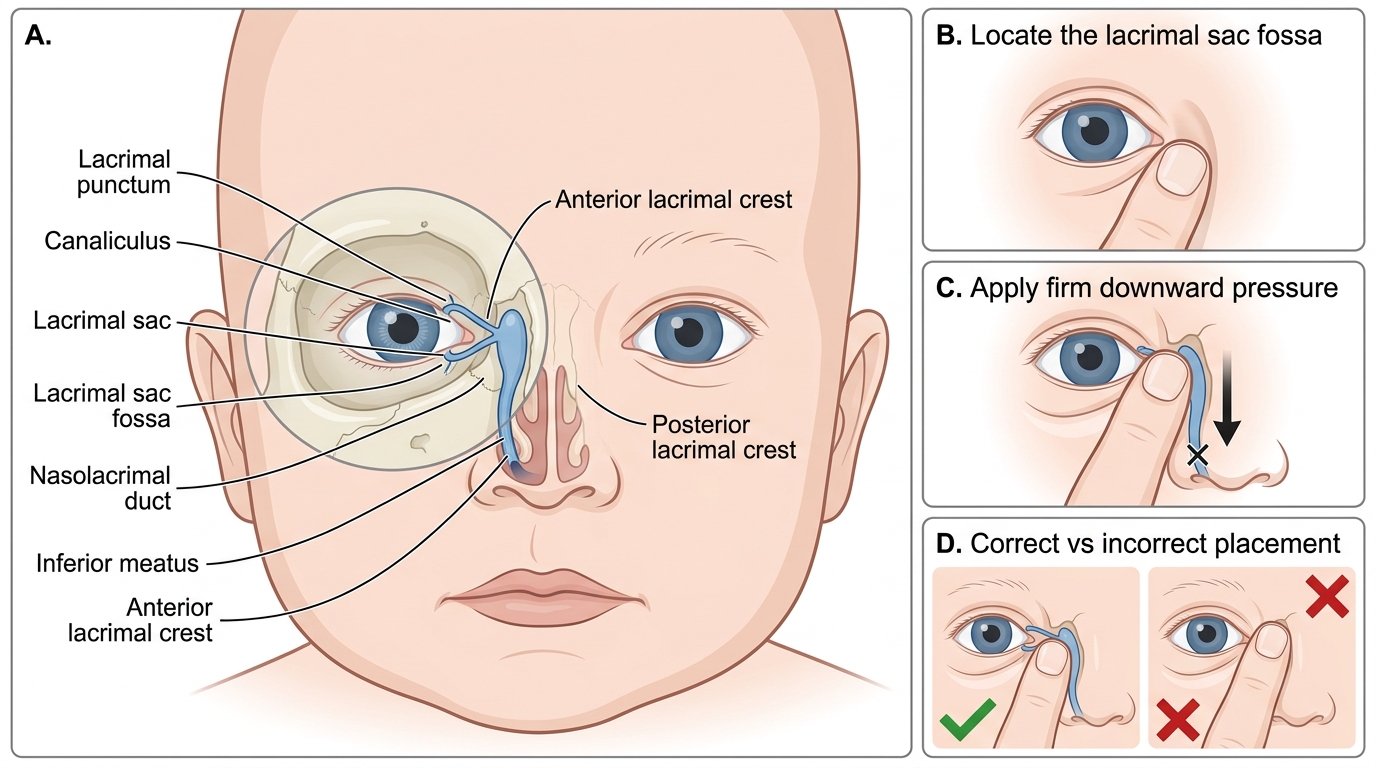
Crigler Lacrimal Sac Massage Technique
If the CNLDO does not resolve by 12 months of age, the child is scheduled for nasolacrimal duct probing under general anaesthesia, which has a success rate of approximately 90% at 12 months (declining with age if delayed further). Syringing and probing can be performed in the office under topical anaesthesia in compliant older children.
SELF-CHECK
The mother of a 4-month-old is performing Crigler's massage for CNLDO. You note she is pressing with her fingertip firmly on the bony nasal bridge. What is the correct correction to her technique?
A. She should increase the number of strokes from 10 to 20 per session
B. She should move her fingertip to the soft depression just medial to the inner corner of the eye (lacrimal sac fossa), not on the nasal bridge
C. She should press toward the inner corner of the eye (medially) rather than downward
D. Pressing on the nasal bridge is correct as it compresses the nasolacrimal duct from the outside
Reveal Answer
Answer: B. She should move her fingertip to the soft depression just medial to the inner corner of the eye (lacrimal sac fossa), not on the nasal bridge
The lacrimal sac lies in the lacrimal sac fossa — the soft bony depression just below and medial to the inner canthus of the eye, between the anterior and posterior lacrimal crests. Pressure must be applied there (over the sac) with a downward stroking motion (toward the nasolacrimal duct and inferior meatus) to generate hydrostatic pressure. Pressing on the bony nasal bridge misses the sac entirely and generates no useful pressure. The direction of pressure is downward toward the nose, not medially.
Technique: Epilation of Aberrant Eyelashes
Epilation is the mechanical extraction of individual misdirected eyelashes using epilating forceps. It is a simple, rapid outpatient procedure that provides immediate symptomatic relief from trichiasis — the scratching and irritation of the cornea by inward-turned lashes — and prevents further epithelial erosion. Because lashes regrow in approximately 4–6 weeks, epilation must be repeated regularly; it is a temporising measure unless the underlying cause (e.g., trachoma, entropion) is definitively treated.
Materials needed: a slit-lamp (for magnified visualisation of the lash root) or a loupe, and epilation (epilating) forceps — fine-tipped, non-tooth forceps with a flat broad grip that grasps the lash without crushing it.
Step-by-step technique: (1) Instil topical anaesthetic drops (proxymetacaine 0.5%) if the patient is in significant pain or if extensive epilation is planned (topical anaesthetic has no direct effect on lash root sensation but reduces blepharospasm). (2) Position the patient at the slit-lamp. Using the slit-lamp for illumination and magnification, identify each trichiatic lash — those touching the cornea can often be identified by the corneal epithelial disturbance they cause. (3) Grasp the lash as close to its base at the lid margin as possible using the epilating forceps. (4) Apply a firm, single, smooth pulling motion in the direction of lash growth (angling slightly away from the lid) to extract the whole lash shaft with its root sheath. An incomplete pull that breaks the shaft leaves the root and causes faster regrowth with a blunter, more damaging tip. (5) Inspect the extraction site to confirm the root has come out; re-examine the cornea for remaining trichiatic lashes. (6) Instil antibiotic ointment to the lid margin after completing the procedure.
For permanent eyelash removal: electrolysis uses a fine needle electrode (radiofrequency) inserted alongside the lash follicle to ablate it — effective but requires specialist equipment. Cryotherapy of the lid margin (using a cryoprobe, −20°C) ablates lash follicles over a section of lid margin; useful for multiple adjacent trichiatic lashes; risk of de-pigmentation in dark-skinned patients and notching of the lid margin if overapplied.