Page 9 of 44
EN2.{3,5} | Otoscopy Tuning Fork Testing and Tympanic Membrane Assessment — SDL Guide
Learning Objectives
- Perform otoscopy using correct technique, including pinna traction and speculum selection
- Identify all landmarks of the normal tympanic membrane (handle of malleus, short process, umbo, light reflex, pars tensa, pars flaccida)
- Distinguish a safe (central, tubotympanic) from an unsafe (attic/marginal, atticoantral) tympanic membrane perforation
- Perform Rinne, Weber, and ABC (absolute bone conduction) tuning fork tests with correct technique
- Correctly interpret tuning fork test results in conductive hearing loss, sensorineural hearing loss, mixed loss, and normal hearing
- Diagrammatically represent tympanic membrane findings
INSTRUCTIONS
Otoscopy and tuning fork tests are the two most important bedside skills in ENT. Together they tell you: (1) whether there is a structural abnormality of the tympanic membrane, and (2) whether any hearing loss is conductive, sensorineural, or mixed — before a single formal audiogram is performed. This module covers both skills in depth, with particular attention to the tuning-fork interpretation rules, which are the most frequently examined and most frequently confused aspect of ENT clinical skills.
References
- Dhingra PL, Dhingra S. Diseases of Ear, Nose and Throat & Head and Neck Surgery, 8th ed. Ch 2, 3 (textbook)
- Hazarika P. Textbook of Ear, Nose and Throat & Head Neck Surgery, 3rd ed. Ch 4, 5 (textbook)
- Scott-Brown's Otorhinolaryngology Head and Neck Surgery, 8th ed. Vol 1, Ch 9, 10 (textbook)
Version 2.0 | NMC CBUC 2024
CLINICAL SCENARIO
You are seeing a 35-year-old school teacher who presents with right-sided hearing loss for 6 months. She has no ear discharge, no vertigo, and no tinnitus. Your otoscopy of the right ear shows a dull, retracted tympanic membrane with no perforation. You perform tuning fork tests: Rinne test on the right — bone conduction is heard longer than air conduction (BC > AC). Weber test — the sound lateralises to the right ear. Your intern, watching over your shoulder, whispers: 'Doesn't a positive Rinne mean normal hearing? And shouldn't a sensorineural loss push the Weber away from the bad ear?' What would you say — and what is the actual diagnosis?
WHY THIS MATTERS
EN2.3 and EN2.5 together cover the complete bedside ear examination — otoscopy and the three tuning fork tests. These are examined in OSCEs, at the clinical bedside, and in the final MBBS. Tuning fork test interpretation is one of the highest-yield question topics in ENT short answers and MCQs because the interpretation rules are specific, counter-intuitive to many students, and carry zero tolerance for inversion: a Rinne POSITIVE result means something precise and opposite to what many students initially assume. Getting the Rinne or Weber interpretation backwards is a clinical error — it means concluding the patient has conductive loss when they have sensorineural loss, or vice versa — which leads to ordering the wrong investigation and planning the wrong management. This module drills the interpretation rules until they are automatic, using the fundamental physics of how sound reaches the cochlea as the explanatory framework, not rote memorisation.
RECALL
Sound reaches the cochlea via two routes. Air conduction (AC): sound waves travel through the external auditory canal, vibrate the tympanic membrane, are amplified by the ossicular chain (malleus→incus→stapes), and transmitted via the oval window to the cochlear fluids. The ossicular chain provides approximately 25–30 dB of mechanical amplification. Bone conduction (BC): vibration is transmitted directly through the skull bones to the cochlea, bypassing the outer and middle ear entirely. The cochlea (inner ear) is the final common pathway for both routes. The critical insight is: AC depends on an intact outer AND middle ear AND inner ear; BC depends ONLY on an intact inner ear (cochlea and vestibulocochlear nerve). Therefore, if middle ear disease impairs AC but BC is intact, AC < BC. If inner ear disease impairs both AC and BC equally, AC remains greater than BC (because the ossicular chain still provides its mechanical advantage). Recall also from anatomy: the tympanic membrane is semi-transparent, pearly-grey, inclined at ~55° to the EAC floor. Its landmarks — handle of malleus, short process, umbo, pars tensa, pars flaccida — are the reference points for otoscopy.
Clinical Indication: Why Otoscopy and Tuning Fork Tests Are First-Line
Otoscopy and tuning fork tests occupy a unique position in clinical medicine: they are bedside skills that provide diagnostic information unavailable from history alone, require no electricity or specialist laboratory, and take less than five minutes to perform. These properties make them not merely part of the ENT specialist's armamentarium but a core primary-care skill for any doctor who will ever see a patient with hearing loss, ear pain, or ear discharge — which is nearly every doctor in practice.
The clinical indication for otoscopy is any patient with an ear complaint: hearing loss, otalgia, otorrhoea, tinnitus, or vertigo. Even when the complaint is not primarily an ear complaint, unexpected otoscopic findings are discovered in a minority of patients — the doctor who does not look will not find them. For hearing loss specifically, the first clinical question is: is this conductive, sensorineural, or mixed? This question determines whether the investigation is an audiogram (to measure thresholds), an impedance audiometry (to assess middle ear function), or an MRI (to exclude a retrocochlear mass). Tuning fork tests provide the bedside answer to this question before any formal audiometry is performed.
Otoscopy cannot assess retrocochlear pathology (acoustic neuroma, for example, has a normal-appearing tympanic membrane on otoscopy). Tuning fork tests cannot precisely quantify the degree of hearing loss in decibels — that is the role of pure tone audiometry. But for the diagnosis of CSOM, cholesteatoma, acute otitis media, otitis externa, and for the preliminary classification of hearing loss type, these two bedside skills are definitive and indispensable.
EN2.3 requires demonstration of correct otoscopy technique AND tuning fork performance and interpretation. EN2.5 adds diagrammatic representation of the TM findings — a skill assessed both in the OSCE and in clinical documentation. Both are designated at SH level: performance in a supervised or simulated setting is the standard.
The Otoscope and Tuning Fork: Instrument Principles
Understanding what each instrument does physically makes the technique errors far less likely, because each technique step follows logically from the physics of the instrument.
The otoscope is a hand-held instrument with a handle (battery/light source), a head containing the illumination system, and a speculum that is inserted into the EAC. The optical system provides magnification (approximately 2–5×) and a bright, focused light directed along the line of sight through the speculum — achieving coaxial illumination within the ear canal. Speculum sizes range from 2 mm to 5 mm; the largest speculum that fits comfortably into the EAC provides the best view. The pneumatic otoscope (Siegle's speculum) has a rubber bulb that allows the examiner to vary air pressure in the canal, assessing tympanic membrane mobility: a normal TM moves inward with positive pressure and outward with negative pressure; a TM with fluid in the middle ear (otitis media with effusion) shows reduced or absent mobility; a perforated TM shows unrestricted movement.
The tuning fork is a U-shaped steel instrument that, when struck, vibrates at a fixed frequency. The two clinical frequencies are: 256 Hz and 512 Hz. For ENT clinical testing, 512 Hz is the standard (as per Dhingra). The 256 Hz fork is not used for clinical hearing testing because its vibration is perceived partially as tactile sensation through the skin and skull — this tactile component can give false results (a patient may perceive 'hearing' the fork via touch when BC is actually absent). The 512 Hz fork produces a pure auditory stimulus at comfortable intensity and decays slowly enough to allow meaningful comparison. The 1024 Hz fork decays too quickly in air to allow reliable AC measurement at the usual ear distance.
Key striking technique: strike the tuning fork against the examiner's elbow or knee (bony, not on a hard surface — which can crack the fork). Strike with moderate force only — striking too hard produces overtones that corrupt the test frequency. Hold the fork by the stem between thumb and index finger; never touch the tines (touching damps the vibration immediately). For BC testing, apply the base (stem end) firmly to the bone; for AC testing, hold the tines at 2–3 cm from the external meatus.
SELF-CHECK
Which tuning fork frequency is standard for performing Rinne, Weber, and ABC tests in clinical ENT, and why is the 256 Hz fork unsuitable?
A. 256 Hz; because it produces the loudest sound for patients with severe hearing loss
B. 512 Hz; because 256 Hz produces tactile vibration that can confound bone conduction results
C. 1024 Hz; because higher frequencies are more sensitive for sensorineural hearing loss
D. 512 Hz; because it is the exact frequency of human speech
Reveal Answer
Answer: B. 512 Hz; because 256 Hz produces tactile vibration that can confound bone conduction results
512 Hz is the standard clinical tuning fork frequency for ENT (Rinne, Weber, ABC) as per Dhingra and Scott-Brown's. The 256 Hz fork vibrates at low frequency, which produces a perceptible tactile sensation through skin and skull — patients can 'feel' the vibration even when they cannot 'hear' it, producing falsely positive bone conduction results. The 1024 Hz fork decays too rapidly in air to allow reliable air conduction measurement. 512 Hz strikes the balance: purely auditory (no tactile confound), sufficient duration for comparison, and within the speech frequency range.
Otoscopy Technique and Tympanic Membrane Landmarks
Correct otoscopy requires three simultaneous actions: adequate illumination, a clear path through the ear canal, and systematic inspection of the TM from the outer margin inward to the central umbo. The technique is as follows.
Step 1 — Select the speculum. Choose the largest speculum that will comfortably enter the EAC (usually 4 mm in adults). Attach it to the otoscope head.
Step 2 — Pinna traction. Hold the otoscope in the dominant hand like a pen (not in the palm — the pen grip allows fine finger movement for adjustment). With the other hand, grasp the pinna at the upper margin and pull upward and backward in adults (downward and backward in infants and young children <2 years). Maintain this traction throughout the examination.
Step 3 — Insert the speculum gently. Slide the speculum along the superior wall of the EAC with gentle pressure. Do NOT jab — the inner bony EAC is sensitive and exquisitely tender in acute otitis externa.
Step 4 — Inspect the EAC. Before looking at the TM, inspect the canal: wax, discharge, foreign body, skin changes (oedema = OE; fungal debris = otomycosis; blood = trauma). If wax obstructs the view, the TM cannot be assessed.
Step 5 — Identify TM landmarks systematically. Move from periphery to centre:
- The annulus (fibrous ring) marks the TM periphery.
- The pars tensa (lower 3/4 of TM): taut, translucent, light grey; the site of central perforations.
- The pars flaccida (Shrapnell's membrane): the small, loose region above the anterior and posterior malleolar folds; the site of attic perforations.
- The handle (manubrium) of malleus: a white/yellowish streak running vertically downward from the short process (a small white prominence anterosuperiorly) to the umbo (the most central point).
- The light reflex (cone of light): normally in the antero-inferior quadrant of the TM, pointing toward the 5 o'clock position on the right TM (and 7 o'clock on the left). Absence or displacement of the light reflex indicates TM retraction, bulging, or perforation.
Step 6 — Diagrammatic representation. In clinical notes, the TM is drawn as a circle divided by the handle of malleus into anterior and posterior halves, and further divided into superior and inferior quadrants. The examiner marks the perforation location, size (as a fraction of the total TM area), and relation to the annulus, pars flaccida, and handle. This is a required skill in EN2.5 and is assessed in OSCEs.
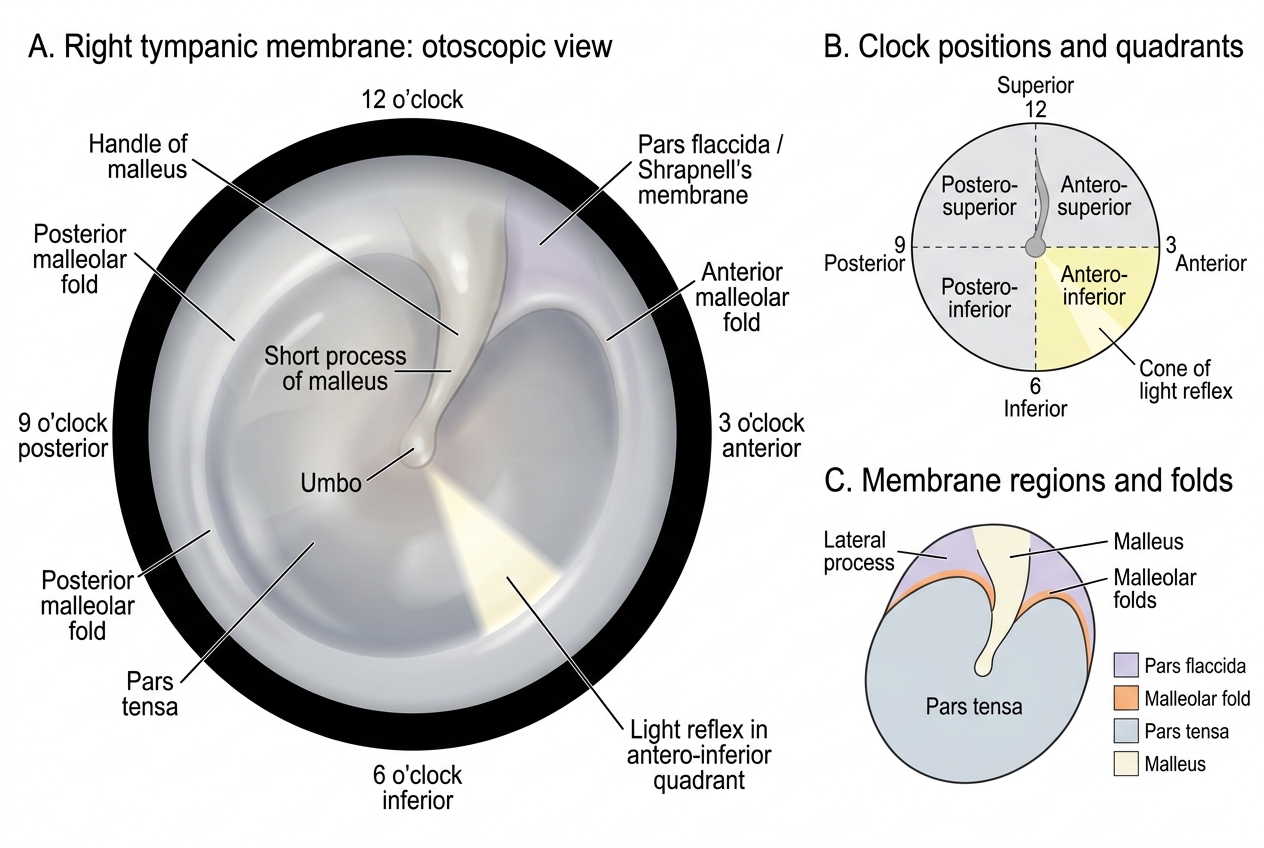
Right Tympanic Membrane Landmarks