Page 8 of 16
PE15.3-4 | Emergency Vascular Access — SDL Guide
Learning Objectives
- Describe the indications for peripheral IV cannulation and intraosseous access in children
- Identify the relevant anatomical landmarks for IV cannulation and IO needle insertion
- Demonstrate the steps of inserting a peripheral IV cannula in a model
- Demonstrate the steps of inserting an intraosseous line in a mannequin
- Confirm correct placement of IV and IO access and recognise complications
INSTRUCTIONS
Gaining vascular access rapidly in a critically ill child can be the difference between life and death. Peripheral IV cannulation is the standard first-line skill; intraosseous access is the essential backup when IV access fails. Both are procedural competencies that require repeated deliberate practice on models and mannequins before performing on patients. This module guides you through the indications, anatomy, technique, and confirmation of placement for both procedures, preparing you for supervised clinical practice.
References
- Ghai Essential Pediatrics, 9th ed, Ch 4 (Practical Procedures in Paediatrics) (textbook)
- Nelson Textbook of Pediatrics, 21st ed, Ch 71 (Vascular Access) (textbook)
- European Resuscitation Council (ERC) Paediatric Life Support Guidelines 2021 (guideline)
Version 2.0 | NMC CBUC 2024
CLINICAL SCENARIO
An 18-month-old boy is brought to the emergency department in cardiac arrest. He is pulseless, apnoeic, and deeply cyanosed. The resuscitation team begins CPR. The nurse attempts to insert a peripheral IV cannula in the antecubital fossa — twice — with no success. The child's veins are collapsed from prolonged shock. Thirty seconds have elapsed. The paediatric registrar looks at you and says: 'Get IO access now.' Do you know what to do, and can you do it?
WHY THIS MATTERS
Every life-saving intervention in paediatric resuscitation — fluid boluses, epinephrine (adrenaline), anticonvulsants, glucose — requires vascular access. In a shocked or collapsed child, peripheral veins are contracted and nearly invisible, making IV cannulation difficult even for experienced clinicians. Intraosseous (IO) access bypasses this problem entirely: the bone marrow cavity is directly connected to the central venous circulation through nutrient vessels and is never collapsed. Current ILCOR and ERC guidelines recommend proceeding to IO access after 2 failed IV attempts or 90 seconds in a critically ill child. The NMC 2024 curriculum mandates that every MBBS graduate can demonstrate IV cannula insertion on a model and IO insertion on a mannequin — skills that must be practised systematically before being needed in a real emergency.
RECALL
Before studying the technique, recall: (1) What are the major superficial veins of the upper limb and lower limb accessible for cannulation? (2) Where is the tibial tuberosity, and what lies below and lateral to it on the anteromedial surface of the tibia? (3) From your previous sessions on fluid management: what volume of IV fluid would you give as an emergency bolus for a child in shock? Having these anatomical and clinical anchors ready will make the procedural steps easier to understand and retain.
Clinical Indication and Relevance of Emergency Vascular Access
Vascular access is required whenever a child needs fluids, medications, blood products, or emergency drugs that cannot be given by the oral or inhaled route. The urgency of access determines the approach: elective IV cannulation for a stable pre-operative child has a different risk-benefit balance than emergency access in a child in cardiac arrest or septic shock.
Provided image
Indications for peripheral IV cannulation (PE15.3): Any child requiring IV fluids, IV medications, blood sampling under the same puncture, or monitoring of central venous access. This includes: dehydration requiring IV rehydration (Plan C), perioperative fluid management, antibiotic therapy, chemotherapy, neonatal jaundice with IV management, and any child unable to tolerate oral fluids.
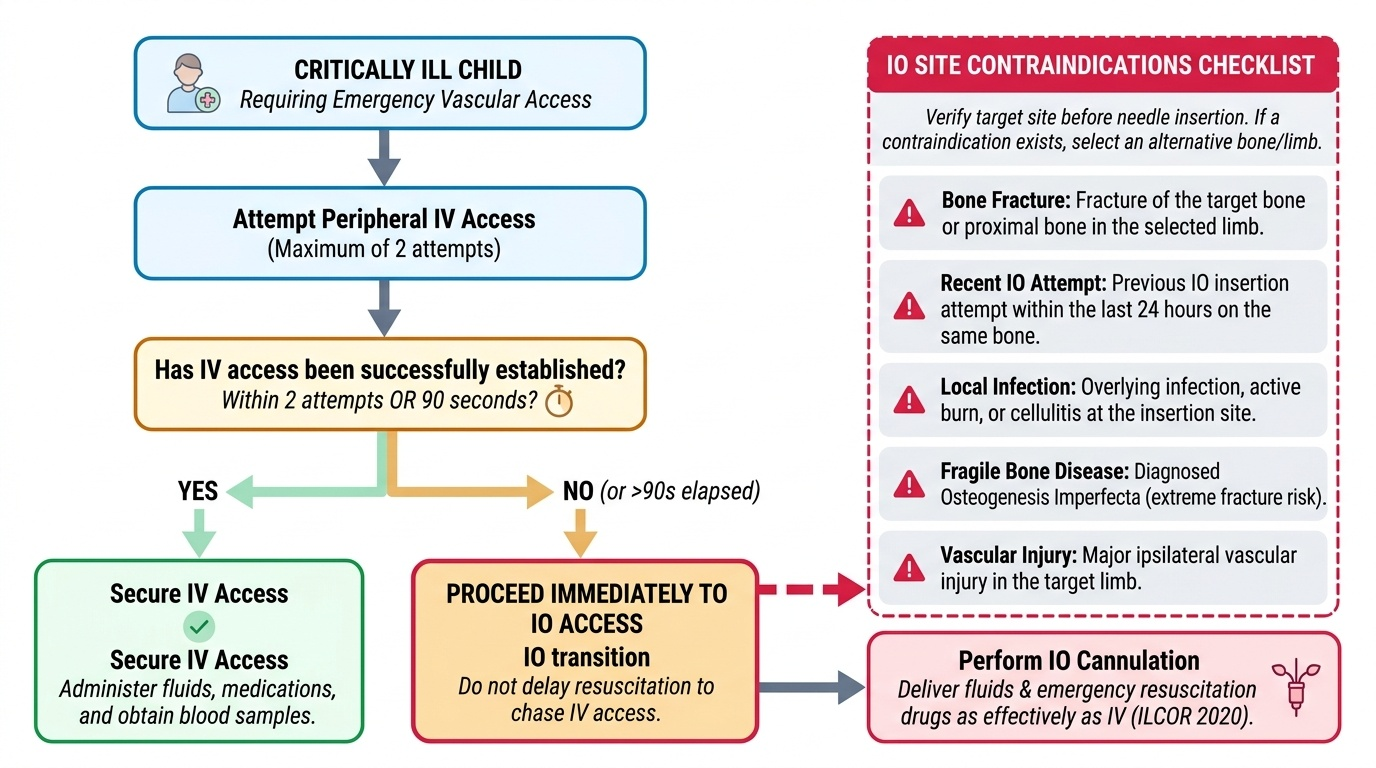
Indications for intraosseous access (PE15.4): The IO route is indicated when peripheral IV access cannot be obtained rapidly in a critically ill child. Specific indications include:
• Cardiac arrest — immediate IO if IV not established at scene or within first 2 attempts
• Shock (septic, hypovolaemic, distributive) — when peripheral veins are collapsed and 2 attempts or 90 seconds have elapsed without IV access
• Status epilepticus — when IV access is unavailable and IV benzodiazepine or phenobarbital is needed urgently
• Trauma resuscitation — IO as initial or backup access in polytrauma
Contraindications to IO at a specific site: fracture of the bone at or proximal to the site; previous IO attempt within 24 hours at the same bone; overlying infection, burn, or cellulitis; osteogenesis imperfecta (fragile bones at risk of fracture during insertion); ipsilateral vascular injury.
The key decision rule: in a critically ill child, do NOT abandon the resuscitation to chase IV access indefinitely. After 2 failed attempts or 90 seconds, switch to IO. IO access delivers drugs and fluids as effectively as IV for resuscitation purposes (ILCOR 2020).
Anatomy and Governing Principles
A confident proceduralist knows the anatomy before picking up the needle, not after. The relevant anatomy for vascular access in children differs fundamentally from that in adults: infants have a much higher surface area-to-weight ratio, their veins are smaller and more mobile, and their bones have thinner cortices — all of which affect technique. For peripheral IV cannulation, the key is knowing which superficial veins are reliably visible and fixed enough to puncture; for IO insertion, the key is knowing the precise bony landmark that defines the safe insertion zone. Mastering both anatomical maps before the procedure allows you to select the right site confidently and adapt when the primary site is not accessible.
Peripheral venous anatomy for IV cannulation in children:
The most accessible sites, in order of preference for routine cannulation:
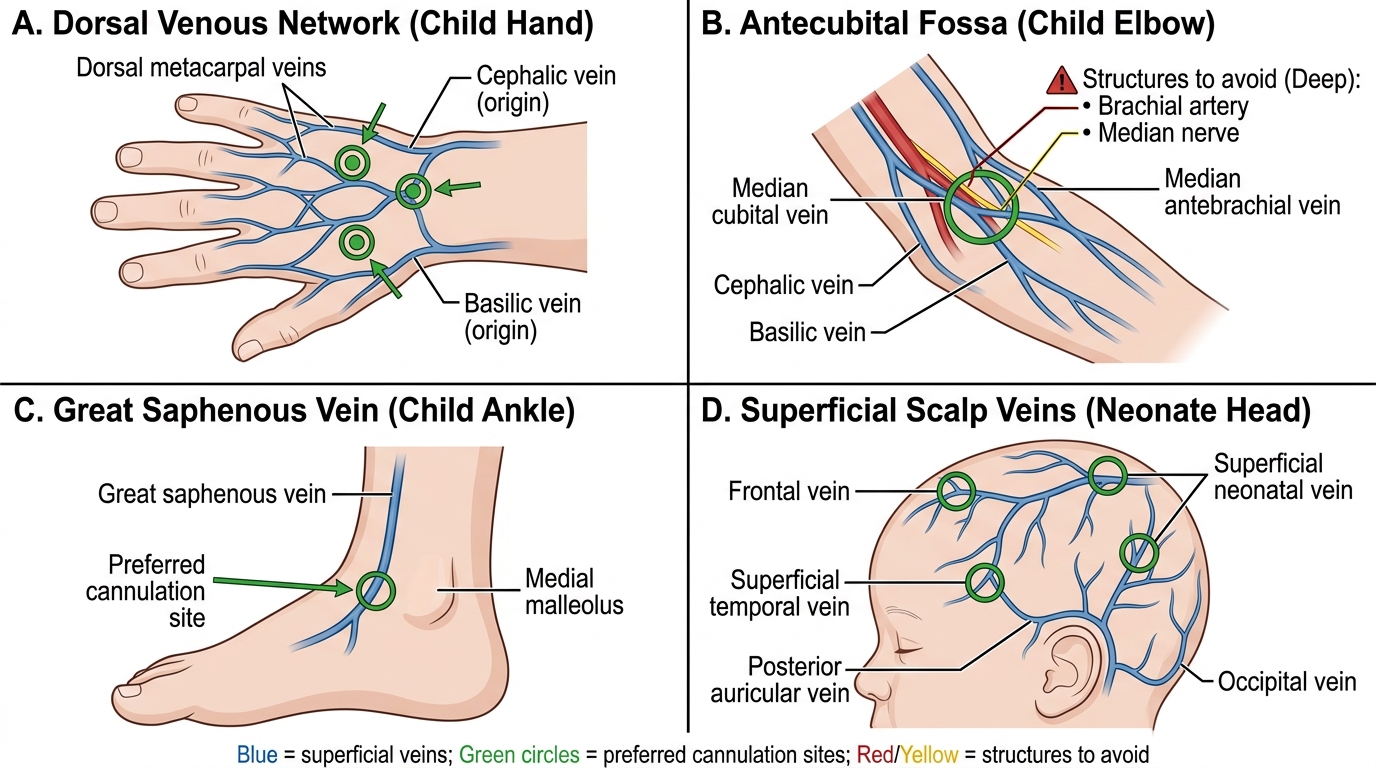
- Dorsum of the hand — dorsal metacarpal veins forming the dorsal venous network; well-visualised in cooperative children; comfortable for prolonged access but mobile and prone to displacement in young children.
- Antecubital fossa — the median cubital vein (crossing from cephalic to basilic) is large, relatively fixed, and easy to cannulate but limits elbow movement; the cephalic and basilic veins are also accessible here. Preferred for blood sampling combined with cannulation.
- Saphenous vein at the ankle — the great saphenous vein runs anterior to the medial malleolus; reliably located, useful when upper limb access fails; movement restricted if the lower limb must be splinted.
- Scalp veins in neonates — the frontal, temporal, and posterior auricular veins are prominently visible in neonates; useful when limb veins are inaccessible; no advantage in infants > 6 months.
- Femoral vein — large and reliably located medial to the femoral artery at the inguinal ligament; useful in an emergency when other sites fail, but risk of infection and thrombosis is higher.
Bony anatomy for intraosseous access:
The proximal tibia is the first-choice IO site in children. The insertion point is on the anteromedial flat surface of the tibia, approximately 2-3 cm below the tibial tuberosity (or 1-2 finger-breadths below it in infants). This avoids the proximal epiphyseal growth plate (which lies within 1 cm of the tuberosity) and the popliteal vessels posteriorly. The needle is inserted perpendicular to the bone surface (90 degrees) with a rotary or drilling motion.
Alternative IO sites: distal femur — 3 cm above the lateral condyle, midline; distal tibia — 3 cm above the medial malleolus, medial surface; proximal humerus — greater tubercle, used in adults and older children with EZ-IO drill. In neonates and infants, the proximal tibia is preferred because the bone cortex is thin and easily penetrated.
Paediatric Peripheral Venous Cannulation Sites
Peripheral IV Cannulation — Procedure and Technique
Peripheral IV cannulation in a child requires preparation, anatomical knowledge, gentle technique, and the ability to manage a frightened child who may be in pain and distress. Rushing this procedure causes more failures than any technical deficit — positioning the limb correctly, engorging the vein with a tourniquet and gravity, and applying firm skin traction before inserting the needle are the three most important determinants of first-attempt success. On a model, the steps are identical to those performed on a patient, which is why deliberate repetition on the model is so valuable: it builds the muscle memory and confidence that prevent hesitation at the bedside. Each step below must be practised in sequence until the entire procedure flows as a single, unhurried chain of actions.
Equipment needed: over-the-needle IV cannula (size appropriate to age — neonates: 24G; infants: 22-24G; children: 20-22G; adolescents: 18-20G), tourniquet, antiseptic swab (2% chlorhexidine or 70% alcohol), transparent dressing (Tegaderm), IV extension set, 5 mL syringe with normal saline flush, adhesive tape.
Step-by-step technique:
- Position the child: parent or assistant holds the limb firmly. Apply a warm compress to dilate the vein if collapsed. Use EMLA cream 60 minutes before elective procedures.
- Apply tourniquet: 5-10 cm above the proposed site; tight enough to occlude venous flow but not arterial. In neonates, a rubber band may suffice.
- Identify the vein: visualise and/or palpate the vein. Choose a straight segment free of valves (avoid bifurcations). Transillumination devices or ultrasound may help in difficult cases.
- Clean the site: swab with antiseptic in a circular outward motion; allow to dry for 30 seconds.
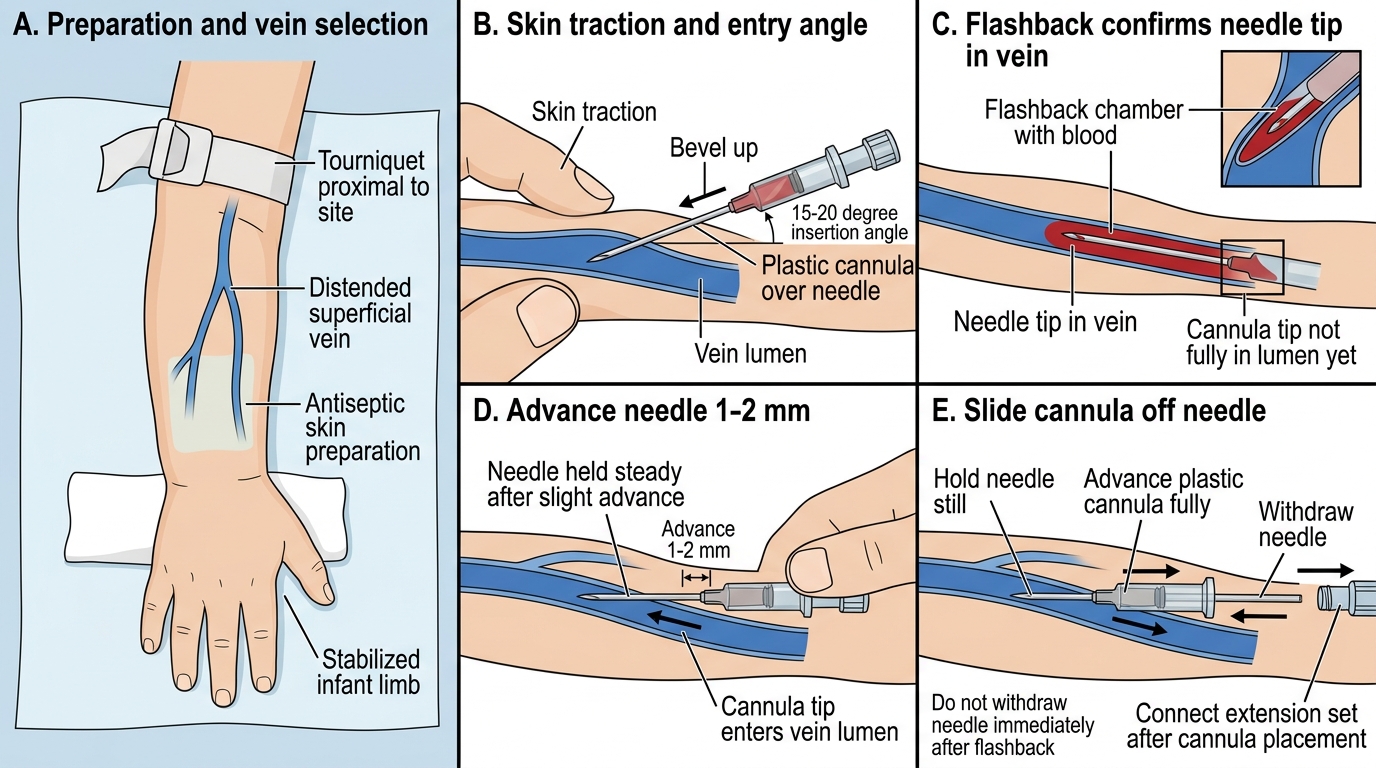
- Stabilise the skin: use the non-dominant thumb to apply gentle traction distal to the site — this prevents the vein rolling and tents the skin.
- Insert the needle: bevel up, at 15-20 degrees to the skin surface, aimed along the axis of the vein. A flashback of blood in the chamber confirms venous entry. Advance 1-2 mm further to ensure the cannula tip (not just the needle) is within the vein.
- Advance the cannula: while holding the needle still, advance the plastic cannula fully into the vein with the thumb and index finger. Then withdraw the needle completely while pressing the skin above the vein tip to reduce blood loss.
- Connect and flush: attach the extension set, aspirate to confirm blood return, then flush gently with 2-3 mL normal saline. Observe for swelling (extravasation) or pain.
- Secure: apply transparent dressing, then secure the extension set with tape. Splint the limb if necessary to prevent accidental displacement.
Common difficulties in children:
• Collapsed veins in dehydration — warm the limb, position dependent (hand below the elbow)
• Rolling veins — apply firmer skin traction, approach from the side
• Short cannula for a chubby infant — use a 25G butterfly needle for blood sampling only if IV access truly fails
Peripheral IV Cannula Insertion Technique
SELF-CHECK
While inserting a peripheral IV cannula in a 6-month-old infant, you get a flashback of blood in the chamber. What is the correct next step?
A. Immediately withdraw the needle and connect the extension set
B. Advance the needle 1-2 mm further, then slide the plastic cannula fully into the vein while holding the needle still
C. Aspirate blood through the needle to confirm venous placement before advancing
D. Increase the insertion angle to 45 degrees before advancing the cannula
Reveal Answer
Answer: B. Advance the needle 1-2 mm further, then slide the plastic cannula fully into the vein while holding the needle still
Flashback in the chamber confirms the needle tip is in the vein, but the plastic cannula tip is still in the subcutaneous tissue. Advance the needle 1-2 mm further to ensure the cannula tip has entered the vein lumen, then hold the needle still and advance the cannula fully while withdrawing the needle. Withdrawing the needle immediately risks leaving the cannula tip outside the vein; aspirating through the needle is not the standard technique.