Page 9 of 16
PE15.3-4 | Emergency Vascular Access — SDL Guide (Part 2)
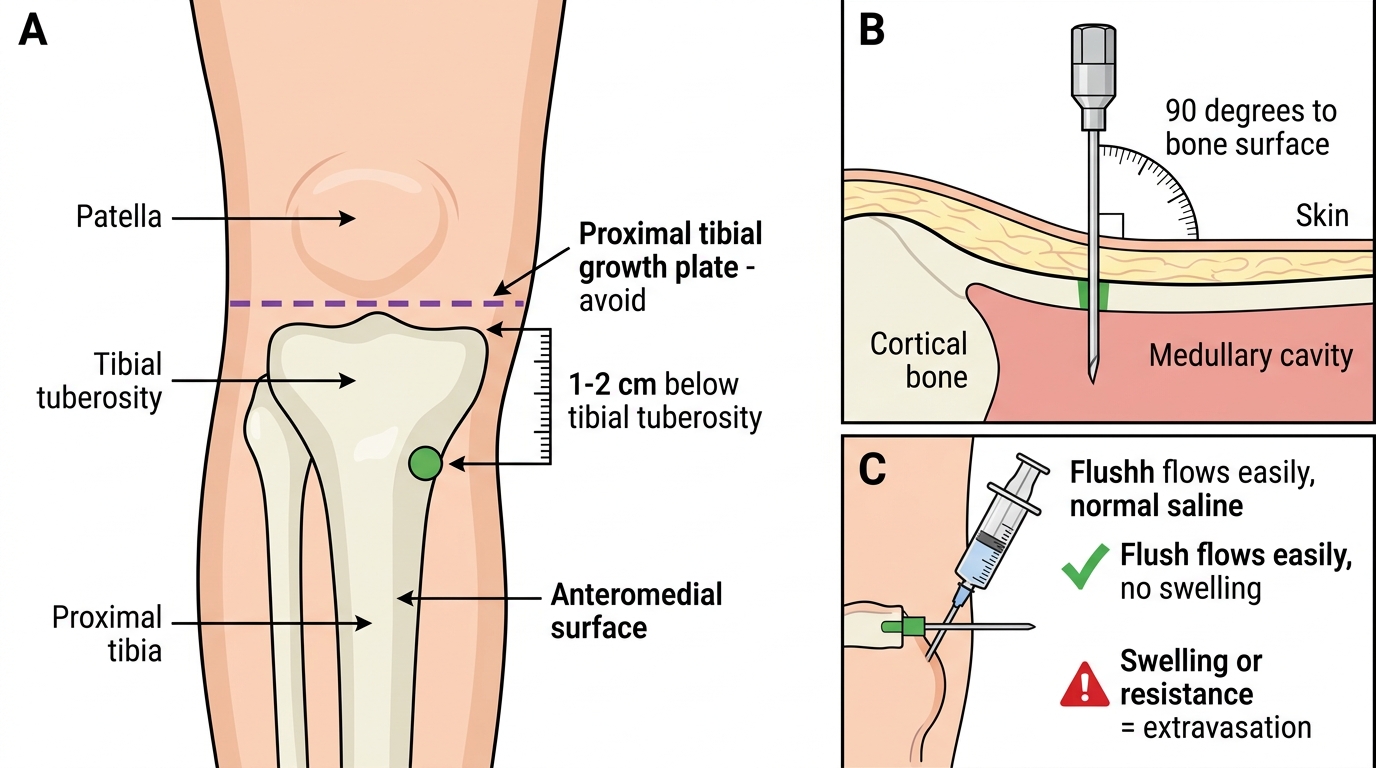
Intraosseous Line Insertion — Procedure and Technique
IO insertion delivers medications and fluids directly into the bone marrow cavity, which drains through nutrient veins into the central venous circulation. Because bone marrow is a rigid, non-collapsible compartment, it remains accessible even during profound shock when all peripheral veins are collapsed and invisible. This anatomical property is what makes IO access so valuable — the same shock that makes IV cannulation impossible does not affect the marrow cavity. The procedure can be performed with a manual IO needle (Cook or similar) or a battery-powered drill (EZ-IO — the standard in most emergency departments). Both methods achieve the same endpoint; the drill simply does it faster and with less physical effort. The technique on a mannequin follows the same steps as for a real patient, making mannequin practice directly transferable to clinical performance.
Equipment needed: IO needle (manual: 16-18G cook-type; drill-based: EZ-IO with 15 mm needle for most children, 25 mm for large/obese children), antiseptic swab, gloves, 10 mL syringe, normal saline flush (5-10 mL), IV extension set, adhesive stabiliser.
EZ-IO drill technique (proximal tibia site) — step by step:
- Position: place the child supine. Place a small roll or pad behind the knee to flex it 10-15 degrees — this exposes the anteromedial tibial surface. Palpate the tibial tuberosity prominently.
- Identify the insertion point: place two fingers below the tibial tuberosity (in infants — one finger-breadth; in older children — 2-3 cm). The site is on the flat anteromedial surface, 1-2 cm medial to the anterior crest of the tibia. This avoids the growth plate (which is within the tuberosity area itself) and the peroneal nerve.
- Clean the site: antiseptic swab; allow to dry.
- Insert the needle: hold the EZ-IO driver perpendicular to the bone surface (90 degrees), with firm downward pressure. Activate the drill and advance with steady pressure. You will feel a decrease in resistance (a "give") as the needle passes through the cortex into the marrow cavity. Stop immediately.
- Remove the driver and stylet: hold the needle hub firmly (it should stand upright without support), remove the drill driver, then unscrew and remove the stylet.
- Confirm placement (3-step check): (a) needle stands upright without support; (b) aspirate — blood or marrow (may be minimal in a shocked child — absence of aspiration does not exclude correct placement); (c) flush with 5-10 mL normal saline — flush should flow easily with no swelling.
- Connect and secure: attach IV extension set, apply the adhesive stabiliser, tape the connecting tubing.
Manual IO needle technique (when drill unavailable): use a rotating, boring motion applying steady axial pressure; the endpoint is the same — decrease in resistance + needle standing upright. Do NOT rock the needle side-to-side (risks widening the hole and causing leakage).
⚑ AI image — pending faculty review (auto-QA score 6/10; best of 3 attempts)
Proximal Tibial IO Insertion Site in a Child
SELF-CHECK
You have inserted an IO needle into the proximal tibia of a 2-year-old. The needle stands upright without support. When you aspirate, you get no marrow return. What is the correct next action?
A. Remove the needle and attempt IO at a different site
B. Flush with 5-10 mL normal saline and observe for swelling or resistance
C. Increase the needle angle to 45 degrees and advance further
D. Attach a blood transfusion set and begin infusion without confirming placement
Reveal Answer
Answer: B. Flush with 5-10 mL normal saline and observe for swelling or resistance
Absence of marrow aspiration does NOT exclude correct IO placement — especially in a deeply shocked child with depleted marrow blood. The next step is to flush with 5-10 mL of normal saline. If the flush flows easily with no visible swelling over the tibia or in the calf (which would indicate extravasation or posterior compartment leak), placement is confirmed. Removing the needle after a failed aspiration prematurely abandons a likely correctly placed IO line.
Interpretation of Findings: Confirming Correct Placement
Both IV and IO access require systematic confirmation of correct placement before drugs or fluids are given at high volume or pressure. This step is non-negotiable — a misplaced cannula delivering a bolus of fluid into the subcutaneous tissues wastes precious resuscitation time and can cause tissue necrosis if vasoactive drugs (such as adrenaline or dopamine) or hypertonic fluids (such as 25% dextrose or 8.4% sodium bicarbonate) are extravasated. The confirmation process is brief — it takes less than 30 seconds — but it must be done every time, even in the most urgent situation. Learning to distinguish 'correctly placed' from 'probably placed' is one of the key practical judgements this module builds. The signs of correct placement differ slightly between IV cannulas and IO needles, but both share the same underlying principle: fluid flows freely, drugs can be delivered, and there is no visible or palpable soft-tissue accumulation around the access site.

Provided image
Confirming peripheral IV placement — positive signs:
• Blood flashback at insertion
• Easy aspiration of blood through the extension set
• Flush with 2-3 mL normal saline flows without resistance and without visible swelling
• No pain reported (in conscious patients)
Signs of failed IV placement / complications:
Infiltration/extravasation: the cannula tip has exited the vein into the surrounding tissue. Signs: swelling and puffiness around the cannula site during or after flushing; pain on flushing; pallor or coolness of skin around the site; loss of flashback. Management: remove the cannula immediately, elevate the limb, apply a cold compress. If vasoactive drugs (dopamine, adrenaline) or hypertonic fluids have extravasated, urgent review for potential tissue necrosis.
Phlebitis/thrombophlebitis: inflammation of the vein wall from mechanical irritation, hypertonic fluids, or infection. Signs: erythema, warmth, tenderness, and a palpable cord along the vein. Management: remove the cannula, warm compress, consider thrombosis if the area is indurated.
Confirming IO placement — positive signs (three-step check):
1. Needle stands upright without support after stylet removal
2. Blood or marrow aspirated (absent in shock — not required for confirmation)
3. 5-10 mL saline flush flows easily without resistance; no swelling or crepitus over the tibia or calf
Signs of failed IO placement / complications:
Extraosseous infiltration: needle has not penetrated the cortex, or has passed through both cortices. Signs: swelling around the insertion site on flushing; resistance to flushing; palpable induration. Management: remove the needle immediately; do NOT attempt IO at the same site — use the other tibia or an alternative site.
Compartment syndrome: rare but serious; fluid under pressure leaks into the anterior tibial compartment. Signs: progressive calf swelling, tightness, pain on passive dorsiflexion. An urgent surgical consultation is required. Prevention: confirm placement before fluid administration; watch for resistance to infusion.
Fracture through IO site: extremely rare; more likely in osteogenesis imperfecta (absolute contraindication) or if the needle is inserted with excessive force.
Applied and Supervised Practice
Both PE15.3 and PE15.4 are skill competencies that require hands-on practice on simulation models before supervised clinical application. The NMC CBME curriculum frames these at the 'demonstrate on model/mannequin' level — the expectation is that you can perform the steps correctly and systematically, not that you will do it unsupervised on a real patient immediately.
Practice targets for IV cannulation (PE15.3):
Practise on a phlebotomy arm trainer or paediatric IV arm. Begin with 20G cannulas (easiest to handle) before progressing to smaller gauges. The key technical skills to master are: (a) firm skin traction to prevent rolling; (b) low insertion angle (15-20 degrees) aligned along the vein; (c) recognising and acting on flashback; (d) advancing the cannula off the needle without pulling back too early. Aim for 5 successful insertions on the model before faculty sign-off.
Practice targets for IO insertion (PE15.4):
Practise on a dedicated IO mannequin leg or a standard resuscitation mannequin with IO target. Focus on: (a) correctly identifying the tibial tuberosity and the insertion point 2-3 cm below it; (b) holding the drill truly perpendicular (90 degrees) — tilting risks cortical breach without entering the marrow; (c) recognising the decrease in resistance (the 'give') as the endpoint; (d) the three-step confirmation sequence. Time yourself — the clinical target is full IO placement and confirmation in under 60 seconds.
OSCE-style checklist (faculty-observed):
| Step | IV Cannulation | IO Insertion |
|---|---|---|
| Preparation | Correct size cannula, tourniquet, swab, flush drawn up | IO needle, flush, stabiliser ready |
| Site identification | Correct vein identified, site cleaned | Tibial tuberosity palpated; 2-3 cm below, anteromedial |
| Technique | 15-20°, bevel up, skin traction, flashback recognised | 90°, steady axial pressure, drill activated, 'give' recognised |
| Advancement | Cannula advanced off needle before needle withdrawn | Stylet removed after 'give', needle stands upright |
| Confirmation | Aspiration + saline flush, no swelling | 3-step check completed |
| Securing | Transparent dressing, extension set taped | Stabiliser applied, extension set connected |
Do NOT attempt to summarise these steps from memory without practising them physically. Procedural muscle memory requires repetition — reading is not enough.
SELF-CHECK
During your OSCE, you have inserted an IO needle in the proximal tibia of a mannequin. The needle does NOT stand upright — it wobbles when you release it. What does this most likely indicate?
A. The needle has passed through the marrow cavity into the posterior cortex
B. The needle has not fully penetrated the cortex and the tip is in the subcutaneous tissue or periosteum
C. The stylet has not been removed correctly
D. The EZ-IO drill was not powered correctly
Reveal Answer
Answer: B. The needle has not fully penetrated the cortex and the tip is in the subcutaneous tissue or periosteum
A needle that wobbles and does not stand upright has NOT fully penetrated the cortex — the tip is in soft tissue or periosteum rather than the rigid marrow cavity. A correctly placed IO needle is anchored in the dense cortical and trabecular bone and stands firmly without support. This finding means the IO insertion was unsuccessful; either re-attempt at the same site with more firm rotary/drill pressure, or switch to an alternative IO site.