Page 6 of 17
OG16.2 | PPH Emergency Techniques — SDL Guide (Part 2)
Intrauterine Balloon Tamponade
Intrauterine balloon tamponade is the single most important non-surgical, non-pharmacological technique for second-line PPH control. It applies hydrostatic pressure from within the uterine cavity directly to the placental bed, mechanically compressing the open spiral arteries and promoting haemostasis. Both commercial (Bakri balloon) and improvised (condom catheter) devices achieve this by the same mechanism, and both have been validated in clinical trials.
Bakri balloon is a specifically-designed, silicone intrauterine balloon with a drainage port that allows monitoring of ongoing blood loss. It is inflated with warm normal saline to a volume of 300–500 mL inside the uterine body.
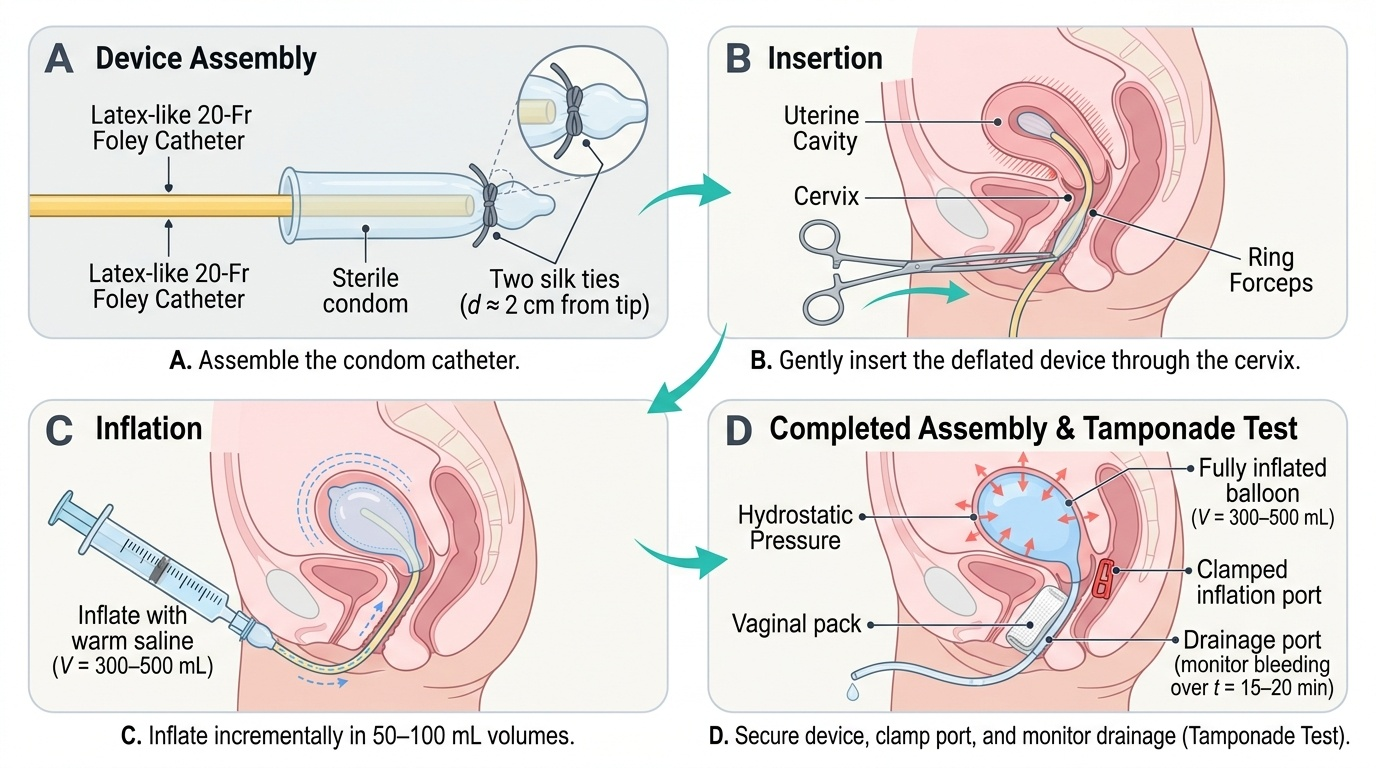
Condom catheter (improvised tamponade device) — This low-cost alternative is assembled at the bedside from a 20-Fr or 22-Fr Foley urinary catheter, a sterile latex condom tied securely to the tip of the catheter with two silk ties, and a syringe and IV giving set for inflation. It has been validated in RCTs in Bangladesh, India, and sub-Saharan Africa as non-inferior to commercial devices.
Technique — condom catheter tamponade (step by step):
1. Assemble the device: open a sterile condom and draw the open end over the balloon tip of the Foley catheter; secure with two silk ties approximately 2 cm from the catheter tip, ensuring an airtight seal; test integrity by inflating briefly with saline
2. Place the patient in lithotomy position; ensure adequate light and exposure
3. Under direct vision, gently introduce the condom end of the assembled catheter through the cervical os into the uterine cavity, using ring forceps if required to guide it through the cervix
4. Inflate the condom with warm normal saline: use a 60 mL syringe to inject incrementally, pausing after each 50–100 mL to check the clinical response; total volume typically 300–500 mL (stop if resistance is felt before this volume)
5. Once the balloon is inflated, clamp the catheter to maintain pressure; a vaginal pack may be placed to prevent balloon expulsion
6. Tamponade test: observe for cessation of bleeding from the vagina and through the catheter drainage port over 15–20 minutes; if bleeding stops, the test is positive — surgical intervention is less likely to be needed
7. Leave the balloon in place for 12–24 hours; remove after administration of uterotonics and with surgical backup available
8. Deflate gradually (50 mL every 15 minutes) rather than abruptly to prevent rebound haemorrhage
Provided image
Non-Pneumatic Anti-Shock Garment (NASG)
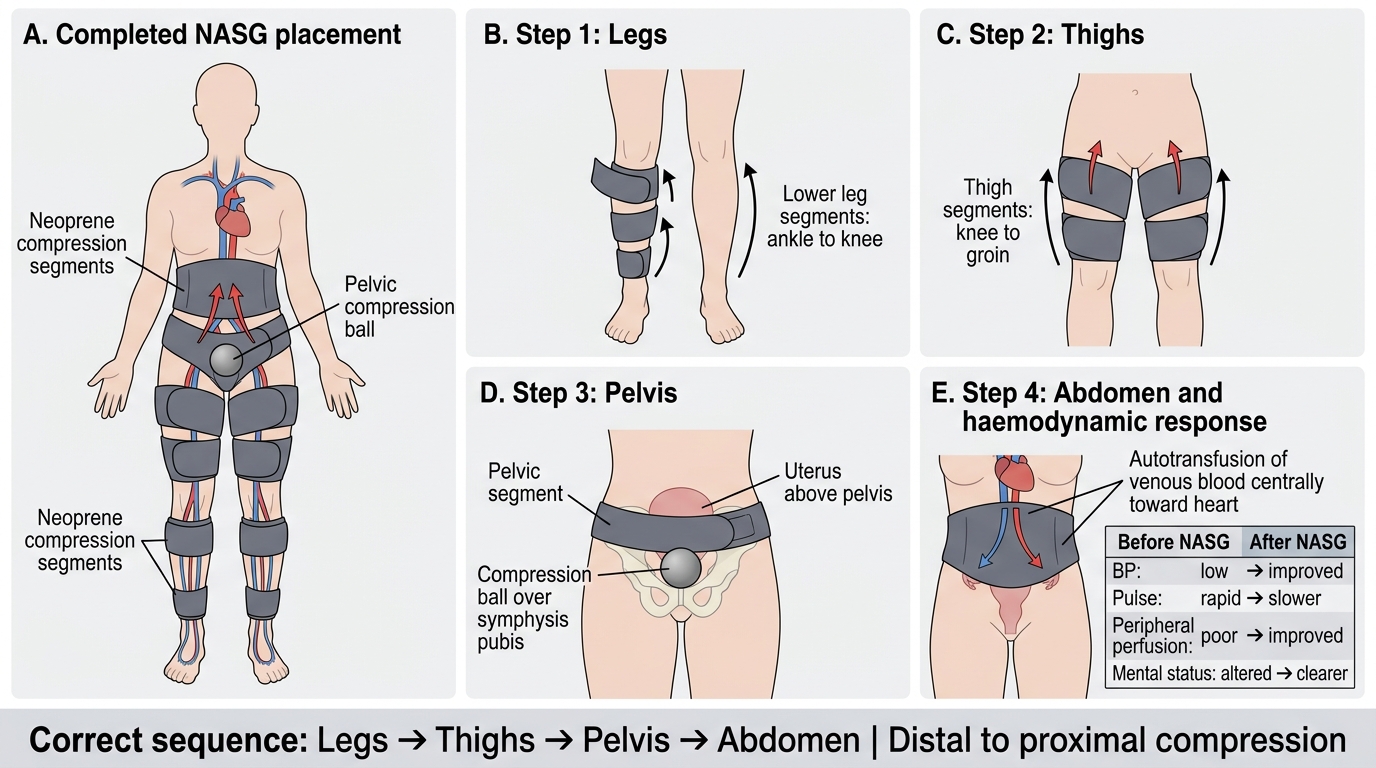
The Non-Pneumatic Anti-Shock Garment (NASG) is a first-responder compression device designed for PPH and obstetric haemorrhagic shock in resource-limited settings. Unlike pneumatic anti-shock garments (which require a pump), the NASG consists of neoprene segments with Velcro closures that apply firm circumferential pressure without inflation, making it available and deployable anywhere. Its primary role is as a bridge therapy: it reduces blood loss, improves haemodynamic stability, and buys time for definitive intervention (surgery, blood transfusion, transfer).
Physiological mechanism: The NASG works by two complementary mechanisms. First, circumferential pressure on the lower limbs and abdomen reduces the capacitance of the peripheral vasculature, effectively autotransfusing 500–1000 mL of blood from the lower body circulation into the central circulation (heart, brain, lungs). Second, abdominal compression (particularly via the pelvic compression ball placed over the symphysis pubis) reduces uterine artery blood flow by external pressure on the pelvis. Together, these effects raise mean arterial pressure, increase cardiac preload, and reduce pelvic blood flow — all without administering any fluid or drug.
NASG application technique (critical: segments must be applied in sequence from distal to proximal):
1. Lay the NASG flat beneath the patient while supine
2. Segment 1 (legs): Wrap the neoprene segment from the ankle to mid-calf, securing firmly with Velcro
3. Segment 2 (thighs): Wrap both thigh segments from knee to upper thigh
4. Segment 3 (pelvis): Apply the pelvic segment, ensuring the hard foam ball is positioned directly over the symphysis pubis (NOT over the fundus — this is the most common application error)
5. Segment 4 (abdomen): Apply the abdominal compression segment from the iliac crests to the costal margin
6. Begin monitoring: note improvement in pulse rate (should fall within minutes), blood pressure (should rise), and skin colour/consciousness
7. Duration: The NASG is kept in place until definitive haemostasis is achieved and haemodynamic stability is confirmed. Remove gradually by reversing the segment order (abdominal first, then pelvic, then thighs, then legs), pausing 15 minutes between each segment to monitor for haemodynamic deterioration before removing the next
NASG Application Sequence in PPH Shock
SELF-CHECK
In applying the NASG to a woman with PPH-related haemodynamic shock, in which sequence should the segments be applied?
A. Abdomen first, then pelvis, then thighs, then legs — working from where the bleeding is toward the periphery
B. Legs first, then thighs, then pelvis, then abdomen — distal to proximal, autotransfusing peripheral blood centrally
C. Pelvis only — the pelvic compression ball is the key component and the rest is optional in an emergency
D. Thighs first, then pelvis, then abdomen, then legs — proximal to distal to maximise pressure on the uterine arteries first
Reveal Answer
Answer: B. Legs first, then thighs, then pelvis, then abdomen — distal to proximal, autotransfusing peripheral blood centrally
The NASG must be applied distal to proximal (legs → thighs → pelvis → abdomen). This sequence is physiologically essential: applying distal compression first mobilises the blood contained in the peripheral venous beds of the legs, driving it centrally as each successive segment is applied. If the abdominal segment were applied first, it would raise intra-abdominal pressure without first mobilising the large volume of venous blood in the lower limbs — the autotransfusion effect would be lost. Applying the pelvis alone is insufficient and misses the major volume reservoir in the leg venous system.
Interpreting the Response to Technique
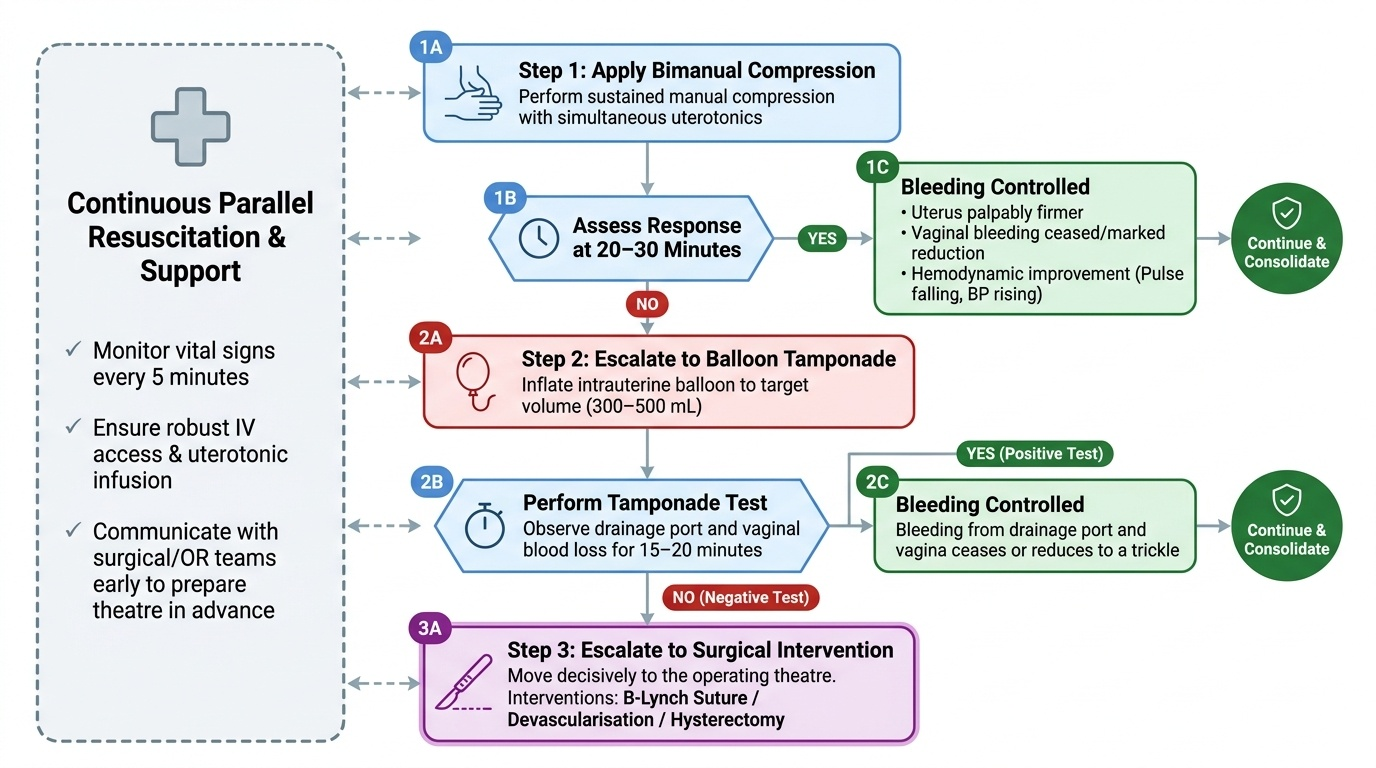
Every mechanical technique has defined endpoints of success and clear criteria for escalation. Failing to recognise an inadequate response and persisting with a non-effective technique costs precious time and blood. The ability to assess the response and make the escalation decision is a key clinical skill that distinguishes a practitioner who can manage PPH from one who delays inappropriately. The fundamental principle is that each technique must be assessed at a defined time point — not open-ended — and if the defined endpoint is not reached, the clinician moves decisively to the next step on the escalation ladder. This time-structured approach prevents the common error of spending 60–90 minutes on sequential mechanical attempts while the patient deteriorates haemodynamically. Assessment runs in parallel with continued resuscitation: monitoring vital signs every 5 minutes, ensuring IV access and uterotonic infusion, and communicating with surgical colleagues so that the operating theatre is prepared in advance if the escalation decision becomes likely.
Endpoints of success for bimanual compression:
- Cessation or marked reduction in vaginal bleeding (blood no longer draining freely from the os)
- Uterus palpably firmer on external examination
- Haemodynamic improvement: pulse rate falling, blood pressure rising, patient becoming more alert
- If the uterus remains completely atonic and bleeding is uncontrolled after 20–30 minutes of sustained bimanual compression WITH uterotonics simultaneously: escalate to balloon tamponade
The tamponade test for balloon tamponade:
After inflating the intrauterine balloon to the target volume (300–500 mL), observe the drainage port and vaginal blood loss for 15–20 minutes:
- Positive test (success): Bleeding from the drainage port and vagina ceases or reduces to a trickle — proceed to monitoring and planned balloon removal after 12–24 hours; surgical intervention is unlikely to be needed
- Negative test (failure): Significant bleeding continues through the drainage port or alongside the balloon — the balloon alone is not achieving haemostasis; proceed to surgical intervention (B-Lynch suture, uterine devascularisation, or hysterectomy) without delay
Response assessment for NASG:
- Within 5–10 minutes of application, heart rate should begin to fall and blood pressure should rise as the autotransfusion effect takes hold
- Consciousness level typically improves (patient less obtunded)
- Urine output resumes or increases (surrogate for renal perfusion)
- If haemodynamics do not improve within 15–20 minutes, the underlying haemorrhage has not been controlled — continue resuscitation, consider blood transfusion, and do not remove the NASG until definitive haemostasis is confirmed
Escalation decision: The decision to escalate from mechanical techniques to surgical intervention is made when haemorrhage is not controlled, haemodynamic status is deteriorating, or the tamponade test is negative. A general rule: if two sequential techniques have failed and haemodynamic compromise is worsening, surgical intervention should not be further delayed. Time spent on repeated unsuccessful mechanical attempts is itself a risk factor for mortality from PPH.
Provided image