Page 2 of 15
EN3.1 | Oto Microscopic Examination — SDL Guide (Part 2)
Procedure: Patient Positioning and Microscope Setup
Correct positioning of both the patient and the microscope is the foundation of a successful examination. Errors in positioning lead to a narrow view, patient discomfort, and failure to reach critical areas of the TM.
Patient positioning:
The patient is seated in the ENT examination chair, which can be tilted or raised to bring the ear to the surgeon's comfortable working height. The head is tilted approximately 15–20 degrees away from the surgeon — for examination of the right ear the patient tilts their head slightly to the left, bringing the right EAC into a more horizontal plane facing the surgeon. The patient's back is straight (not hunched), and the chin is held slightly downward to further open the EAC axis. In children and uncooperative adults, an assistant stabilises the head.
Pinna traction: With the non-dominant hand, the surgeon or assistant grasps the pinna and retracts it upward, backward, and outward. This manoeuvre straightens the external auditory canal and aligns the cartilaginous and bony segments, providing a direct line of sight from the speculum tip to the tympanic membrane. Without this traction, the anterior wall of the EAC obstructs the view of the anterior TM.
Speculum insertion: As described above, the appropriately sized speculum is inserted to the bony-cartilaginous junction with a single smooth motion, directed along the canal's long axis.
Microscope setup:
1. Swing the microscope head over the patient's ear and align the objective lens coaxially with the speculum.
2. Turn on the illumination and set the brightness to a comfortable working level.
3. Adjust the focus by moving the entire microscope body (or the focus arm) until the image is sharp — the focal plane coincides with the tympanic membrane surface, approximately 5–10 cm from the objective for a 250 mm focal length instrument.
4. Select a starting magnification of 6× or 10× for orientation of the whole TM, then increase to 16–25× for detailed inspection of specific regions.
5. Adjust interpupillary distance of the eyepieces to match your own interpupillary distance — the two images should fuse into a single binocular field with the sensation of depth.
6. If the image is asymmetrically focused, adjust individual eyepiece diopter rings to correct for any refractive difference between your two eyes.
Once setup is complete, the surgeon should be able to see the full pars tensa including the anterior annulus, the handle of malleus, and the pars flaccida region without repositioning.
Systematic Examination of the Tympanic Membrane
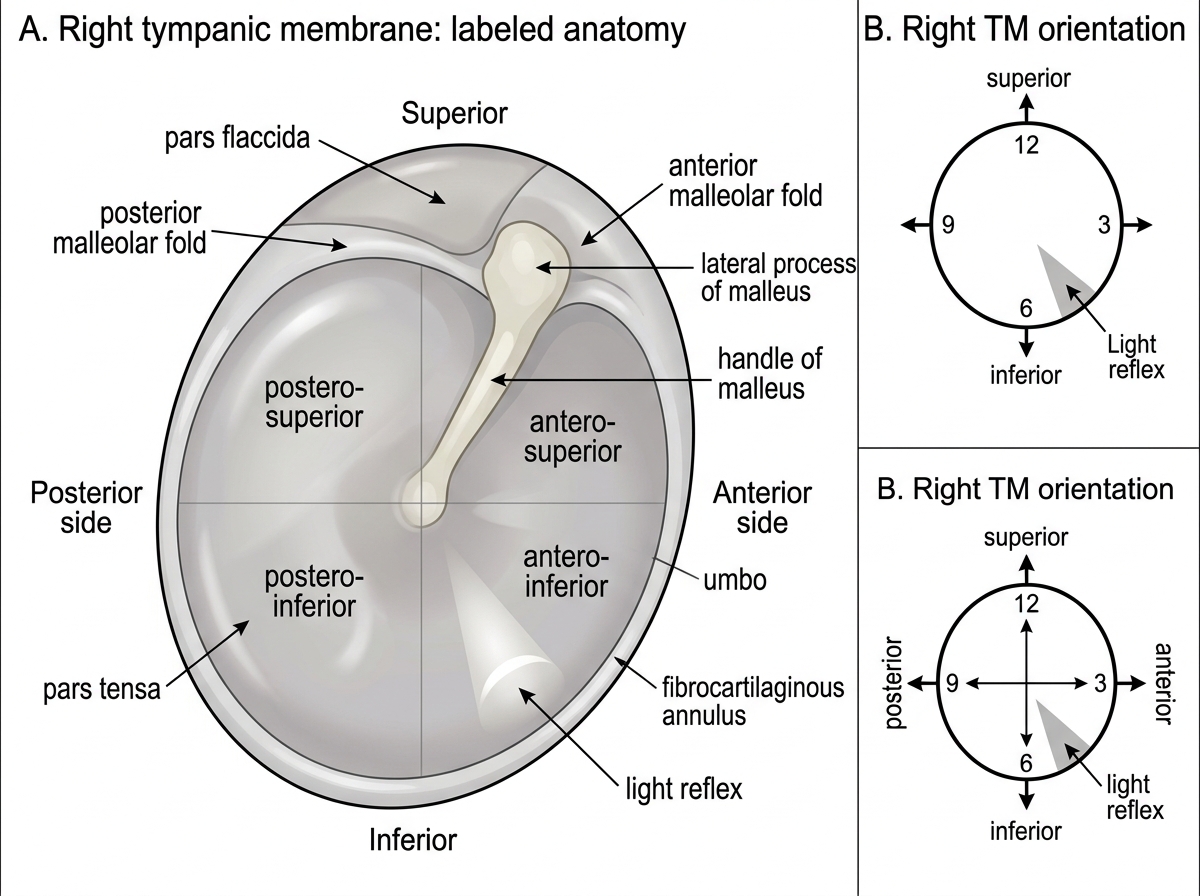
A systematic, quadrant-by-quadrant survey of the tympanic membrane ensures that no region of clinical significance is missed. The risk of an unsystematic examination is that a small attic retraction — the earliest sign of an atticoantral CSOM destined for cholesteatoma — is overlooked because attention was drawn immediately to the more obvious pars tensa. Every experienced ENT surgeon begins the oto-microscopic examination at low magnification, orients themselves by identifying the bony landmarks, and only then surveys each zone methodically before increasing magnification for areas of concern. This discipline prevents the common beginner error of immediately zooming in on a prominent finding (such as a pars tensa perforation) while missing a subtle but far more dangerous attic retraction pocket. The tympanic membrane is small — approximately 10 mm in diameter — but its clinical information is highly concentrated, with different regions carrying entirely different diagnostic and therapeutic implications. A posterior-superior quadrant retraction pocket and a pars flaccida retraction pocket, for example, sit millimetres apart on the same membrane but have different pathological origins, different management thresholds, and different surgical approaches. The landmarks described below are the navigational anchors that make this precise regional survey reliable and reproducible.
Landmarks to identify first (orientation):
Before surveying quadrants, identify the principal landmarks:
- The handle of malleus (manubrium): a white, bony stripe running vertically along the upper TM, from the lateral process superiorly to the umbo inferiorly.
- The umbo: the central depression at the inferior tip of the handle, the point of maximal TM concavity.
- The light reflex: the triangular or cone-shaped bright reflection from the antero-inferior quadrant — at approximately 5 o'clock for the right TM, 7 o'clock for the left TM. Absence or distortion of the light reflex suggests retraction, effusion, or perforation.
- The lateral process of malleus: the prominent nub at the top of the handle, visible just below the junction of pars tensa and pars flaccida.
- The anterior and posterior malleolar folds: lines running from the lateral process to the anterior and posterior walls of the EAC, demarcating the lower boundary of the pars flaccida.
Quadrant-based survey (four quadrants of the pars tensa):
1. Antero-superior quadrant: above the handle, in front — inspect for subtle perforations or retraction.
2. Antero-inferior quadrant: below the handle, in front — the site of the light reflex; the safe quadrant for myringotomy, as it is furthest from the incus long process and jugular bulb.
3. Postero-superior quadrant: above the handle, behind — the area closest to the ossicular chain (the incus long process and stapes head lie just medial to this area); retraction pockets here must be assessed for depth.
4. Postero-inferior quadrant: below the handle, behind — generally the least disease-prone region.
Pars flaccida (attic) — always inspect last and at high magnification:
The pars flaccida is the uppermost portion of the TM above the lateral process. It is the earliest site of atticoantral disease. Any retraction, skin ingrowth, white debris, or granulation in this zone must be documented and triggers assessment for cholesteatoma.
Right Tympanic Membrane Anatomy
Aural Toilet Under Oto-microscopy
One of the most important therapeutic applications of oto-microscopy in the outpatient setting is aural toilet — the careful removal of wax, discharge, crusts, granulations, or debris from the external auditory canal and, where appropriate, from the middle ear space visible through a perforation. This procedure is now the standard of care, replacing the older practice of blind syringing, which carries the risk of tympanic membrane perforation, canal laceration, and dizziness from cold-water caloric stimulation. Blind syringing was the traditional method for clearing the ear canal and was widely performed by non-specialist practitioners, but its fundamental problem is that the irrigating jet is directed blindly into the canal — the clinician cannot see where the tip is pointing or whether the water is hitting the tympanic membrane directly. In a patient with a pre-existing perforation or a thin atrophic TM, blind irrigation can rupture the membrane, wash infected material into the middle ear, or cause acute labyrinthitis if cold water reaches the oval or round window. Oto-microscopy eliminates this risk by providing direct magnified vision throughout the procedure, so that every instrument movement is guided by what the surgeon can actually see. The safety advantage is not theoretical — aural toilet under oto-microscopy is now the recommended approach for all patients with chronic or recurrent ear disease, and the operating department nurse or ENT technician who assists during this procedure should understand why the instruments are used the way they are.
Why oto-microscopy is superior to syringing for aural toilet:
- Direct magnified vision ensures that the instrument tip is never directed at the TM surface, preventing iatrogenic perforation
- Bimanual technique possible (the speculum is held by an assistant or self-retaining, leaving both surgeon's hands free for suction and forceps)
- Accurate identification of the extent and nature of debris before and after clearance
- Visualisation of granulations, polyps, or exposed bone, which should not be subjected to syringing
- Microbiological sampling under vision for targeted culture
Instruments used for aural toilet:
- Suction tube (Zoellner or Frazier suction): A fine-bore metal suction cannula connected to a surgical suction unit; the most important instrument for removing liquid discharge, wax fragments, and debris. The suction is applied gently with a finger-controlled vent to modulate vacuum — direct high-suction contact with the TM or ossicles is avoided.
- Aural forceps (crocodile/Hartmann's): Fine angled forceps for grasping and removing loose crusts, polyp tags, or foreign bodies.
- Jobson Horne probe/wax hook: A fine blunt probe or ring curette for loosening dry wax from the canal walls before suction.
- Cotton wool wisps on fine wire carriers: For absorbing residual moisture and applying topical agents under vision.
Procedure sequence:
1. Inspect the ear canal and TM at low magnification to assess the nature and extent of debris.
2. Begin with suction — apply the Zoellner suction tip gently to wax or discharge, working from the medial canal outward.
3. Use forceps for adherent crusts or polyp tissue, grasping the base of the tissue under direct vision.
4. Reassess at higher magnification after clearance to confirm clean canal walls and fully visualise the TM.
5. Apply topical ear drops (antibiotic or antifungal) under vision if indicated, directing the drop to the perforation site or the canal floor.
Contraindications to aural toilet in the outpatient setting include suspected labyrinthine fistula (dizziness provoked by pressure in the ear), suspected dehiscent facial nerve, and uncooperative patients — all require theatre conditions.
SELF-CHECK
A 55-year-old man is referred with a chronically discharging right ear. Oto-microscopy after aural toilet reveals a central perforation in the postero-inferior quadrant of the pars tensa, mucoid discharge, no evidence of white debris or skin in the attic, and no bony erosion visible. The most appropriate classification of this finding is:
A. Atticoantral CSOM (unsafe type) — requires urgent mastoidectomy
B. Tubotympanic CSOM (safe type) — mucosal disease, central perforation
C. Cholesteatoma — requires CT scan of temporal bone immediately
D. Otitis media with effusion — manage with hearing aids
Reveal Answer
Answer: B. Tubotympanic CSOM (safe type) — mucosal disease, central perforation
The finding describes a central perforation in the pars tensa (postero-inferior quadrant) with mucoid discharge and no cholesteatoma features (no white pearly debris, no attic involvement, no bony erosion). This is the classic oto-microscopic picture of tubotympanic CSOM — the 'safe' or mucosal type, affecting the pars tensa, characterised by central perforation and mucosal rather than squamosal disease. Atticoantral CSOM involves the pars flaccida or a marginal perforation, with cholesteatoma. OME presents with an intact dull TM, not a perforation.